A roof valley is a meting point of changing slopes of a roof. The name comes from the valley-like look, which protects the roof from rain and snow, and reduces debris buildup.
The roof valley helps the roof slope drain water and reduces snow and ice accumulation on roof liners; thus, roof water drainage remains unimpeded. In addition to reducing the accumulation of water on the roof, this system also enhances the overall look and feel of the home.
What is a dead valley on a roof? This is simply the intersection of two roof slopes to form a valley where water cannot be drained effectively. There is more to this question which is further discussed in this article.
A section of a roof where two or more angles meet in the same spot is termed a "pitch point." If you have a complex roof with numerous pitches, dead valleys are inevitable and must be adequately safeguarded and carefully maintained.
Good home designers that understand roofing design and water movement tend to avoid leaving dead valleys, which might later cause difficulties, in their plans. When this is missed, it becomes the obligation of a trained roofing firm to discover and protect these vulnerable locations.
At the place where opposing roof slopes meet, water can flow easily down the roof through a trough formed by the intersection. The slope of a valley is usually the same as the slope of the roof as a whole.
As a result of the roof's layout, water can flow directly into these pitch spots, which often have inadequate or no drainage due to the structure's design. When two or more opposing roof slopes meet in a dead valley, there is little or no fall, which can lead to the accumulation of water and other debris.
It's normally not a big deal because the water drains quickly, but in the case of a dead valley, water cannot drain away because of the valley's extreme flatness. It can also happen when a piece of your roof meets an exterior wall that is lower than the rest of the roof.
If you don't take adequate care of a dead valley, you could end up with leaks and other major roof damage. However, we've put together this guide so that you can simply fix a dead valley roof in advance of issues arising.
Not all roofs and watersheds are treated equally by home builders and designers. A dead valley is a region on a roofing system where water cannot easily run down the roof because of the junction of two slopes or a slope with a wall.
There are two types of dead valleys: The first is when a normal valley flows into a flat wall corner instead of right off the roof, and the other is as a result of two or more slopes merging into one.
Any low-sloping roof should employ materials that can withstand gradual water runoff without early deterioration, just like any other low-sloped roof. Roofing contractors frequently shingle over these sections without the correct underlayment, which can cost homeowners hundreds of dollars in repairs.
Use a selected low-slope material the first time around to ensure your safety. There is an upfront investment, but it is necessary for your roof's longevity.

Dead valleys have water and debris have nowhere to go resulting in impeded or nonexistent proper drainage. Debris and water in that location can degrade the wood and shingles, resulting in costly repairs in the long run.
There is a serious problem with dead valleys on any roof since they are prone to accumulating rainwater, snow, leaves, and other debris. As the roofing material ages or begins to disintegrate, stored debris and water will eventually seep through the shingles and cause leaks.
As time goes on, dead valleys become a problem area for roof services, as leaking spreads to other areas of the roof, and the roof structure beneath the shingles begins to decay. When damage is severe and has continued for an extended period of time, it may be necessary to replace the roof and adjoining structural components.
Even if it is possible to fix a dead valley, if it is not done early enough or in the wrong way, it can still become a problem; your roof's lifespan will be significantly reduced if you don't fix the dead valley.
Builders and roofers frequently utilize the "solution" of running a bundle of shingles and felt paper down in an area with little to no slope. Despite what they believe, this will not endure long because using a shoddy solution like this will get you a leak in this area within three to five years.
False solutions like these have the potential to inflict significant harm. These are only a few examples:
1. Excessive roof leaks
Dead valley leaks are, of course, a major concern for everyone, and more and more leaks coming from your roof may indicate the presence of an undiscovered dead valley. Unless there is a leak, most homeowners have no idea they have a dead valley roof until it is discovered, and as long as a leak has been discovered, it doesn't mean that your dead valley problem is beyond repair.
It is possible to prevent your roof from water pooling and further damage by installing membranes and other solutions during the course of roof repairs.
2. Water and debris pooling on the roof
When it comes to leaking roofs, it's easy to see that stagnant water is the most typical culprit though this isn't the only drawback. There are various problems that pooling water creates.
In reality, bugs are drawn to stagnant water and trash in many different ways. Rooftop puddles attract mosquitoes because they provide ideal nesting conditions for the insects, and in addition, cockroaches and termites will be more likely to start nesting in your home if water seeps through the roof.
For drinking and nest-building purposes, it's a perfect area for them to go. The trash that accumulates can also be useful to other critters, which may worsen the condition of the roof.
Apart from the fact that it can lead to expensive repairs, standing water can also establish entire ecosystems that should be kept away from the property.
3. Ice and water dams
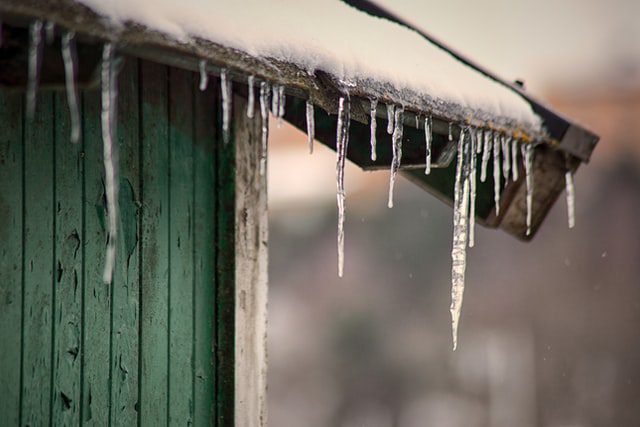
Even in situations where pooled water appears to be flowing, ice dams can inflict significant damage to a home and be a major source of leaks. To make matters worse, the presence of ice dams can lead to the creation of dead valleys where there were none before.
An ice dam forms along the roof's edge, thus preventing melting snow from properly draining off the side. Mold and mildew growth can be exacerbated as a result.
In addition, the repeated freezing and thawing of ice can lead to a wide range of physical damage, such as extensive cracking of the roof and also blistering and peeling of interior paint.
Keeping your home safe from the dangers of ice dams requires the necessary water and ice precautions to be in place.
4. Moss and Rot
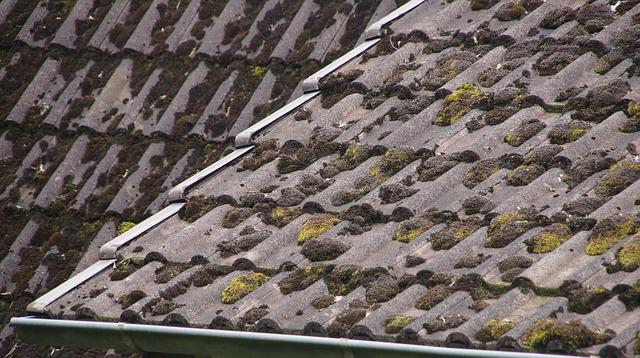
Unwanted vegetation growth can find its way into even the smallest cracks and crevices in the roof, posing a serious threat. A roof that has moss, algae, or weeds growing on it is less likely to be water-resistant, which makes it more vulnerable to harm.
When it comes to roof membranes, these roots can break them apart, and a negative feedback loop can be created by allowing more water to accumulate, which in turn attracts more pests.
Water flows downhill by nature, and in most cases, rainwater flows down the gutters and away from the house. Leaves, twigs, and other debris that hold water make for an expensive roof repair in a dead valley since there is nowhere else for the water to go.
Though dead valleys might be unavoidable owing to a home's architecture, they don't have to be damaged areas that require a partial roof repair. The felt paper and shingles you'd use in a dead valley will eventually wear out from exposure to the sun, so you should expect a leak within three to five years.
Applying a modified bitumen treatment and other waterproofing methods will help prevent water from accessing the framing and causing leaks and damage.
If you want to avoid leaks and other problems caused by dead valleys on your roof, you should hire a certified roofing company with experience in this area. Your roofer is the one responsible for making the necessary repairs as many inexperienced roofers may just shingle over the region even though a dead valley requires special attention.
1. Put up an ice and water barrier
It has become customary to install an ice and water membrane and to use high-grade metal products that are custom-made to fit your application to create waterproofing on vulnerable areas of a roof.
Roof underlayment membranes are designed to prevent ice and water damage to places that are particularly prone to it, such as roof valleys. Polymer-modified bitumen is used to make ice and water protectors (also known as ice and snow shields in cold areas).
Underlayments such as roofing felt can be placed after the ice and water barrier has been put in. In addition to protecting against ice dams, the ice and water shield can also protect against rain pushed by high winds.
2. Use PVC, modified bitumen or TPO
Modified bitumen is a tough-yet-flexible waterproof membrane created by mixing asphalt with polymerized rubber or plastic and then reinforcing the mixture with fiberglass. It is an asphalt-based roofing system that offers several layers to provide leak resistance and requires minimal roof maintenance.
The rip and puncture resistance of modified bitumen outweighs that of TPO when it comes to waterproofing. There are many advantages of using modified bitumen roofing over TPO, such as its ease of repair or replacement in the event of membrane damage.
In some regions, high-quality modified bitumen is also utilized to help prevent leaks or seepage and increase water flow, as well.
As a result, it is a very adaptable solution to this widespread roofing issue, whether applied to the entire roof or only to dead valleys in specific places.
In general, TPO roll roofing is less expensive to purchase and install, but it lacks the long-lasting aesthetic of modified bitumen roofing. Leak-resistant membranes made from PVC and TPO are commonly used for waterproofing.
Thermoplastic polyolefin (TPO) is white and aids in both water drainage and heat reflection off the roof. This reduces the temperature inside the space while also preventing leaks.
PVC functions in a similar manner but is more durable and rigid than TPO.
In order for waterproofing systems to perform properly, additional drainage systems must be installed to help prevent pooling and also divert water away from the roof. It is critical that any membrane roofing you purchase comes from a trustworthy source, as the quality of these products can vary greatly.
3. Install a custom-made metal flashing
A custom-made metal flashing is probably the best solution for roof problems such as a dead valley. Installing a metal flashing can help to seal the leakage and slope the water off of the roof.
These are especially handy in dead valley corners, where water floods in the corner instead of draining off the roof. The flashing ensures that the seal will be perfect, preventing any water from spilling through though this can be an expensive and time-consuming process.
4. Have a well-designed valley

Most roofing contractors shingle over a dead valley without the necessary waterproofing steps. A dead valley roof doesn't have to be a problem, but unfortunately, many builders/roofers don't know how to deal with them, and it can lead to major water damage.
Architects are creating beautiful modern homes but don't really understand how water traffics. They build homes where water from different areas of the roof goes down into a pinch point, causing a dead valley.
By properly constructing a dead valley, the major problems can be avoided.
When a valley terminates on tile rather than the edge of a roof, it causes the most trouble. While a dead valley may appear to be a problem at first, it can survive as long as any other area of the roof with correct installation and upkeep.
Almost every roof has some sort of valley in it, and for a tile roof, an issue that may arise is when the amount and/or speed of water pouring out of the valley causes the water to splash or seep under the tile. If the end of the valley is positioned incorrectly, water will pool on the underlayment rather than on top of the tile.
Continuous accumulation of water makes the underlayment too wet. Typically, this problem will not lead to a leak right away but rather over time.
When a leak like this happens, the plywood base will have to be replaced because it will have been compromised by the leak. Installing flashing at the end of a valley helps the hard galvanized steel valley metal mold with the tile, and this type of leak may be readily prevented.
When checking for leaks, flooding of the roof can be done to establish where the leak is coming from if the water drains off. The roof has to be completely cleared of debris first to reveal any hidden areas of damage.
Any compromised shingles or tiles will have to be replaced. Before this happens, the area of damage or leakage should be stripped bare to the roofing deck.
When water bypasses the roofing underlayment, it can wet the roof deck damaging the plywood, and this can lead to rot and insect infestation. Damaged plywood sheathing has to be replaced too.
After cleaning the roof, determining the damaged area, and stripping bare the area, the new deck can be installed. The second step is to install an ice and water dam protection first, followed by the roofing underlayment.
You can follow with the flashing for an open valley or seal it for a closed valley flashing. A closed valley conceals the valley lining allowing a seamless blend of the roof slopes.
The metal flashing is installed over the underlayment but below the roof, cladding to prevent any water from seeping into the flashing of the roof.
While it may not always be feasible to prevent water and debris from building up on your roof or even ice damming, dead valley roofs should be dealt with before they become a bigger problem.
Most homeowners can't tackle repairing a dead valley on their own. Professional roofers can assess and recommend the best materials for protecting your house.
You can consult your architect when designing a new home and request that they avoid as many dead valleys as possible.
Preparing your roof for the rain that comes with the monsoon is an important task of yours – if you are new to the Valley, you may even be wondering how bad it can get.
In order to get your roof ready, you have to understand the monsoon consists of heavy winds, sudden and heavy rain, and dust storms in the form of haboobs, all of which your roof will need to be ready to face because eventually, it will come through.
Before you order the inspection you can look for debris that's lying up on your roof. Things like branches, bunches of leaves, or objects that might have gotten tossed up there can get stuck in causing blocked gutters and downspouts.
This will cause a problem when it rains by trapping water and making it pool up on your roof. if you have a BUR (built-up) roof, you want to make sure there are no open seams where moisture can enter.
With elastomeric coatings, you want to also ensure they are still in solid, undamaged shape.
On a pitched roof, you’ll have valleys that run down it. These canals channel water down off the roof and need to be completely clear of debris like the material coming off of aging asphalt roof shingles, leaves, and branches.
Just like flat roofing systems, you have to make sure that the seams are inspected and that everything is in good condition and watertight.
Obviously, if tiles or shingles are missing, you’ll need to order some repairs or if it's still under warranty, get your roofing contractor out to replace them.
These need to be inspected also. They need to be in good shape, attached securely to your property and free of debris so they can be effective in channeling the heavy rainfall off your roof and down to the ground.
If they are hanging oddly or not how they’re supposed to they can accumulate water and it can be pushed back onto the roof, instead of flowing down away from your roof and foundation.
Speaking of the foundation, It’s also a good time to check the protection for the foundation of your home, making sure proper drainage is occurring and water isn’t pooling up against it, which will undermine it over time.
They provide shade that can cut down on energy bills, but if they’re too close to your property they can cause problems for a roof.
If it’s a bigger, older tree and it collapses during a high wind event, a large branch can scrape across the roof, knocking off shingles or tiles, or even knock a hole in your roof.
Even if it’s not a big branch that comes through your roof, just having all the falling leaves, twigs, and branches on your roof will interfere with proper roof drainage.
Previous owners might have taken shortcuts that weren’t caught during the home buying inspection. Patching or other roof repairs may have gone unnoticed.
Have a professional roof repair contractor come out and inspect your roof to make sure there aren’t any do-it-yourself problems.
Catching simple problems ahead of time will keep them from turning into major problems later on. Contractors should look for overlapping layers of roofing material, gaps, or just poor craftsmanship.
Any of these could lead to a leaky roof, premature wear, and mold or algae.
A few preventative steps will go a long way to avoid serious issues and damage to the interior of your property.
With all of the potential causes of roof leaks, you tend to panic at the first sign. It may not be as bad as you think.
Most leaks just need minor repairs and aren’t indicative of your roof failing or needing to be replaced. Most of them are easily rectified, and expensive repairs or even replacements are unnecessary.
You should remedy roof leaks as soon as you find them though because it will keep your roof from the further deterioration that could lead to mold, mildew, and interior damage, as well as possibly needing to replace. There are several different ways to repair or patch a leak, such as using roofing tar on flat roofs.
If you do find a leak, you can use this list of the 7 most common causes of roof leaks in the Valley to figure out the issue and fix it before it gets worse. We also have a list of the Common Roof Problems.
If you don’t vent your attic properly, warm, moist air from below can gather and in time, condensation can build up and leak back down through your ceiling.
The number one cause of roof leaks is flashing, the thin metal sheeting around openings in your roof, that is either faulty or cracking.
Flashing doesn’t last forever and it will split or crack before you need a new roof, which is why leaks here are so common.
To fix it, you just pull up the shingles that are covering the edges of flashing, and then remove the faulty piece.
Your roofer will place a new flashing around the opening by nailing it down. Cover the nail heads with sealant and the repair is made. Then they’ll seal the nail heads and area around the opening and replace the shingles. A simple repair.
Cracked, broken, and missing shingles can cause problems. You can spot them easily and they’re not difficult to replace.
They can be cracked by hail or flying debris, or just simply wear out and start to crack. If the rest of the roof is in good shape, you can usually just replace the faulty ones.
Your roofer will lift up the shingles that cover the edges of the broken ones and remove it. Then, they place a new shingle in, nail it down and replace the shingles that were lifted up to expose it.
Vents, for gas as an example, are pipes that stick out around 2 feet over your roof. There’s a boot around the base that keeps water from getting through around the vent.
This boot, over time, will crack or split and allow moisture to get through. The roofing company will pry up the old boot and remove any nails and the adhesive holding it down. Then they slide a new boot over the vent and use caulk to seal it to the shingles.
Your gutters are there to direct water away from your roof and foundations. If they get clogged with debris they will cause water to back up and get beneath your shingles and roof underlayment.
If you have a leak that's close to a gutter, it could be caused by water backing up out of it due to debris.
To fix it, just remove whatever debris or leaves are causing the backup and get the water flowing through them smoothly again.
Your problem could be in your attic and not your roof. If you see indications of mold or mildew, you’ve probably got a condensation problem in your attic. The solution is getting attic ventilators installed that will circulate the air and keep it dry to prevent moisture and mold from getting a foothold.
The shingles on your roof could lose their protective granules over time and normal wear and tear, causing leaks. You could cause this issue yourself by doing things like retrieving items from your roof, fixing or installing things like satellite dishes, or just casually removing debris. You might need a new roof at this point.
Don’t go up on your roof any more than you absolutely have to, because these types of leaks are the kind that most often lead to replacement. You’ll need a roofing contractor to come out and inspect your roof to determine if this is your problem.
When you have a leak, the tendency is to sometimes put it off because you might think it will cost too much. Unfortunately with roof leaks, this is the worst thing you can do, because the issue will just get worse over time, making it even more expensive.
So, the most cost-effective and cheapest option is usually getting your leaks fixed as soon as you find them. Keep in mind that a leak can have several causes, so don’t automatically think it's a worst-case scenario. Every time you find a leak, make sure to have a professional inspect it to pinpoint the cause.
Here in the Southwest, we tend to ignore our roof. One of the most critical features of our home, because we have so many days of sunshine every year. Then the monsoon season comes and all of a sudden we regret not doing our routine maintenance because we have a big, expensive problem with roof maintenance during winter.
You can only expect your roof to last about half as long as it should if you don’t regularly maintain it. Your roof accumulates damage every day from the elements – rain, the hot sun, even pests and people walking on it. Pile on to that the even more intense heat and periodic heavy rains from the monsoon season and it’s a disaster waiting to happen. You could have a big roof repair just waiting to happen and you’re completely ignorant of it.
Before the monsoon season begins, at least once every year, you should have your roof inspected – especially if its a flat roof and its over 15 years old. Our roofs here in Arizona get hit the hardest during the winter rain between December and February and the monsoon season between June and September. When it rains here, we have drops in temperature that happen suddenly, causing thermal shock, compromising your roof’s surface.
In your roof’s warranty, it probably has a clause that voids the warranty if you’re not properly maintaining it, so its critical to keep up with regular maintenance, schedule routine inspections and fix any necessary problems as soon as possible.
If you’re not scared of getting on your roof, here’s a couple things you can do to increase your roof’s lifespan. Take the correct safety steps if you do, because one of the leading causes of serious accidents around a home is falling off a ladder. Also, be careful walking on it, especially if its older. You can cause some serious damage and weaken your roof if you do.
There are some roofing issues that you should leave to a professional roofing contractor. Find an experienced, licensed, professional roofer like Mikku and Sons Roofing if you find any of these problems:
A roofing system is a big investment for property owners, and represents a big portion of construction costs.
It’s a roofing contractor’s job to help the owner protect their investment. They should provide professional, careful maintenance on the roof on a regularly. This will make sure its properly protected.
Here are some tips that will help your roofing contractor ensure they won’t miss any essentials during services. If you’re a homeowner, these tips will guide you on what to expect when you hire a professional roofing company to perform routine shingle roof maintenance.
A roofer should perform 4 basic services twice per year to help a homeowner properly maintain their asphalt shingled roof. Also, you’ll want to do this after major storms. Here’s your roofing maintenance checklist:
A critical part of roof maintenance is routine cleaning and clearing of the roof and its related systems. Pay attention not only to shingles and flashing but other key elements, like eaves, troughs, down spouts, installations (such as skylights, vents, chimneys, solar panels), and ventilation.
Here’s what we recommend:
Property owners should regularly clear debris from the roof, including leaves, branches, and other items that might clutter the surface. Your roofing contractor might use a leaf blower, being sure to blow the air down the roof. This will ensure that debris won’t be blowing up and underneath the shingles. To lower the debris that accumulates, clear away vegetation and branches that hang over the roof. Hire a professional tree service to cut away difficult or hard to reach areas.
Dig out leaves and organic material from all gutters. This will ensure water drains without obstruction through to the downspouts. Homeowners could install eave protectors, metal meshed grates that prevent buildup of debris and make cleanup easier.
Be sure the downspouts are clear and unobstructed so water drains properly from the roof and away from the foundation. A homeowner should take notes of any leaks or drips that occur during or right after a rain storm. Report any issues to the contractor during inspection time.
Once cleared of debris, your roofing contractor should inspect it for any red flags that could indicate potential trouble.
They should complete this inspection twice a year – recommended in the spring and fall. This will allow them to make note of anything suspicious, as well as complete small fixes or minor repairs before they become bigger issues. Also, they’ll see if there’s any evidence the ventilation system is malfunctioning or might need maintenance or cleaning.
An experienced roofer should immediately complete any asphalt shingle roof repairs to maintain the integrity of the roof’s materials and related systems, such as drainage and ventilation. Little fixes performed properly will prevent bigger issues, or more costly repairs, over time. They could:
Replace or repair missing, broken or buckled shingles: A roofing contractor could use roofing cement or nails to repair shingles that have become cracked or loose. They could also replace any shingles that have broken free or blown away.
Replace or install valley flashing: They may also consider replacing the existing valley flashing if its become corroded, cracked or is no longer secure – which would threaten its waterproofing abilities.
Replace other flashing: Your roofer could use roofing cement and nails to replace metal flashing around chimneys, roof vents or other installations if the flashing has become loose or rotten. If they’re installing the flashing against a brick structure, it’s advisable to use copper or galvanized steel, because the lime in brick mortar could corrode aluminum materials.
Repair gutters or downspouts: Your roofing company might use gutter caulking, a gutter patching kit or roofing cement and patches to fix leaky or corroded sections of the eavestroughs or downspouts. If they are sagging, they should use a level to determine the proper pitch, then rehang them so they drain properly.
Whether you’re a homeowner looking to maintain the life of your roofing system, or a roofing professional educating your customer on the benefits of regular inspection, maintenance and repair, sticking to a consistent, regular schedule is well worth the investment.
Finding out your roof is damaged and needs repairs or replacement can be stressful for a homeowner. Handling insurance claims, dealing with adjusters and ensuring you get paid for all covered damage is an intimidating process. Many property owners aren’t confident about filing a claim, process issues and what kinds of documentation they will need.
To an insurance company, your roof is the most critical feature of your property. If its damaged, it can lead to much larger damage claims. The Insurance Institute for Business and Home Safety has stated that more than 90% of hail or high-wind claims result in a payout relative to the quality of the roof cover. Insurance companies check roofing claims with great scrutiny and expect homeowners to provide correct documentation and accurate information in order to process the claim.
To make the claims process experience easier and to help you get the right settlement for your damage, take some photos of your roof and exterior property before they are damaged. Then, when you have some damage from a storm, update the photos when you need maintenance or repairs completed. Once the roof is damaged take another set of photos showing the need for repairs. Document and record the damages and any quotes, estimates or bills you get in relation to the damage. Having this info on file in one place will ensure your claims process is a smooth and easy experience.
Before you file your insurance claim completely, you’ll need an estimate from a professional roofing contractor. Most of the time you can pick the roofing company of your choosing. Your contractor should help you make your way through the sometimes complicated roof insurance claims process. Some roofing companies have adjusters on their staff that can deal with your insurance claim for you. Try to find a contractor that has a lot of experience providing roofing quotes for insurance claims. They should help through the process of getting a roof repair or replacement covered by the insurance company.
Keep in contact with your insurance agent and company. Its the best and most simple way to be aware of what’s covered or not covered in your homeowners policy.
Some policies use the age of the roof and take it into account when it gets damaged. If your roof is under 10 years old, you could be covered for the entire cost of repairing or replacing the damaged section at the time of the claim. If it’s more than 10 years old, you could be paid for the depreciated value of the damaged roof. The depreciated value takes wear and tear and age of your roof into account. This could mean the value has lowered before the damage occurred.
Some insurance policies will offer damage coverage only up to the depreciated value, no matter what the age of your roof is. Others will cover the entire cost of repairing or replacing the damaged section at the time of the claim, no matter the age of your roof. Most of the time, your insurance company will send out an adjuster to your property to inspect and verify the claim. If the damage is found to be from age, normal wear and tear, or the poor condition of your roof, it will probably be classified as normal maintenance, and won’t be covered under your policy.
The most critical thing to remember is if you think your roof has been damaged and needs repair, you shouldn’t wait for the inspection by a roofing contractor. Determine how much damage you have as soon as you can. This will help move along the process expeditiously and help you avoid more damage that might not be covered under your policy.
If you’re a property owner, you can’t predict when and how severe weather will hit you. You’ll need to take steps when your roof is damaged and you’ll need to completely understand the steps to take. Severe rain, high windstorms and monsoons can all cause heavy damage to your roof.
After your roof experiences severe wether, you have to assess the damage you’ve experienced. You can then be able to discuss what happened with your insurance representative and your roof repair contractor to help you avoid hidden costs or issues. (You should do this during daylight hours, which means you might have to skip to step 2 before you inspect the damage.) Use binoculars when you’re checking the damage so you can see the details closely.
Take the area thats been damaged and figure the estimated square footage. Look to see if there are any shingles missing and note how severe the damage is. In some smaller cases, you may just have a few random shingles missing or sheered off. Make a note of the material that’s visible and exposed. Here’s what to look for – the ends of missing shingles, tar paper or exposed plywood. Notice the shade and color of the material thats exposed. If you have some shingles from when the roof was installed or last repaired, you can check the packaging for the right shingle style and color you’ll need.
If you have a little experience with repairs, try to make some temporary fixes to minimize your damage. Personal items inside your home could be damaged by water if your roof is leaking directly above a living area. Put a garbage can or bucket under any leaking water and move any valuable items away from the area so they won’t get damaged more. You may need to use a tarp to cover badly damaged areas to get them waterproofed immediately. If they’re smaller repairs that are needed you can get them shingled right away.
Call your insurance representative and check your insurance policy if it looks like there’s enough damage for a claim. If there isn’t, it may make more sense money wise to hire a roofer yourself and get any needed repairs done. If you’re involved in a large, natural disaster where big swaths of residential properties are hit by severe weather or a big storm, you may want to contact your insurance company ASAP so you can get on a good contractor’s schedule immediately. Good, reputable roofing companies will have their calendars filled up quickly after a severe storm in their area, due to demand.
If you need to hire a roofing contractor, be sure it’s a reliable, professional roofing company. Be careful not to hire any fly-by-nighters that flood these areas after a storm and rip off vulnerable, uneducated property owners. Avoid these type of contractors at all costs. These traveling contractors that chase storms around will give you poor quality workmanship and be gone as fast as they arrived, leaving you with bigger issues than you had from just the storm.
Your business or personal belongings depend on the proper maintenance and repair of your roof. Keep in mind that a little prevention now can prevent catastrophic roof failure in the future. This will save you a lot of inconvenience and expense in the process.
You should bring in a professional roof repair contractor if you have concerns after an inspection. The roofing contractor can also help you determine the remaining estimated lifespan of your roof, the roof’s general existing condition and help you develop a maintenance plan moving forward.
You should bring in a professional commercial roof repair contractor if you think that there could be some concerns after an inspection.
The commercial roofing contractor can also help you determine the remaining estimated lifespan of your roof, the roof’s general existing condition and help you develop a maintenance plan moving forward.
Regular inspections and maintenance is the best way to avoid major roof issues and help your roof sustain extreme weather conditions.
Regular maintenance will also prolong your roof’s lifespan. This may allow you to repair your roof instead of replacing it when issues pop up, saving you a lot of money.
How often you should have your roof inspected depends on several factors like age, recent weather events, foot traffic on your roof, and any type of conditions that may have been uncovered in past inspections.
Your roof should be inspected twice per year, in the spring and fall, to ensure that it’s not being forgotten.
A lot of homeowners take their ceilings for granted and don’t check them often, but we recommend you inspect them regularly for signs of moisture seeping through. Even if you see something that looks minor, you need to get on it and check it out. This article will discuss tips for taking care of water stains quickly and effectively.
When you spot moisture, the first thing you need to do is find out the source of where its coming from. Most of the time, the area directly above the stain is the best place to start. If you can’t see anything on your roof that looks like a problem, you could have a pipe thats leaking. There could also be moisture running along some pipes or trusses that will come from a source somewhere else and drop onto your ceiling.
Are they water stains? There are other causes for stained ceilings including:
If the leak is coming from your roof, it could be that there are other sources of moisture other than obvious leaks. If you need a professional, experienced roofing company to inspect your roof for leaks and determine where any moisture spots may be coming from, give us a call at (623) 465-1068.
You don’t want to repair any moisture stains, no matter how bad they look, until you know the source and have it repaired. If you fix it first then find the source, chances are you’re going to be repairing another moisture stain. If there’s permanent damage, you might have to take out part of your ceiling or wall to fix the issue. So the stain doesn’t seep through, when you’re dealing with a cosmetic stain, you should use a stain covering primer before painting over the spot. Depending on how much damage there is and the stain itself, you may need to contact a professional to help fix the issue.
Make sure you don’t let moisture stains and their source go unchecked. Always take care of the issue as soon as possible, or what could be a minor cosmetic and roof repair could turn into something major and much more expensive. Here at Mikku and Sons Roofing, we can put you in touch with financing options, if the need for it arises.
In the past, Victorian gray slate and Spanish Mediterranean red tiles were about the only choices if you wanted tiles on your roof. But because of new tile roofing innovations, technologies and manufacturing methods, there are many more architectural choices for your tile roofing system. Now, tile roofs are constructed of many different materials, colors and designs that can fit a multitude of taste and design choices for residential and commercial property owners.
For the most part, you can expect a tile roof to have a lifespan of 50 years or more. Some of the great things about tiles are their fire resistance, how they withstand strong chemicals, how they are resistant to biologically degrading, keep away bugs and animals, are mold resistant and can handle extremes in temperature, whether hot or cold.
A lower weight makes them able to be used in many types of architectural designs and systems.
20 to 30 % more utility savings for property owners due to modern green technologies.
Cool roof choices that will help towards solving urban heat island issues.
Manufacturing processes are incorporating new materials, such as recycled options in their manufacturing of tiles.
Many architectural styles can be used because of a myriad of new colors and shapes, such as even wood and shakes.
They’re more moisture resistant than the past due to developments in waterproof underlayment barriers and trim and venting options.
These are made by baking clay thats been colored and glazed. They can be used with many textures, finishes and styles. They are durable and long lasting, requiring less maintenance.
These are made using concrete reinforced with fibers, which increases strength and durability. They can be pressed into molds, which creates different kinds of shapes and designs for architectural purposes. They are then finished with different colored dyes and glazes.
Can last as long as 100 years, a natural stone material that requires very little maintenance. You can cut it into various shapes and sizes to fit the architectural needs of any home or business its being designed for.
Made form aluminum, copper, steel or tin, they can be made to look like stone with many different shades, shapes, and colors. They’re very lightweight, extremely durable and can be used in cold and elevated areas that have a lot of snow.
They can mimic the look of clay, ceramic or slate through rubber or polymer compounds that can be shaped and molded into many styles and designs. They’re also very light, durable and much easier to install than other tiles like clay, concrete or metal.
