A heavy rain event leaves behind more than just puddled driveways and clean gutters. It saturates the roofing materials with moisture that begins a slow migration through the structure.
The visible surface might appear dry within hours, yet the true condition of the roof lies hidden beneath the shingles. The timeline depends on a precise combination of material density, ambient humidity, and airflow across the surfaces.
A soaked asphalt shingle can release its surface moisture in a single afternoon of strong sun. A wood shake, by contrast, will absorb water deep into its grain and hold it for days. How long does It take a roof to dry after rain? Let's look at the timeline.
A roof does not dry uniformly, and assigning a single number to the process would be misleading. The surface might lose its visible moisture in a matter of hours, while the substructure retains dampness for a significantly longer period.
A reasonable estimate for the entire roofing system to return to a dry state falls between one and five days. This range assumes typical weather patterns and does not account for severe saturation or hidden leaks.
Asphalt shingles dominate residential construction due to their widespread availability and cost. These shingles consist of a fiberglass mat coated with mineral granules and a waterproof asphalt layer. The exposed face of the shingle can appear dry within two to four hours of direct sunlight.
The surface repels water effectively, but the edges and gaps between shingles can trap moisture temporarily.
Wood presents a different challenge because it is a porous, organic material. Cedar and pine shakes absorb water like a sponge, drawing it into the grain where it remains until the air pulls it out.
The gap between the shake and the roof deck must remain open to allow airflow, or the wood will rot from the back side.
Tile and slate offer a hard, impervious surface that sheds water instantly. The water runs off these materials without soaking in, which gives the impression of an instantly dry roof.
The danger with these systems lies beneath the tile.

Metal panels provide the fastest surface drying time of any roofing material. Water beads on the factory finish and runs off immediately, leaving no place for moisture to cling.
The seams and fastener locations present the only points of concern.
Condensation on the underside of the metal, not the rain itself, often poses the greater drying challenge for this material.

A roof does not exist in a vacuum. The same rainstorm can leave one roof dry in hours while another stays wet for a week.
The variation comes down to three primary factors that control how water behaves on and within the structure. These elements interact with each other, meaning a disadvantage in one area can extend the drying time significantly
The angle of the roof plane determines how gravity assists the drying process. A steep slope allows water to run off quickly, leaving only a thin film behind.
A low slope or flat roof holds puddles that must evaporate completely before the surface can dry.
Every roofing material interacts with water differently based on its chemical composition and physical structure. Some materials repel water entirely, while others welcome it into their cellular structure.
The density and surface texture also affect how water spreads or beads up.
The conditions present in the days following a storm dictate how quickly evaporation can occur. A roof subjected to ideal drying weather will recover rapidly, while poor conditions extend the wet period indefinitely.
Most people judge a wet roof by what they can see from the ground, watching the shingles change from dark to light and assuming the danger has passed. This assumption overlooks the part of the roof that matters most: the structural deck, the layer of wood fastened to the rafters.
The deck holds the key to long-term performance. Water can reach this layer through capillary action, wind-driven rain, or failed flashings long before a ceiling stain appears.
The deck provides the substrate onto which all other roofing materials attach. It spans the gaps between rafters and carries the weight of snow, workers, and equipment.
The deck sits in complete darkness beneath the underlayment and roofing material. It never sees sun or feels wind, so trapped moisture has no natural escape route.
Plywood and oriented strand board (OSB) serve as the most common deck materials in modern construction.
Water does not need a visible hole to penetrate a roof. It exploits small weaknesses in the system and follows the path of least resistance downward.
Capillary action pulls water into gaps narrower than a human hair. Wind-driven rain pushes water up and under shingle edges that would remain dry in calm conditions.
A wet deck does not rot overnight, but the clock starts ticking immediately. The moisture creates conditions that degrade multiple components of the roof system simultaneously.
The damage progresses in stages, starting small and accelerating over time.
The question of how long a roof takes to dry after rain has no single answer that applies to every structure. The roof deck beneath the surface holds the real answer, and it reveals itself only to those willing to enter the attic and look.
A dry surface means little when the structure underneath remains saturated. The drying process completes only when every layer of the system, from the shingles down to the rafters, returns to its normal moisture content.
This can happen in a day for a simple metal roof in full sun or take a week for a complex wood shake roof on a north-facing slope. Monitoring the roof after heavy rain provides valuable information about its condition and remaining service life.
A roof replacement should end weather concerns, yet a new ceiling stain or cracked texture often appears soon after installation. This damage rarely results from defective roofing materials.
More often, vibration during tear-off and installation travels through the structure, dislodging attic debris while crew movement flexes the roof deck and ceiling joists. Water stains or popped seams raise concerns about the integrity of the installation.
The key distinction lies between cosmetic settlement from construction activity and an active leak that requires immediate repair. Inspection should begin in the attic, checking the underside of the decking for moisture and tracing any intrusion to its source. Let's look at what to do with ceiling damage after roof replacement.
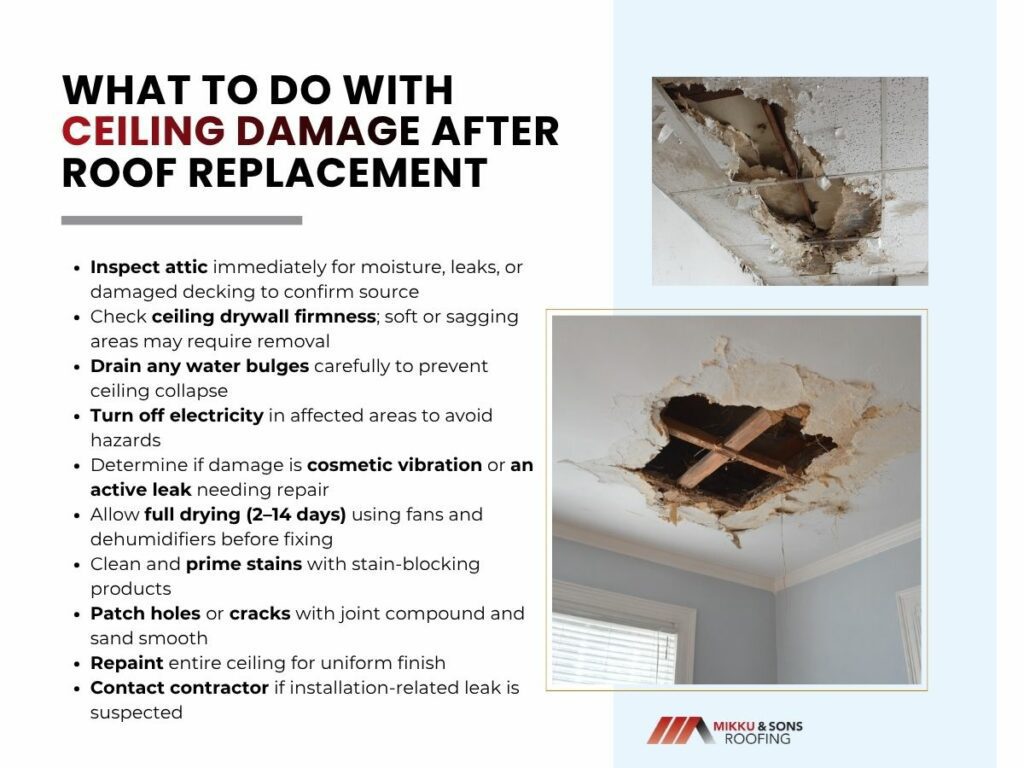
The immediate concern after discovering ceiling damage is not cosmetic repair, but structural stability and the potential for hidden water intrusion. A systematic assessment conducted within the first day establishes a baseline for the necessary repairs and prevents secondary damage to the property.
This inspection follows a logical progression from active leaks to structural integrity to electrical hazards.
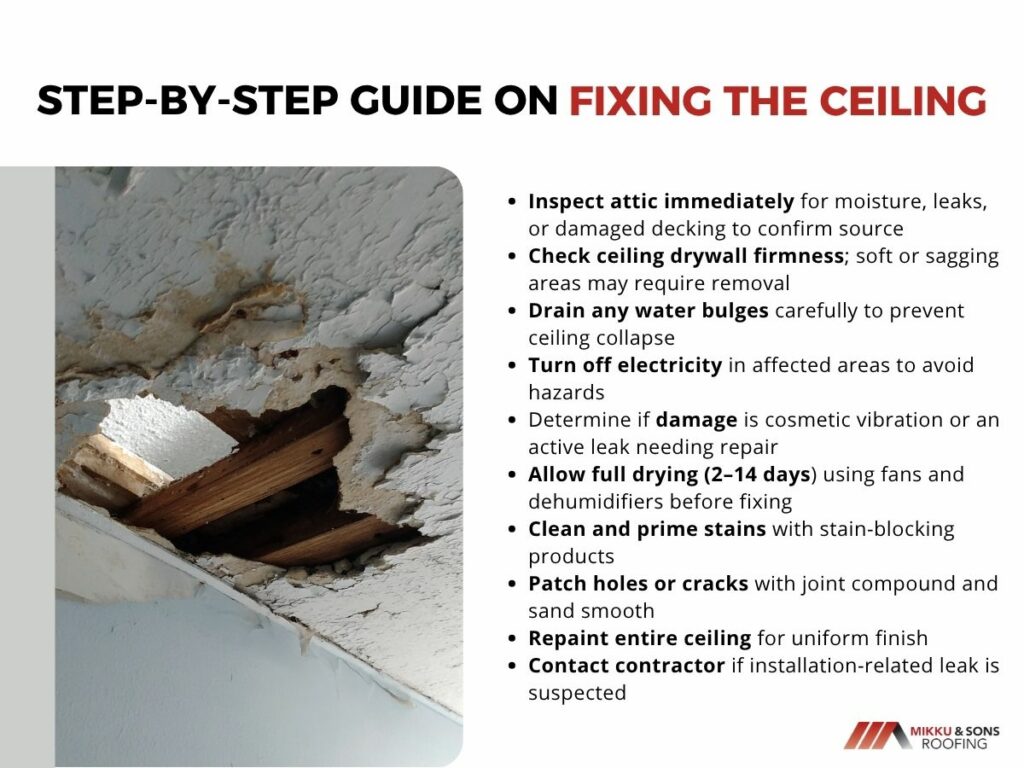
A visual inspection from the living space cannot confirm whether the damage is actively leaking or simply residual moisture from a previous event. The attic space provides the definitive answer.
Access the area directly above the visible ceiling damage during a rain event if possible, or immediately after discovering the stain.
Water saturation compromises the structural integrity of gypsum board long before visible failure occurs. The ceiling assembly relies on the drywall to maintain its rigidity, and a loaded pocket of water presents a collapse risk.
A physical examination determines the extent of the saturation. Press upward on the stained area with an open palm using moderate pressure.
If the material depresses easily or feels soft, the section requires removal.
A ceiling bulge containing trapped water requires immediate intervention to prevent a catastrophic failure. Gravity pulls water downward, creating a pocket between the drywall paper and the gypsum core or pooling on top of a paint layer.
Relieving this pressure in a controlled manner is safer than allowing the weight to increase.
The water will drain through the small hole, which prevents the ceiling from collapsing under the increased weight and allows the drying process to begin.
Water and electrical current create a dangerous combination within wall and ceiling cavities. Water traveling along conduit or pooling inside junction boxes poses an electrocution hazard and can damage fixtures.
A precautionary measure protects both the structure and the individuals working on the repair.
Establishing liability for ceiling damage after a roof replacement requires a factual assessment of the evidence. Responsibility may differ between the roofing contractor and the property owner depending on whether the damage arose from construction work or pre-existing conditions.
A clear understanding of these categories prevents unnecessary disputes and directs the repair costs to the correct party.
The roofing crew operates in a dynamic environment on the roof deck, and physical accidents can occur during the work. These incidents are typically straightforward to identify because they manifest suddenly during or immediately after the installation.
The contractor's insurance or the company itself usually bears the financial responsibility for these repairs.
Roof replacement creates substantial vibration within a structure. Tear-off machines remove old materials, nail guns drive thousands of fasteners, and crews move continuously across the deck.
These forces travel through the framing and can loosen settled dust, debris, or cracked paint that had remained undisturbed in the attic. Fine particles may fall onto the ceiling below, sometimes along with minor hairline cracks in the drywall compound.
This situation does not indicate improper roof installation. It reflects a pre-existing condition within the ceiling assembly that construction activity revealed.
A new roof should create a watertight barrier. If a rain event occurs after the installation is complete and water enters the living space, the roofing system has failed at some point.
This situation demands an immediate response from the installing contractor. The source of the leak often lies in the flashing details.
Step flashing around chimneys, valley installations, or headwall flashing at roof-to-wall intersections are common failure points if not properly integrated with the new shingles. Plumbing vent boots can crack during installation or be set at the wrong height.
Moisture trapped within a ceiling assembly will compromise any repair attempted over it. Paint applied to a damp surface fails to adhere properly, and joint compound cracks as residual moisture attempts to escape.
The drying process requires patience and a deliberate approach to air movement before any patching or finishing work begins.
Gypsum board acts as a sponge when exposed to water. The paper facing absorbs moisture rapidly, while the gypsum core wicks water outward from the point of intrusion.
A stain visible on the surface often indicates saturation that extends several inches beyond the discolored perimeter. This absorbed moisture must migrate back out through the same materials.
Trapped water causes the gypsum to lose compressive strength and promotes delamination of the face paper. The drying process cannot be rushed with heat alone, as rapid temperature changes can cause the materials to crack or warp unevenly.
Still air prolongs the drying cycle and allows moisture to settle into framing members and insulation. Moving air across the affected area accelerates evaporation by carrying away the water vapor released from the drywall surface.
The setup requires strategic placement of equipment to create continuous circulation.
The thickness of the drywall and the extent of saturation dictate the drying duration. A surface stain from minor humidity may dry in two to three days.
A significant saturation event where water penetrated the gypsum core requires a full 7 to 14 days before the material returns to its stable moisture content. A moisture meter provides objective confirmation that the surface is dry.
Without one, touch can offer a rough guide: damp areas feel cool, while dry material matches the temperature of the surrounding drywall and is ready for repair.
Once the ceiling assembly is verified as dry and structurally sound, the repair process moves to material restoration. The approach differs significantly based on whether the damage is limited to surface discoloration or involves physical deformation of the drywall.
Each scenario requires specific products and techniques to achieve a seamless finish.
A flat ceiling with intact paint but visible brown or yellow discoloration requires chemical blocking rather than simple paint coverage. Standard latex paint allows tannins and minerals deposited by the water to migrate through to the surface over time.
Do not skip this step. Primer creates the barrier that prevents the stain from returning.
Repainting the entire ceiling surface ensures uniform appearance.
Physical damage such as punctures, popped seams, or areas where paint has blistered and peeled away requires material replacement or patching. The repair must restore the flat plane of the ceiling before any texture or paint is applied.
Small holes or gouges accept setting-type joint compound or lightweight patching compound. Larger areas up to twelve inches may require a self-adhesive fiberglass mesh for reinforcement.
Dried joint compound leaves ridges and texture that differ from the surrounding ceiling. Sanding blends the repair into the existing surface.
The patched area consists of raw joint compound and exposed paper, which absorb paint differently than the surrounding ceiling.
Ceiling damage discovered after a roof replacement represents a disruption that feels contradictory to the purpose of the new installation. The reality is that structural vibration and construction activity often reveal weaknesses or create conditions that manifest on the finished surface below.
The sequence of response matters. Safety checks prevent injury from unstable materials or electrical hazards.
Drying periods ensure that subsequent repairs bond properly and remain stable. Accurate fault determination directs costs to the correct party and preserves working relationships with contractors.
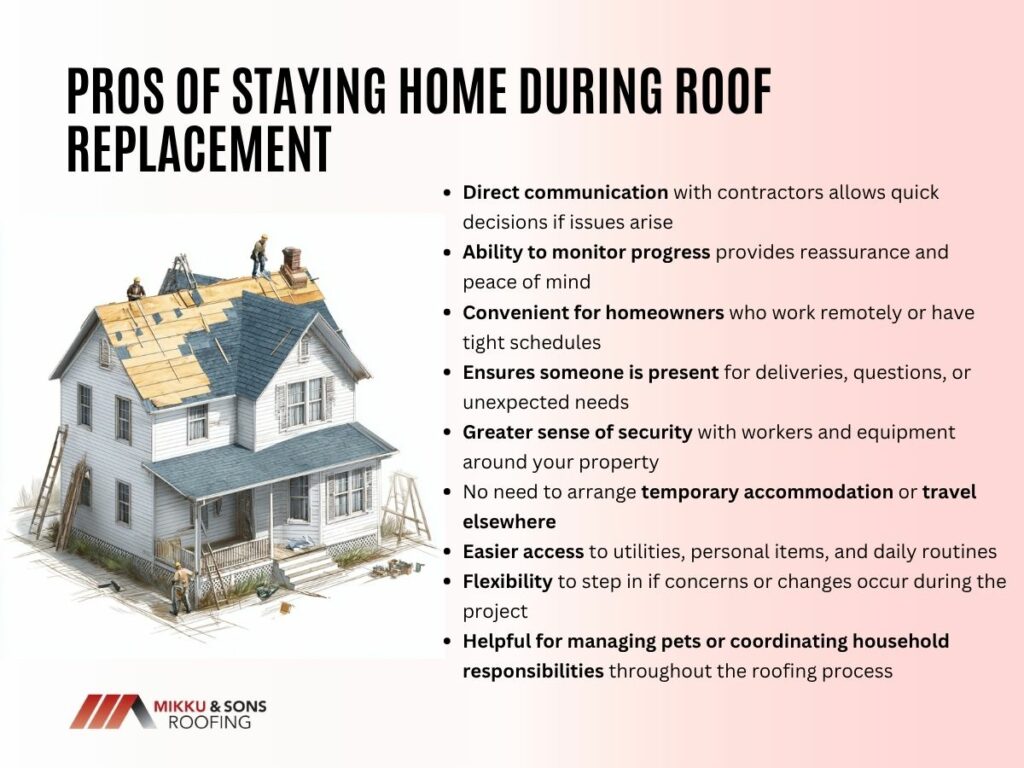
If you are planning a new roof, one of the first questions that comes to mind is simple and practical: should I stay home during roof replacement? The short answer is that it depends on your tolerance for noise, your household situation, and the scope of the project. Many homeowners choose to leave for part or all of the day because roof replacement is loud, disruptive, and sometimes unpredictable. Others stay home with preparation and clear communication with the contractor.
This guide walks through what actually happens during a roof replacement, the risks and inconveniences involved, and how to decide what works best for your family.
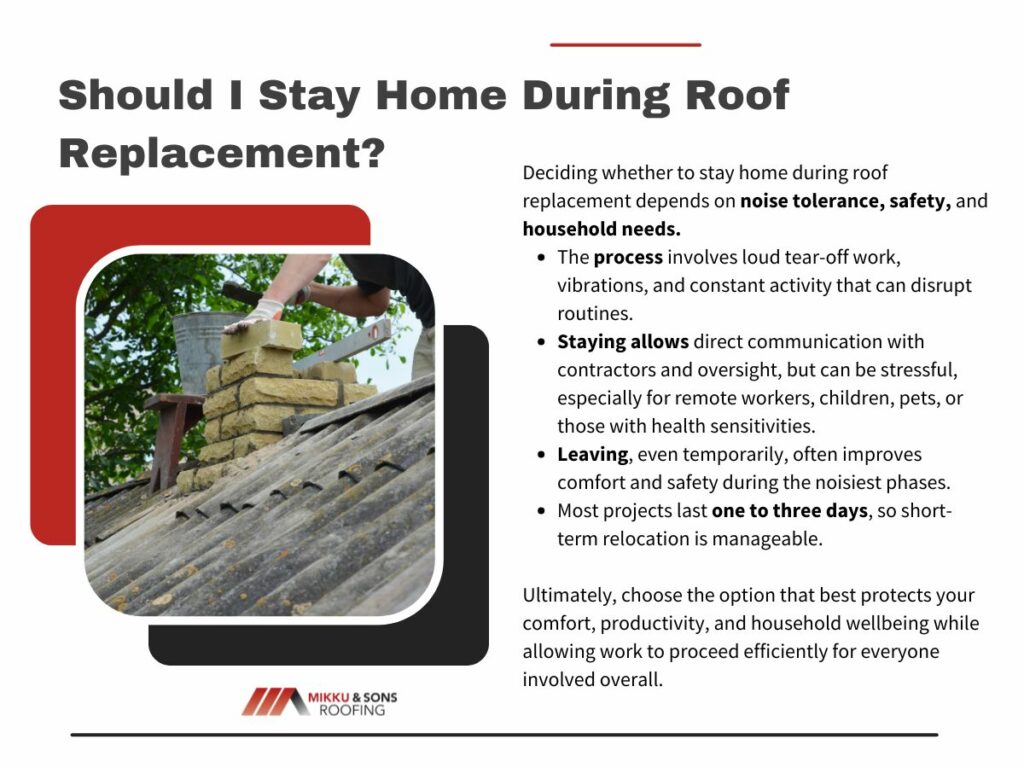
A roof replacement is not a quiet, gentle home improvement project. It involves tearing off old materials, inspecting the decking, making repairs if needed, and installing new underlayment and shingles. The process is active, physical, and noisy from start to finish.
Understanding the stages of a roof replacement helps you decide whether being home will feel manageable or overwhelming. Most residential projects in the United States take one to three days, depending on the size of the home and weather conditions.
The first step is removing old shingles and underlayment. Roofers use pry bars and specialized tools to strip the roof down to the decking. During this phase, debris is tossed into dumpsters placed near the home.
This is typically the loudest and most jarring stage. The banging, scraping, and thudding vibrations can travel through walls and ceilings. If you work from home, have small children, or are sensitive to noise, this period can be particularly uncomfortable.
Once the old material is removed, contractors inspect the plywood or boards beneath. If they find water damage or rot, sections are replaced before new materials go on.
This stage is less noisy but still active. If repairs are extensive, the project may take longer than originally planned. Staying home during this part is usually manageable, though the disruption continues.
Installing new underlayment and shingles brings back bursts of noise, especially from nail guns. There will also be workers walking across the roof, which creates vibrations.
While this phase feels more structured, it still involves consistent sound and movement overhead. Pets and young children often react strongly to this stage.
Staying home is not automatically a bad decision. In fact, some homeowners prefer to remain present for practical or personal reasons.
Being home allows you to monitor progress and communicate directly with the roofing crew if questions arise. That sense of oversight can provide peace of mind.
First, there is convenience. If you work remotely or have responsibilities that keep you nearby, leaving for several days may not be realistic. You may also want to ensure access to utilities or keep an eye on deliveries.
Second, being home makes it easier to answer contractor questions. Occasionally, roofers uncover hidden damage that requires approval before proceeding. Quick decisions can prevent delays.
Third, security matters. Although reputable roofing companies maintain strong safety standards, some homeowners simply feel more comfortable knowing someone is present.
However, staying home comes with tradeoffs that should not be underestimated.
Roof replacement is physically disruptive to your living environment. Even if the project goes smoothly, the experience can feel intense.
The noise level alone is often enough to make homeowners reconsider staying home for the full duration of the project. Nail guns, hammering, scraping, and constant foot traffic overhead can be exhausting.
Vibrations are another factor. Items on walls may shift slightly. Dust can fall from attic spaces. If you have fragile decor or open shelving, you may need to secure those items in advance.
There is also the safety consideration. Roofing projects involve heavy materials, falling debris, and equipment placed around the perimeter of your home. Children and pets require extra supervision to prevent accidents.
For households with newborns, elderly residents, or individuals with medical sensitivities, temporary relocation is often the more comfortable option.
Roof replacement changes the environment around your home, both inside and outside. Driveways may be blocked, landscaping partially covered, and debris scattered.
If you have pets or young children, leaving the house during peak construction hours may be the safest and least stressful option.
Dogs often react strongly to unfamiliar noise and strangers moving overhead. The vibrations can cause anxiety or escape attempts. Cats may hide for extended periods, which can complicate supervision.
For children, the constant sound can disrupt naps and routines. Additionally, contractors may need access to certain areas around the home. Keeping kids indoors and away from work zones requires vigilance.
A simple solution is to arrange daytime childcare or take pets to a boarding facility during the loudest phases. Even spending part of the day elsewhere can significantly reduce stress.
Roofing materials and adhesives can emit mild odors during installation. While modern products are designed to meet safety standards, the smell can be noticeable inside the home.
According to the Occupational Safety and Health Administration in its 2023 construction safety guidance, ventilation is important during roofing work to minimize exposure to airborne particles and fumes.
If you suffer from migraines, asthma, or sensory sensitivities, the combination of noise, vibration, and odor can become overwhelming.
Here is a comparison to help weigh comfort factors:
| Home Situation | Staying Home | Leaving Temporarily | Best Choice |
| Remote worker needing quiet | Noise disrupts calls and focus | Quiet elsewhere improves productivity | Leave during peak hours |
| Household with infants | Naps interrupted | Routine maintained off site | Leave during tear off |
| No pets or children | Manageable with preparation | Optional | Personal preference |
| Health sensitivities | Odors and vibration may aggravate symptoms | Reduced exposure | Leave |
Every home is different, but evaluating your daily routine is essential before making a decision.
Some homeowners do choose to stay home, either by necessity or preference. If that is your plan, preparation makes a big difference.
Taking simple precautions before the crew arrives can dramatically reduce stress and protect your belongings.
Communication with your contractor is key. Ask about start times, expected loud phases, and break periods. Many roofing companies are willing to give realistic daily timelines.
There are situations where leaving is strongly recommended rather than optional.
If you or someone in your household works night shifts, has medical vulnerabilities, or cannot tolerate prolonged noise, temporary relocation is usually the better choice.
Hotels, short term rentals, or staying with family for one or two days can preserve your well being. Even planning to leave during the tear off phase and returning later can strike a good balance.
Weather can also influence your decision. If a sudden storm interrupts the process, contractors may work quickly and intensively once conditions improve. That can increase stress for anyone inside the home.
In most standard roof replacement projects, homeowners insurance does not cover temporary lodging unless the home becomes uninhabitable. According to a 2022 Insurance Information Institute overview of homeowners policies, additional living expenses are typically tied to covered losses such as fire or severe storm damage.
If your roof replacement is part of a major claim after significant storm damage, ask your insurer whether lodging reimbursement applies. Otherwise, leaving the home is usually a personal expense.
Budgeting for one or two nights away may still be worthwhile if it protects your peace of mind and family comfort.
Most asphalt shingle replacements on average sized homes are completed in one to three days. Larger or more complex roofs can take longer.
Metal or tile roofing projects may extend beyond that timeframe due to installation complexity. Weather delays can also add extra days.
Before deciding, request a detailed timeline from your contractor. Clear expectations reduce frustration and help you plan accordingly.
At its core, the question of should I stay home during roof replacement is less about rules and more about lifestyle fit. If your home environment can tolerate loud, persistent construction noise for several days, staying may be manageable. If comfort, safety, or productivity will suffer, stepping away temporarily is often the wiser decision.
The best choice is the one that protects your household’s safety and sanity while allowing the roofing crew to work efficiently. Some homeowners split the difference by leaving during the noisiest hours and returning in the evening.
A new roof is a major investment in your home’s protection and value. Once complete, it shields everything beneath it for decades. In a future guide, we will explore how to choose the right roofing material for long term durability and energy efficiency, so you can pair smart installation decisions with the comfort choices you make during construction.
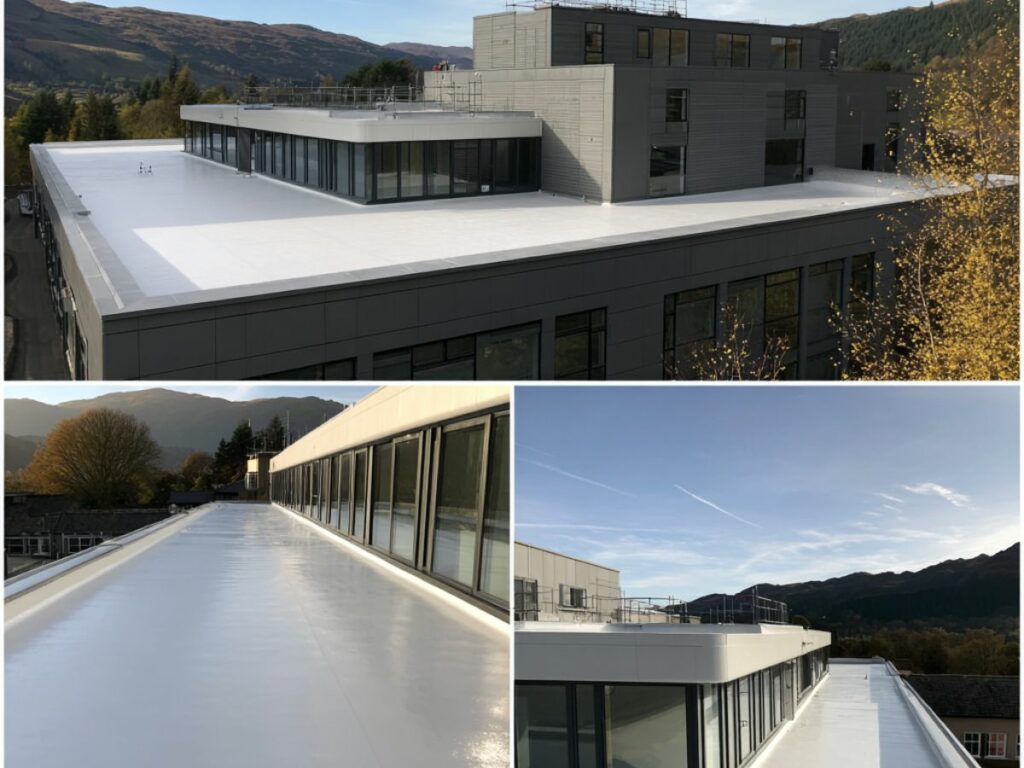
Flat roofs are built with specialized waterproofing systems designed to handle standing water, intense sun exposure, and temperature fluctuations. What are the key materials used in flat roofs? The most common materials include single ply membranes like TPO and EPDM, multi layer asphalt systems such as modified bitumen and built up roofing, spray polyurethane foam, and in some cases metal panels.
Each material serves a different purpose depending on climate, building type, and budget. In commercial real estate and modern residential construction across the United States, choosing the right flat roofing material directly affects durability, energy efficiency, and long term maintenance costs
Flat roofs are made from layered waterproofing systems designed to protect buildings from standing water, UV exposure, and temperature swings. The most common materials include single ply membranes such as TPO, PVC, and EPDM, as well as modified bitumen, built up roofing, spray polyurethane foam, and certain metal panel systems. Each option offers a different balance of durability, insulation performance, and maintenance requirements. In commercial real estate and modern residential construction, material selection often determines how long the roof lasts and how efficiently it performs.
Flat roofs are not a single material but a carefully engineered system built to manage water, insulation, and structural protection. Unlike steep slope shingles that shed water quickly, flat roofing materials must resist ponding water and constant sun exposure. According to the National Roofing Contractors Association in its 2022 industry guidance, membrane based systems now dominate low slope construction across the United States because of their durability and ease of installation.
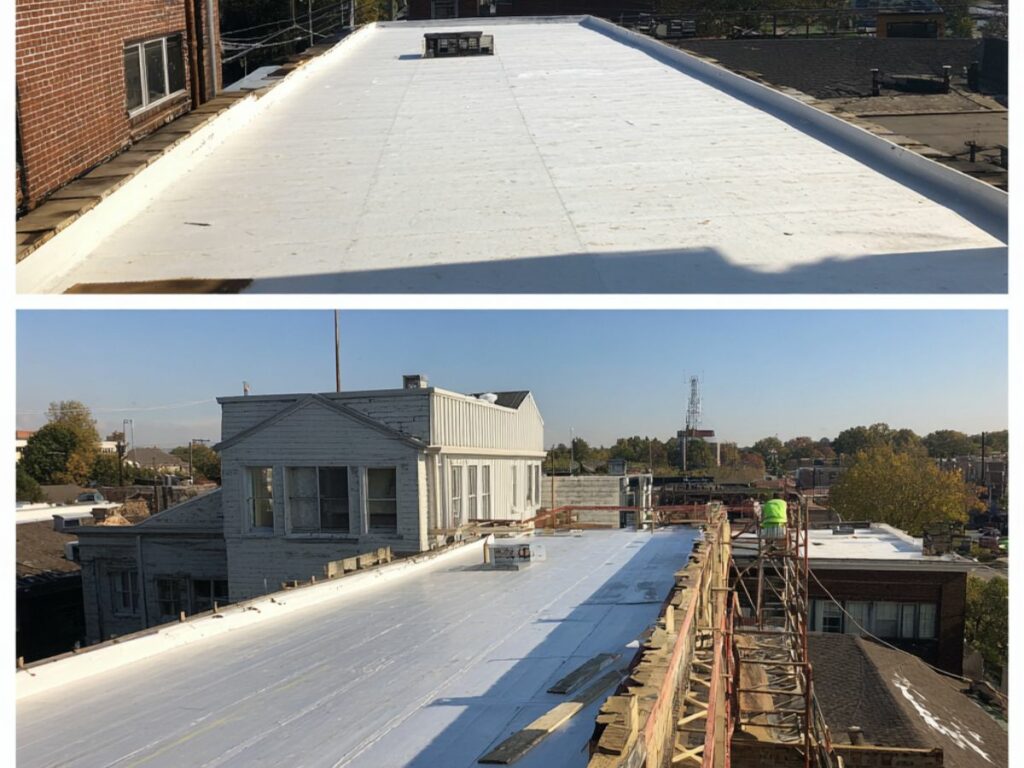
Single ply membranes are among the most widely used flat roofing materials today. They are factory manufactured sheets that are rolled out across the roof deck and either mechanically fastened or adhered in place. Seams are heat welded or chemically bonded to create a continuous waterproof surface.
TPO, which stands for thermoplastic polyolefin, is popular for commercial buildings due to its reflective white surface. The U.S. Department of Energy reported in 2021 that reflective roofing materials can reduce roof surface temperatures by up to 50 degrees Fahrenheit in hot climates. PVC membranes offer similar reflectivity with added chemical resistance, making them common on restaurants or industrial facilities. EPDM, often called rubber roofing, is typically black and performs well in moderate climates where extreme heat reflection is less critical.
Each membrane type typically lasts between 20 and 30 years when properly installed and maintained. Their relatively lightweight structure also makes them suitable for retrofit projects where adding heavy layers is not practical.
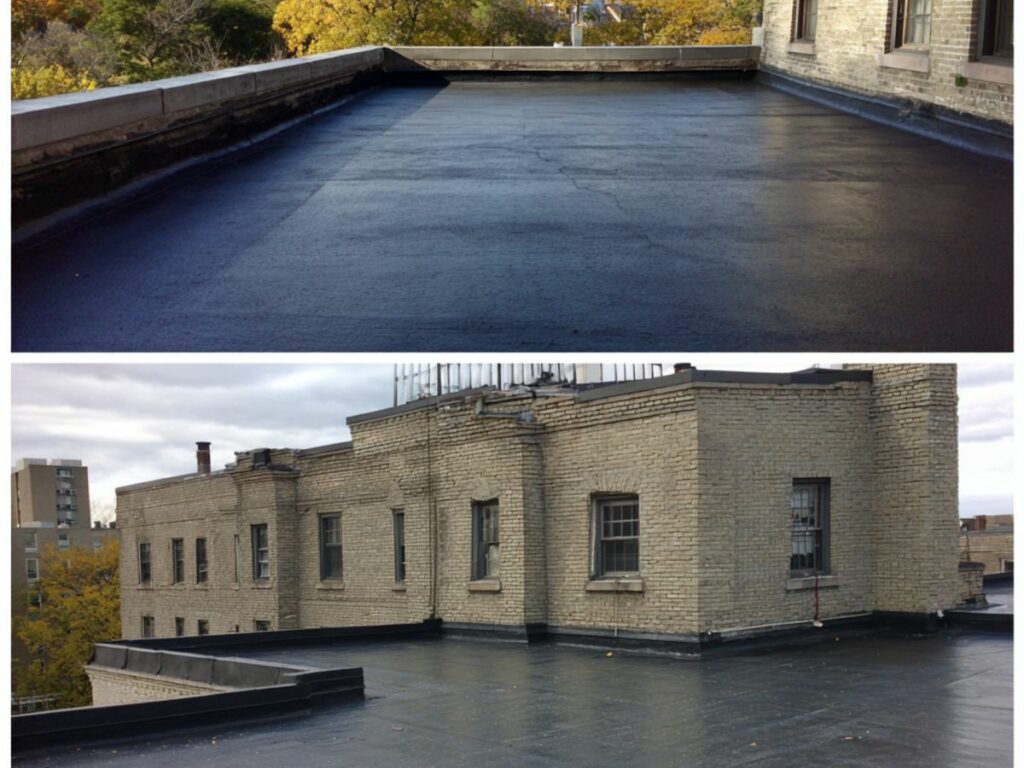
Modified bitumen is an asphalt based roofing system enhanced with polymers for added flexibility and durability. It is usually installed in multiple layers, either torch applied, cold applied, or self adhered. This system has been widely used in the United States since the 1970s and remains common in both residential and small commercial properties.
Because modified bitumen is thicker than most single ply membranes, it offers strong resistance to punctures and foot traffic. That makes it a practical option for buildings with rooftop HVAC units that require regular service access. Lifespans generally range from 15 to 25 years depending on installation quality and climate conditions.
Built up roofing and spray foam represent two different eras of flat roofing technology, yet both remain relevant in today’s market. Built up roofing is considered one of the oldest flat roof systems in America, while spray foam reflects modern advances in insulation science. Each serves specific building types and climate zones effectively.
Both built up roofing and spray foam systems demonstrate how flat roof technology has evolved to balance waterproofing with insulation performance. Property owners often choose between them based on budget, energy goals, and the condition of the existing roof deck.
Built up roofing, often referred to as BUR, consists of alternating layers of asphalt and reinforcing fabric. These layers are topped with gravel or a mineral surface that protects against UV exposure. The result is a thick, durable barrier designed to handle foot traffic and fluctuating weather conditions.
BUR systems have been installed on commercial buildings for more than a century. According to historical data from the Asphalt Roofing Manufacturers Association in 2020, multi layer asphalt systems remain common in institutional buildings because of their redundancy and durability. If one layer becomes compromised, additional layers still provide protection.
However, built up systems can be heavy and require strong structural support. They also involve more labor during installation, which can increase upfront costs.
Spray polyurethane foam, often called SPF roofing, is applied as a liquid that expands into a seamless insulating layer. Once cured, it is coated with a protective elastomeric top layer to shield against UV damage. The seamless design eliminates many of the joints that can become weak points in other roofing systems.
SPF roofing is especially effective in hot climates. The U.S. Department of Energy reported in 2021 that spray foam can provide an R value of approximately 6.5 per inch, making it one of the highest performing insulation materials available for roofing. This insulation value helps reduce cooling costs, which is particularly valuable in states such as Arizona and Nevada.
Because it can be applied over certain existing roof systems, spray foam is often used in restoration projects rather than full tear offs.
While membranes and asphalt systems dominate the flat roofing market, metal has gained popularity in certain applications. Modern architectural design sometimes incorporates low slope metal panels that combine durability with contemporary aesthetics. Emerging materials also include hybrid systems that integrate reflective coatings and enhanced insulation layers.
Metal and hybrid systems show that flat roofing continues to evolve beyond traditional membranes and asphalt layers. These materials appeal to property owners looking for longevity and design flexibility.
Metal flat roofs are typically constructed from aluminum or steel panels treated with corrosion resistant coatings. Although more common on low slope roofs than completely flat ones, they can be engineered for minimal pitch applications. Metal systems often exceed 30 years of service life when properly maintained.
To help clarify the differences among major materials, the following table outlines typical characteristics.
| Material | Average Lifespan | Best Climate | Maintenance Level | Typical Use |
| TPO | 20 to 30 years | Hot climates | Low | Commercial |
| EPDM | 20 to 25 years | Moderate | Moderate | Residential |
| Modified Bitumen | 15 to 25 years | Variable | Moderate | Mixed use |
| Spray Foam | 20 to 30 years | Hot dry | Low | Residential and commercial |
| Built Up Roofing | 20 to 30 years | Variable | Moderate | Commercial |
Material choice ultimately depends on structural design, climate exposure, and long term maintenance expectations. A commercial warehouse in Phoenix may benefit from reflective TPO, while a smaller residential addition in the Midwest might rely on EPDM for cost efficiency.
Selecting the right flat roofing material requires more than comparing lifespans. Building codes, energy goals, and long term operating costs all influence the decision. Commercial property owners often evaluate roofing materials based on total lifecycle cost rather than upfront expense alone.
The right flat roof material balances climate demands, structural capacity, and long term maintenance planning. For example, a reflective membrane can lower cooling costs in hot regions, while thicker multi layer systems may offer added durability in areas with heavy foot traffic.
When evaluating options, property owners should consider:
According to the 2023 Remodeling Cost vs Value Report, energy efficient upgrades continue to influence buyer preferences and property values. Roofing plays a direct role in that equation, particularly in regions with high cooling or heating demands.
Professional inspection is also critical. A roofing contractor can assess deck condition, drainage slope, and ventilation before recommending a system. Skipping this step can lead to premature failures, especially if moisture is already trapped beneath existing layers.
Flat roofs also require proper drainage design. Even slight ponding water can shorten the lifespan of certain materials. Ensuring that scuppers, drains, and tapered insulation are properly configured can make as much difference as the membrane itself.
Flat roof replacement cost in Arizona depends largely on material selection, labor rates, and whether the existing roof requires full removal. In hot desert climates, reflective systems such as TPO or spray foam are often preferred, which can influence pricing.
The 2023 Remodeling Cost vs Value Report notes that regional labor variations significantly affect roofing project totals across the Southwest. Insulation upgrades, code compliance improvements, and disposal of old materials also add to the final figure.
Understanding material differences is the first step, but budgeting wisely requires examining installation complexity and long term energy savings. In the next discussion, we will explore how to recognize when a flat roof has reached the end of its lifespan and how to plan financially for a timely replacement.
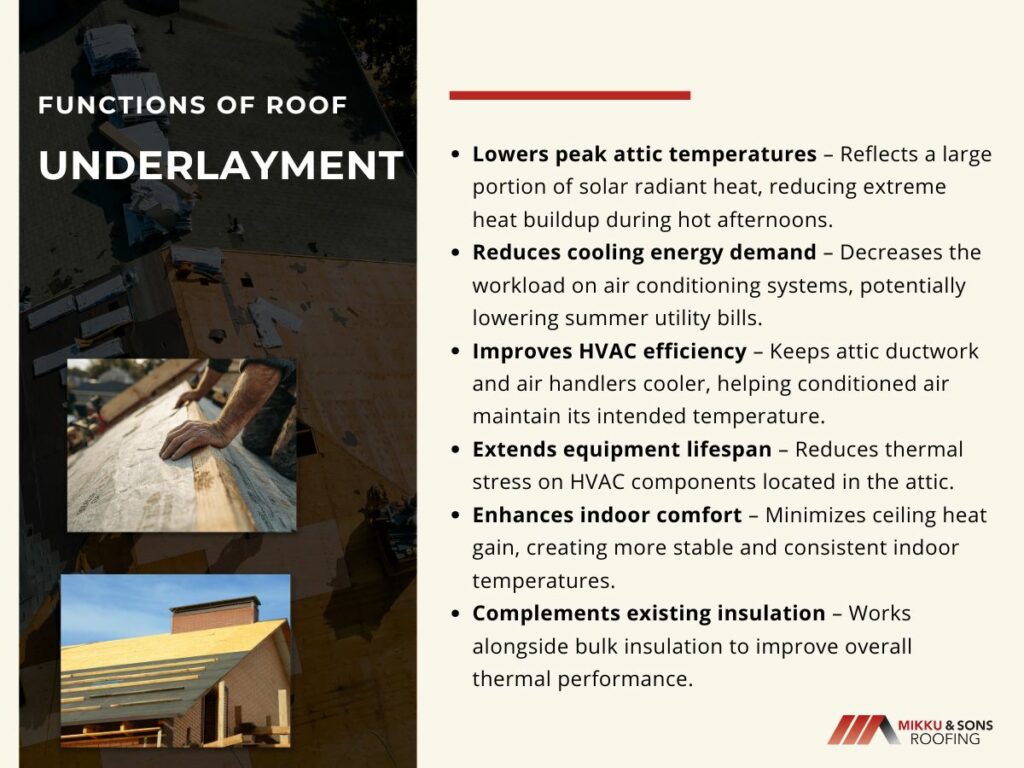
Under your roof's final shingles or tiles lies a critical barrier, the underlayment. This layer provides the primary waterproofing defense for the decking beneath it.
Manufactured as a temporary protective membrane, underlayment is engineered to shield the substrate during construction delays. Its composition directly dictates resilience against ultraviolet radiation and precipitation during exposure periods.
How long can roof underlayment be exposed? Prolonged exposure inevitably degrades the material’s integrity, compromising its fundamental waterproofing function. Determining a precise exposure limit requires analyzing the specific product’s synthetic polymer or asphalt-saturated felt construction.
Beneath the primary roofing material, a secondary membrane performs a critical function. Roof underlayment acts as a secondary line of defense.
Its principal role is to prevent water infiltration from wind-driven rain or ice dam backup that bypasses the outer shingles or tiles. The membrane also protects the structural decking from precipitation during the construction phase.
The performance characteristics of underlayment are determined by its base material. The construction industry utilizes several distinct types, each with specific properties that influence durability and exposure tolerance.
Installation of roofing components does not always proceed as a continuous process. Weather delays, material shortages, or scheduling conflicts can leave the underlayment exposed for extended periods.
The material’s composition dictates its capacity to withstand ultraviolet radiation, temperature cycles, and physical abrasion during these intervals. Recognizing the specific limits for each underlayment type is necessary for long-term roof system integrity.
A universal exposure timeframe does not exist for roof underlayment. The permissible duration before final roofing cover installation is a direct function of the material's chemical formulation and physical construction.
Each primary underlayment type possesses distinct vulnerabilities and strengths when subjected to the elements.
Asphalt-saturated felt paper represents the historical standard. This material is manufactured by saturating a mat of organic cellulose fibers or fiberglass with asphalt coatings.
The cellulose base is hygroscopic, meaning it naturally absorbs atmospheric moisture. This characteristic defines its primary limitation.
Prolonged exposure leads to moisture absorption, which causes the felt to wrinkle, swell, and become brittle upon drying. The asphalt coating itself can also soften under high heat, increasing its susceptibility to tearing from foot traffic or wind.
Modern synthetic underlayments are engineered from polypropylene or polyethylene polymers. These materials are inherently non-absorbent and are designed to resist ultraviolet radiation degradation significantly better than felt.
These properties permit a substantially longer exposure tolerance. Many product data sheets indicate a resistance period of 6 to 12 months, though this is a measure of material survival, not a recommendation for indefinite exposure.
Rubberized asphalt underlayment, commonly called ice and water protector, is a self-adhering, modified-bitumen membrane. It is formulated to create a waterproof seal at eaves, valleys, and penetrations.
Its performance relies on the integrity of its adhesive layer as extended exposure presents unique challenges. The adhesive surface can attract and embed airborne dust and debris, compromising its ability to bond with the overlying shingle.
Direct summer sunlight can also over-soften the asphalt, leading to premature adhesive flow or membrane deformation. For these reasons, manufacturers frequently advise immediate covering, often within hours or days of installation, to maintain specified performance.
Manufacturer specifications form the only authoritative source for precise exposure limits. However, general industry guidelines exist for typical products, providing practical frameworks for project planning and material selection.
For traditional 15# or 30# asphalt-saturated felt, the exposure window is narrow. Best practice dictates covering the material with the primary roofing within a maximum of 30 days from its installation.
This guideline assumes stable, dry weather. Any period of rain or high humidity during this timeframe can immediately compromise the felt's performance. The material may absorb moisture, leading to visible wrinkles or puckering that telegraph through the finished roof.
A more conservative approach treats one to two weeks as a safer practical limit to guarantee integrity.
High-quality synthetic underlayment products offer a considerably wider margin for error. Many are engineered and tested to withstand solar ultraviolet exposure for periods ranging from 180 to 360 days without a critical loss of water resistance or tensile strength.
This extended tolerance accommodates common construction delays. It is essential, however, to verify this rating for the specific product batch in use.
The material remains vulnerable to physical damage from foot traffic, falling debris, or high winds during any exposure period, regardless of its UV rating.
Product labels and technical data sheets supersede all general guidelines. Manufacturers conduct specific accelerated weathering tests to determine the exact UV resistance and exposure limits for their products.
This information is printed on the product wrapper or available through official product literature. Failing to consult these documents before an extended exposure event risks voiding the material's warranty and can lead to premature roof system failure.
The installer's responsibility includes verifying these limits prior to product installation.
Exceeding the material's specified exposure tolerance initiates a series of degradative processes. These failures compromise the underlayment's core function, which is to provide a reliable secondary water barrier for the roof deck.
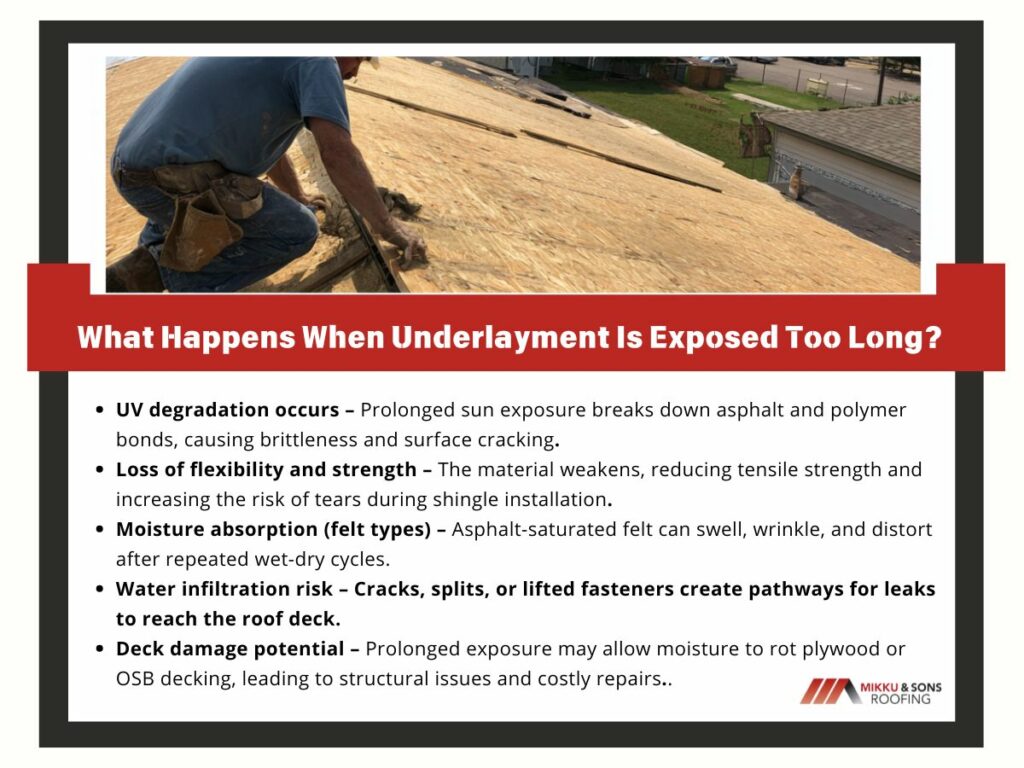
Solar UV radiation acts as the primary agent of chemical breakdown by disrupting the molecular bonds in asphalt, polymers, and reinforcing fibers. This photodegradation manifests as a loss of flexibility and a reduction in tensile strength.
The material becomes brittle and may develop a chalky surface residue. Cracks and splits can form, particularly along fold lines or in areas stressed by thermal movement, creating direct pathways for water infiltration.
Underlayment exposed to rain or prolonged dew absorbs moisture at different rates based on its composition.
Repeated wet-dry cycles, combined with freeze-thaw action, can further degrade the material's structure and adhesive properties.
The failure of the underlayment has direct consequences for the entire roof assembly.
An extended exposure event requires a systematic assessment before proceeding with the installation of the final roof covering. Visual inspection and material verification are critical steps to determine if the underlayment remains viable or requires replacement.
If the underlayment has been exposed for a period well within the manufacturer's published limits and shows no visible defects, installation can typically proceed. A thorough inspection is still mandatory.
Check for any lifting corners, minor wrinkles, or surface debris. Secure any lifted sections with additional cap nails or staples as specified by the underlayment manufacturer.
Remove all surface debris, such as leaves or grit, to ensure a flat substrate for shingle adhesion.
When exposure time approaches or exceeds the specified limit, or if the material's history is unknown, a more rigorous evaluation is necessary.
Findings from the inspection dictate the necessary corrective measures.
A Critical Prohibition: Never install new shingles or metal roofing over underlayment that shows confirmed signs of UV degradation, moisture entrapment, or physical damage. This practice traps compromised materials against the roof deck, guaranteeing future moisture-related failure and negating any product warranties.
The long-term performance of any roof system depends on the integrity of its underlayment, a component designed for protection, not prolonged exposure. Adhering strictly to manufacturer-specified exposure limits remains the only reliable method to preserve its function.
The principles governing felt, synthetic, and rubberized asphalt underlayment exposure apply with equal consequence to tile roof systems. A compromised underlayment beneath tiles can lead to concealed water damage that may remain undetected until significant structural decay occurs.
Replacing tile roof underlayment demands the complete removal of the primary tile covering, a labor-intensive and costly process. Proactive management of exposure timelines during initial installation or repair offers a far more efficient safeguard than the extensive remediation required after a failure.
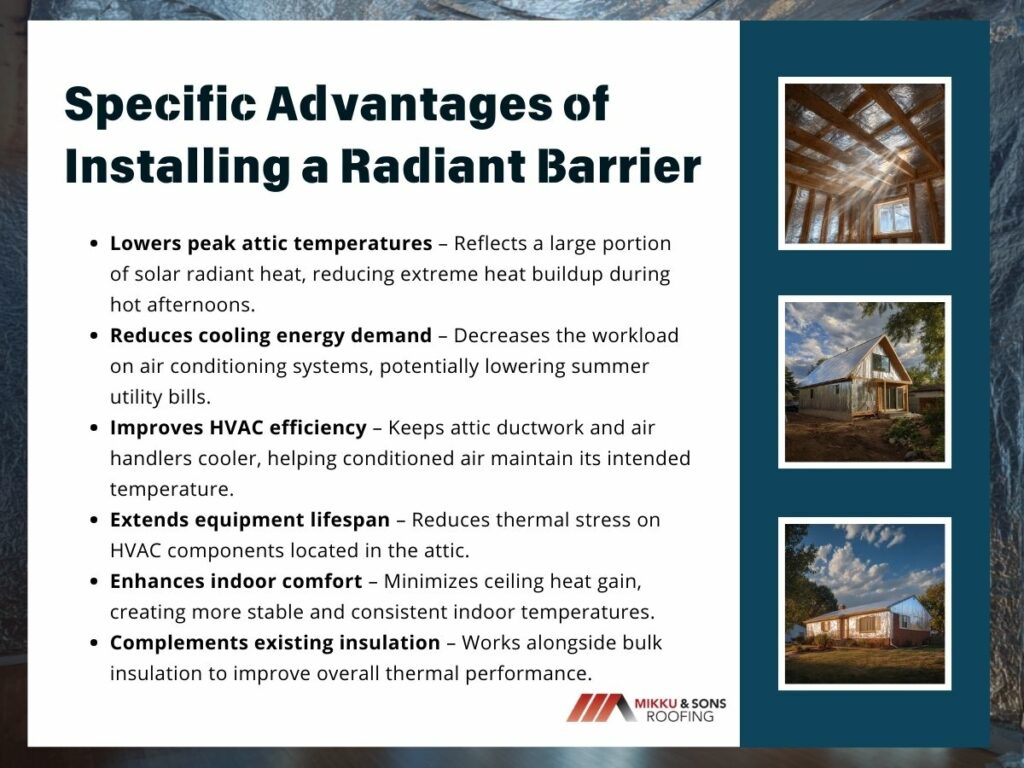
Radiant barriers are a distinct thermal control technology designed specifically to manage heat transfer through radiation. They differ from traditional insulation, which primarily resist conductive and convective heat flow.
The system typically employs a reflective foil surface to intercept and repel infrared energy before it permeates the attic space. Proper application can significantly reduce peak attic temperatures, altering the thermal load on the structure below.
While effective in specific conditions, these barriers are not a universal solution for all homes or climates. Their performance is dependent on correct installation, local climate severity, and the existing insulation envelope. Let's look at what homeowners need to know about radiant barriers for attic.
The principle of a radiant barrier is based on a specific form of heat transfer, separate from the processes that insulation addresses. All heat moves in one of three ways: conduction, convection, or radiation.
Standard attic insulation like fiberglass or cellulose works primarily against conduction, the heat that travels through solid materials, and convection, which involves heat movement through air currents.
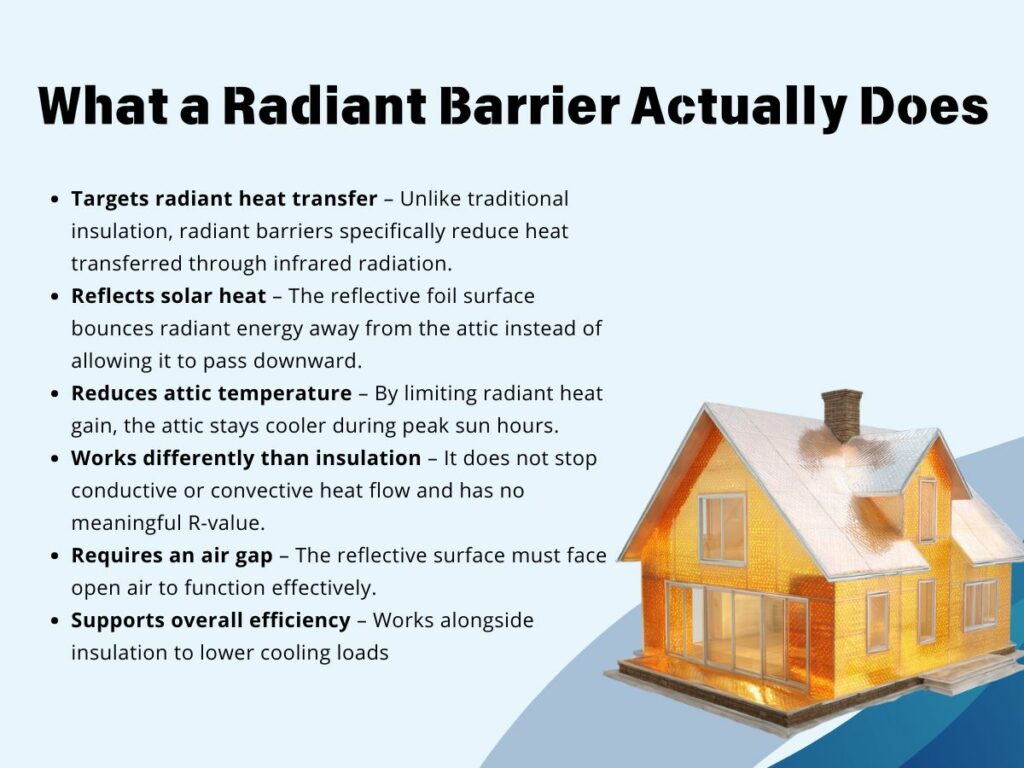
A radiant barrier targets radiant heat, which is electromagnetic infrared energy. This energy travels in a straight line from a hot surface to a cooler surface, without heating the air in between.
In an attic, the sun heats the roof decking, which then emits intense radiant heat downward toward the insulation and the living space below. A radiant barrier interrupts this specific energy transfer.
The functional component of a radiant barrier is a surface of low emissivity, typically a layer of aluminum foil. This surface possesses two key properties:
The combination of these properties allows the material to block radiant gain effectively. The barrier must face an open air space to function, as it cannot reflect heat if it is pressed tightly against another material like roof sheathing or insulation.
It is critical to distinguish this technology from bulk insulation. Insulation possesses a measurable R-value, which quantifies its resistance to conductive heat flow.
| Feature | Radiant Barrier | Traditional Insulation (Fiberglass / Cellulose) |
| Primary Heat Transfer Addressed | Radiation | Conduction and Convection |
| Measured Performance Metric | Reflectivity / Emissivity | R-value |
| Effectiveness in Summer | High (in suitable climates) | High |
| Effectiveness in Winter | Minimal | High |
| Requires Air Space | Yes | No |
| Can Replace Insulation | No | No (must meet code) |
| Typical Installation Location | Under roof deck or rafters | Attic floor or wall cavities |
A radiant barrier has no meaningful R-value since its performance is not measured by resistance but by reflectance. The efficacy of a radiant barrier depends on the temperature differential between the hot roof and the cooler attic floor.
Its impact is greatest in climates with long, intense cooling seasons where the sun consistently drives high attic temperatures. The system works in tandem with adequate attic insulation, addressing a different element of the total heat load that enters a building.
The suitability of a radiant barrier depends on specific environmental and structural factors. Its application is not universally advantageous, and its performance is tied to conditions where radiant heat transfer is the dominant source of thermal gain.
The technology delivers the most significant benefits in regions characterized by hot, sunny climates with prolonged cooling seasons. States across the Sun Belt, where summer solar radiation is intense and persistent, present the ideal operational environment for this system.
Performance diminishes in regions with mixed or heating-dominated climates. Homes in northern states or temperate coastal areas may see little to no practical benefit from the installation of a radiant barrier.
The primary reason is a reduced need for cooling and fewer hours of intense solar exposure on the roof. In these climates, the investment is difficult to justify, as the barrier would remain inactive for a substantial portion of the year.
The thermal challenges in such regions are better solved by increasing the R-value of traditional attic insulation and improving air sealing.
A critical prerequisite for any radiant barrier installation is an existing, adequate layer of bulk insulation on the attic floor. The barrier is a supplemental technology, not a substitute.
| Climate Type | Typical Cooling Demand | Radiant Barrier Effectiveness | Recommendation |
| Hot / Sunny (Sun Belt) | High | High | Strongly Recommended |
| Mixed Climate | Moderate | Low to Moderate | Case-by-Case |
| Heating-Dominated | Low | Minimal | Not Recommended |
| Coastal / Temperate | Low | Minimal | Generally Not Justified |
It is designed to work in conjunction with proper insulation, not replace it. The insulation handles conductive and convective heat flow from the attic air, while the barrier addresses radiant heat from above.
Installing a radiant barrier in an under-insulated attic will not correct the fundamental deficiency in the building envelope.
When installed in a compatible climate and correct structural context, a radiant barrier provides targeted performance benefits. These advantages are mechanical and measurable, focusing on the alteration of heat flow and system efficiency.
By reflecting radiant energy, the barrier prevents a substantial portion of the sun's thermal load from being absorbed into the attic space. This can lower the temperature differential between the living space and the attic, which directly reduces the conductive heat gain through the ceiling.
The attic becomes a less hostile thermal environment for any infrastructure housed within it.
Air conditioning systems operate against a reduced thermal load, which may allow them to run for shorter cycles or with less intensity. The magnitude of this saving is variable and depends on climate severity, home construction, and HVAC efficiency.
In optimized scenarios, the reduction in cooling demand can be significant over a season.
Ductwork and air handling units located in the attic are exposed to lower ambient temperatures. This reduces the conductive heat gain into the conditioned air moving through the ducts, improving the delivered air temperature and the overall efficiency of the distribution system.
The reduced thermal stress on these components can also contribute to extended service life.
The occupants below the attic have some improved comfort. This is often perceived as a more stable and uniform temperature, with fewer hot spots or areas of noticeable radiant warmth emanating from the ceiling during peak afternoon hours.
The effect complements the work of the insulation and the air conditioning system, creating a more controlled interior environment.
While a radiant barrier offers specific advantages, its performance is bounded by clear physical and practical constraints. A clear assessment of these limitations is necessary for accurate expectation setting and effective system design.
It provides no meaningful resistance to conductive or convective heat flow, which are the primary modes of heat loss in winter. Therefore, the technology is not designed to reduce heating energy consumption.
In heating-dominated climates or seasons, the barrier remains inert. The investment rationale must be based solely on summer cooling performance in relevant geographic zones.
In a typical attic environment, dust and other particulates can gradually accumulate on the reflective face. This layer of dust increases the surface's emissivity, allowing it to absorb and re-radiate more heat, which degrades performance over time.
The rate of this degradation depends on attic ventilation rates, local air quality, and the specific installation method. A barrier stapled to the underside of roof rafters is more susceptible to dust accumulation than one installed with the reflective surface facing a sealed air space.
The reflective surface must face an open air gap to effectively reflect radiant energy. Compressing the barrier against another material, such as roof sheathing or insulation, negates its function by enabling conductive heat transfer.
This requirement influences both the choice of installation method and the potential for retrofit in existing attics with limited clearance.
Material selection also influences long-term performance. Key considerations include:
A radiant barrier’s viability is not universal but is determined by a strict evaluation of climate, existing building envelope performance, and correct installation. When applied within its optimal parameters the system can effectively reduce peak attic temperatures and contribute to lower cooling loads.
This technology's effectiveness is intrinsically linked to the geometry and exposure of the roof itself. The roof's shape, pitch, and orientation define the surface area exposed to solar radiation and the volume of the attic space being heated.
A simple, high-pitched gable roof presents a large, direct target for the sun, potentially creating a significant radiant heat gain that a barrier can address. Conversely, complex roof shapes with multiple valleys, dormers, or low slopes alter the solar exposure and can complicate the installation of a continuous, effective barrier plane.
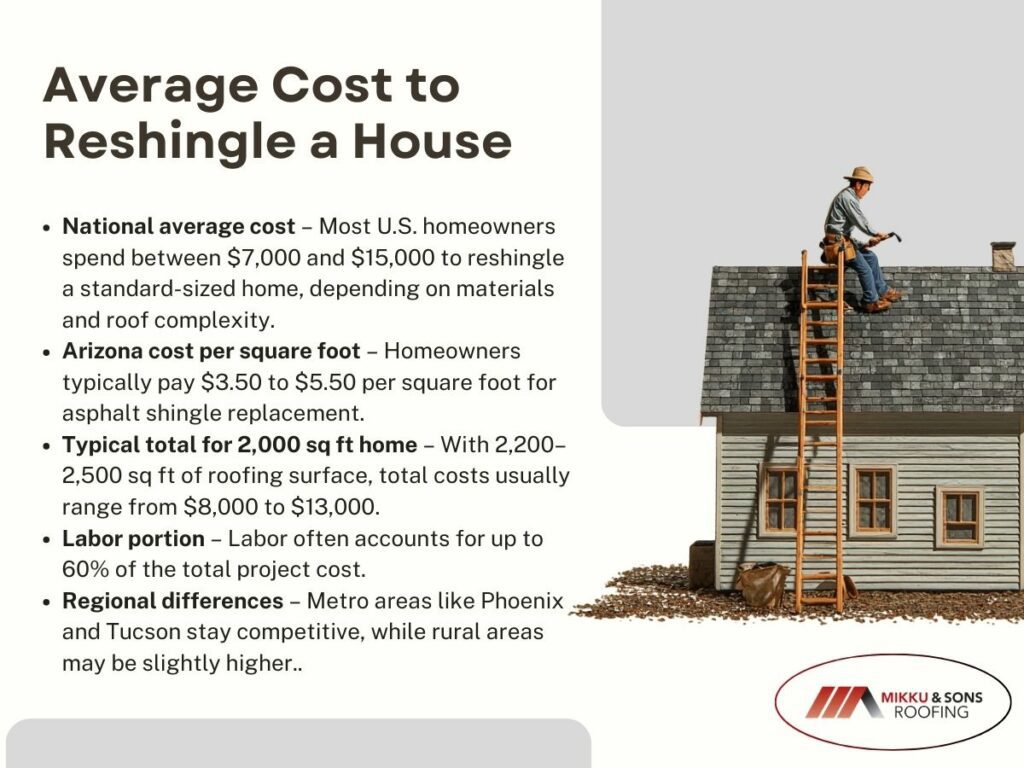
If you're planning to reshingle your house in Arizona, you're likely wondering what kind of price tag to expect. How much does it cost to reshingle your house? On average, U.S. homeowners pay between $7,000 and $15,000 to reshingle a standard-sized home.
In Arizona, costs often fall right in the middle of that range, thanks to the state’s dry climate and regional labor rates. But the final price you pay depends on a mix of factors: your roof size, the material you choose, the pitch of your roof, and whether existing shingles need to be torn off. This guide walks through what influences the cost and what Arizona homeowners should expect before scheduling a reroofing project.
Most homeowners in Arizona spend about $3.50 to $5.50 per square foot to reshingle their homes. A typical 2,000-square-foot home with a medium-pitch roof usually has around 2,200 to 2,500 square feet of roofing surface, putting the total between $8,000 and $13,000.
Prices vary based on size and material, but the biggest chunk of your cost will come from labor and materials. Labor alone can make up 60% of the total project budget. In Arizona’s major metro areas like Phoenix and Tucson, competitive contractor markets tend to keep costs closer to national averages, while rural areas may see slight increases due to limited labor availability.
Most Arizona homeowners can expect to pay between $8,000 and $13,000 to reshingle a typical single-story home.
| Home Size | Roof Area (sq ft) | Low-End Cost | Mid-Range Cost | High-End Cost |
| Small (1,200 sq ft) | 1,500 | $5,250 | $6,750 | $8,250 |
| Medium (2,000 sq ft) | 2,300 | $8,050 | $10,350 | $12,650 |
| Large (3,000 sq ft) | 3,500 | $12,250 | $15,750 | $19,250 |
Even within the same neighborhood, roofing prices can vary widely. The design of your roof and the choices you make during the planning phase play major roles.
The steeper or more complex your roof, the more labor and time it will take to complete the job. A simple gable roof is faster to reshingle than a hip roof with multiple valleys and dormers. Roof pitch also determines whether special equipment is needed for safety.
Contractors use “squares” to calculate roofing area: one square equals 100 square feet. A multi-story home may have the same living space as a ranch-style house but a smaller roof area due to compact design. In Arizona, common roofing challenges include sun damage and brittle underlayment in older homes.
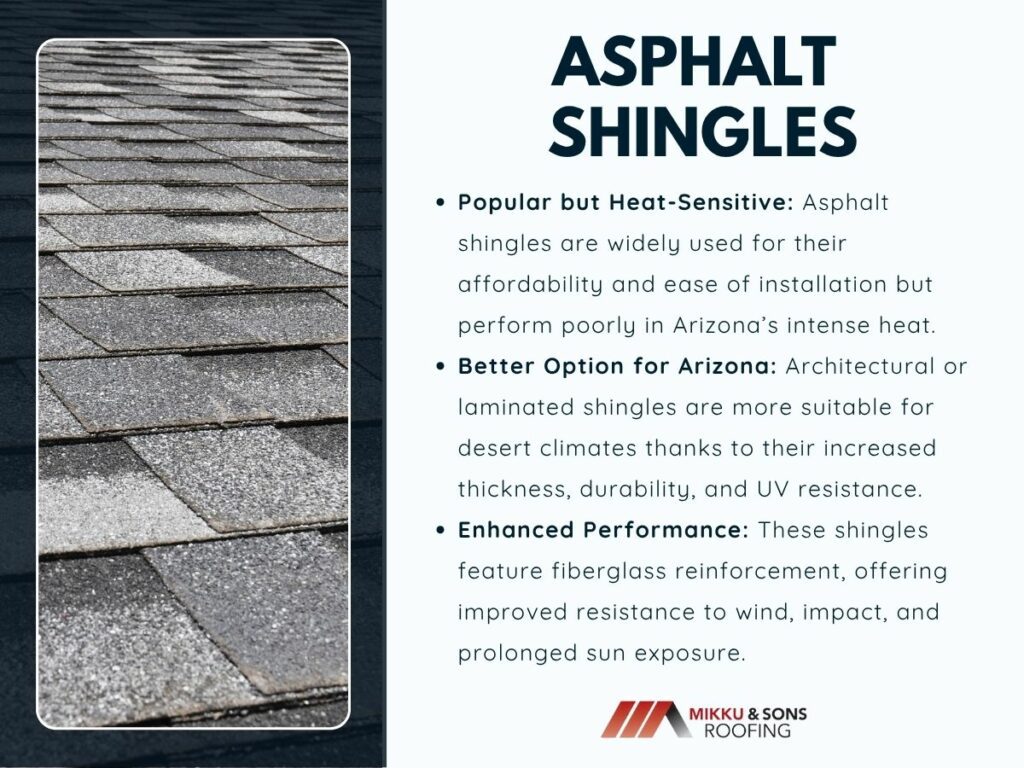
Asphalt shingles are the most popular roofing material in Arizona, largely because they handle high heat well and are relatively affordable. There are three main types:
Tile roofs are also common in Arizona, especially in newer developments. However, reshingle jobs typically involve removing and replacing asphalt shingles, which keeps pricing more predictable.
Tearing off old shingles is a labor-intensive step. Overlaying new shingles on top of old ones can save money, but it's not always allowed by building codes and may void warranties. In Arizona, local codes often require a complete tear-off if the roof already has two layers.
Disposal fees vary by municipality. In Maricopa County, expect to pay between $300 and $600 in dumpster and landfill fees depending on the amount of material removed.
Complex roof shapes, multiple layers, and code requirements can significantly raise labor and disposal costs.
Key cost drivers include:
Arizona's roofing labor rates are generally close to the national average, though they fluctuate depending on region and season. In Phoenix and Tucson, competition among roofing companies keeps prices reasonable, averaging $50 to $80 per hour for experienced crews.
In smaller towns or rural parts of the state, you might see higher labor costs due to limited contractor availability. Additionally, extremely hot summer months often lead to labor shortages and delays, pushing prices upward. Scheduling work in early spring or late fall can result in better pricing and faster turnaround.
Arizona also has some of the strictest building permit and inspection rules, especially in fast-growing metro areas. Permits typically cost between $150 and $500, depending on your municipality.
Where you live in Arizona and when you schedule the project can swing costs by several thousand dollars.
Many homeowners focus only on shingle and labor prices, but other expenses can catch you off guard. Planning for these costs can help avoid budget surprises.
Once shingles are removed, contractors often find rotted or damaged wood that needs replacing. Arizona’s harsh sun and occasional monsoon season can deteriorate roof decking over time. Plywood sheets typically cost $70 to $100 each, and you might need several replaced.
Fascia, flashing, and drip edge repairs may also be needed and usually aren't included in the base quote. These small components keep water out but often wear down unnoticed.
City permits and inspections are mandatory in most Arizona jurisdictions. Inspection costs are often bundled with permits but could be itemized separately, especially in new developments.
Warranties add peace of mind but may come at a premium. A basic contractor warranty is often included, but an extended manufacturer-backed warranty may cost an extra $500 to $1,500, depending on coverage.
Failing to budget for hidden repairs and warranty options can derail even the best-planned roofing project.
When you reshingle your roof can influence cost just as much as what materials you choose. Timing your project right can help you get better contractor availability, avoid weather delays, and even qualify for lower prices.
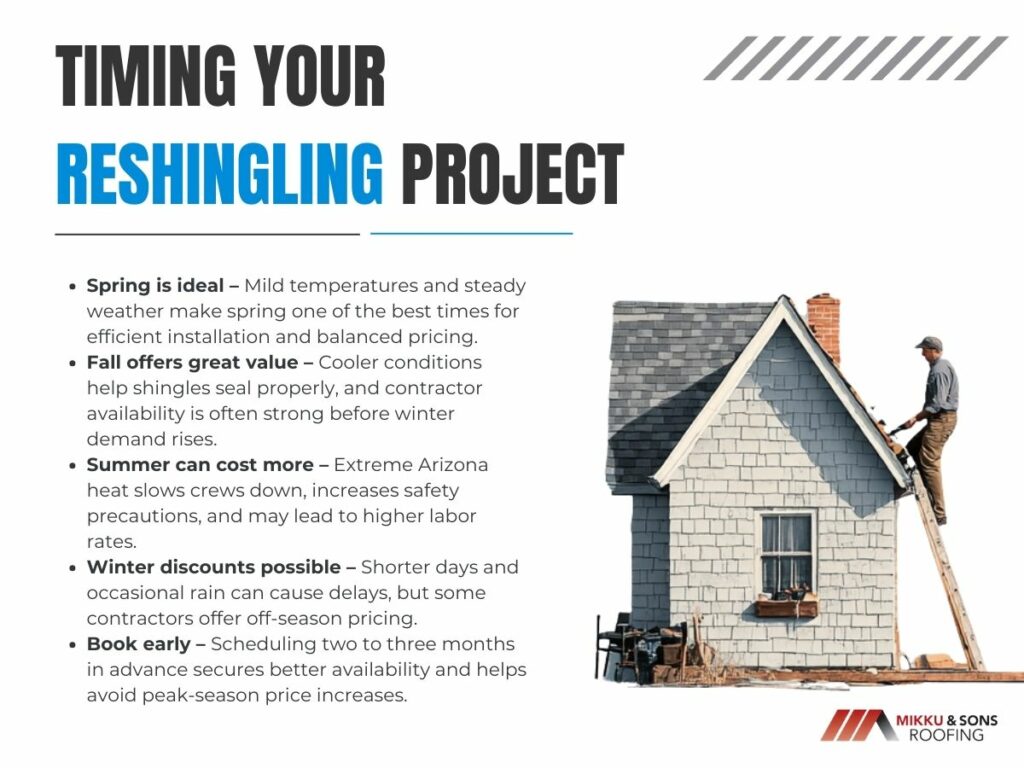
Arizona's unique climate allows roofing projects nearly year-round, but certain seasons offer advantages. Spring and fall are ideal due to milder temperatures. Contractors are more active during these months and may offer promotions to fill schedules.
Summer poses challenges. Extreme heat makes work conditions tough, slowing down progress and increasing labor costs. Some crews charge a premium in July and August to compensate for additional safety measures and reduced efficiency.
Winter is workable in Arizona, but shorter daylight hours and unexpected rain can lead to delays. However, this off-peak period sometimes results in discounted pricing, especially from contractors looking to keep crews busy.
Scheduling in spring or late fall offers the best balance of cost, quality, and timing for Arizona homeowners.
Like any construction sector, roofing has its own supply chain and seasonal surges. Following market conditions can help you make smarter decisions.
For example, asphalt shingle prices often rise after natural disasters elsewhere in the U.S., as manufacturers divert materials to those regions. Demand spikes in areas recovering from hurricanes or tornadoes can lead to shortages even in Arizona.
Similarly, insurance-related work can flood the local market after monsoon season. If many homes need roof repairs at once, you may face longer wait times and fewer available contractors.
Experienced homeowners know to book well in advance ideally two to three months before your desired start date. This ensures you get a reputable contractor rather than being forced to settle due to availability.
Ask roofers about their backlog, recent project timelines, and whether they subcontract. A transparent estimate and timeline protect you from price hikes or sudden reschedules. Early planning reduces surprises and positions you to negotiate better terms.
If you're planning to sell your home within a few years, timing your reshingling project right can also boost resale value. A fresh roof completed in spring or fall shows better during real estate showings and inspections.
Buyers feel more confident when a roof was recently installed by a known contractor, especially when weather was favorable for quality workmanship. Good timing isn’t just about savings it can improve how buyers perceive your entire home.
Arizona homeowners reshingle their homes for many reasons storm damage, aging materials, or planned upgrades. Knowing what influences cost puts you in control of the process. Most homes will fall into the $8,000 to $13,000 range, but your final quote depends on roof size, pitch, materials, and timing.
Requesting multiple estimates is your best strategy for getting a fair price. Ask about tear-off requirements, permit fees, and warranty coverage upfront. That way, you can compare apples to apples and avoid mid-project surprises.
If you're weighing roofing options, your next step is knowing how to choose the right contractor. A trusted local expert can explain code requirements, recommend the best shingle type for Arizona heat, and help you time the project for savings.
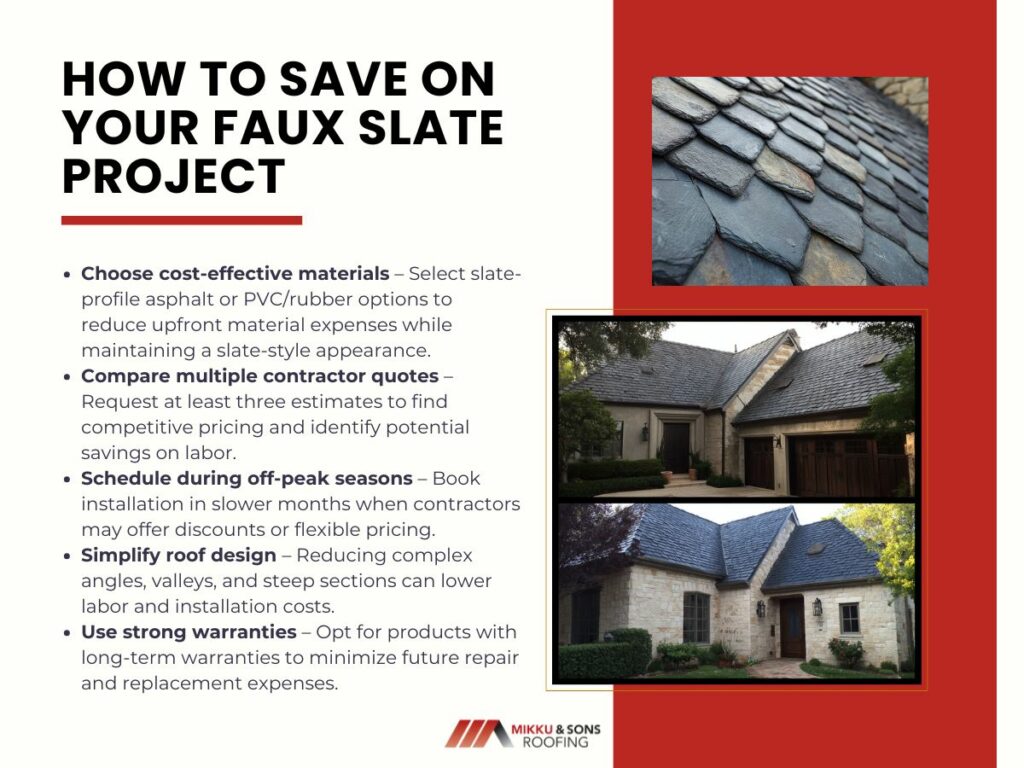
Affordable faux slate roof options include composite slate, synthetic polymer tiles, rubber slate shingles, stone-coated steel, and slate-profile asphalt each designed to deliver the classic slate look at a fraction of the cost. These modern alternatives are lightweight, durable, and visually appealing, making them an ideal choice for homeowners who want premium curb appeal without the premium price.
In this article, you’ll also find comparisons of these materials, cost ranges, durability, installation tips, maintenance guidance, and how to choose the right option for your home along with practical ways to save on your faux slate roof project.
Faux slate roofing gives homeowners the classic, upscale look of natural slate while eliminating many of the drawbacks that come with it. It combines modern materials with traditional design to create a practical and stylish roofing solution.
Faux slate costs significantly less than natural slate in both materials and installation. This makes it possible to achieve a premium look without exceeding your budget.
Unlike real slate, faux slate is much lighter and does not require structural reinforcement. This makes installation easier and suitable for most existing homes.
Most faux slate products are designed to resist cracking, impact, and harsh weather. This helps extend the life of your roof and reduces repair needs.
Faux slate tiles are more uniform and easier to handle than natural stone. This results in faster installation and lower labor costs.
These materials do not absorb moisture or flake like real slate. Routine inspections and basic cleaning are usually all that’s needed.
Many faux slate products are made from recycled rubber or plastics. This reduces waste and supports more sustainable building practices.
Faux slate offers the beauty of traditional slate with added affordability, durability, and convenience. It’s an excellent choice for homeowners who want a long-lasting, attractive roof without the complications of natural stone.
Faux slate roofing comes in several material types, each offering a different balance of cost, appearance, and durability. Understanding these options helps homeowners choose the best solution for their budget and climate.
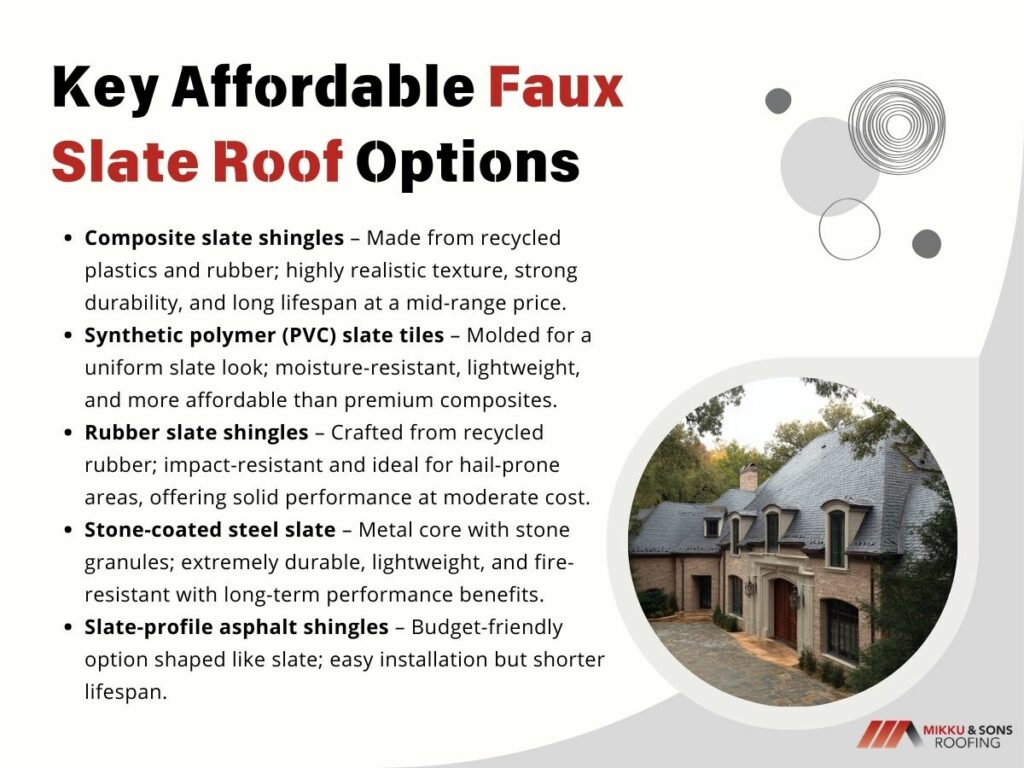
Composite slate shingles are made from blends of recycled plastics, rubber, and polymers designed to replicate the look of natural slate. They offer excellent durability, realistic texture, and long lifespans while remaining lighter and less expensive than real stone. This makes them a popular mid-range option for homeowners seeking both beauty and performance.
These tiles are manufactured from molded polymers that create a consistent slate-like appearance. They are more affordable than high-end composites and resist moisture, mold, and cracking. While slightly less textured, they still provide a clean, attractive slate look.
Rubber slate is typically made from recycled tires and other rubber materials, making it an eco-friendly option. It is highly impact-resistant and performs well in hail-prone areas. Although the color and style range may be more limited, it offers solid durability at a lower price point.
Stone-coated steel combines a metal base with stone granules to create a slate-style finish. It is extremely lightweight, fire-resistant, and built to last for decades. While slightly more expensive than some other faux slate options, it delivers exceptional strength and weather protection.
These asphalt shingles are shaped and colored to resemble slate at a much lower cost. They are widely available and easy to install, making them the most budget-friendly option. However, they typically have a shorter lifespan and less realistic appearance than other faux slate materials.
Each affordable faux slate roofing option offers its own mix of style, durability, and price. By comparing these materials, homeowners can find a solution that delivers the elegant look of slate while staying within budget.
With so many faux slate roofing materials available, comparing them side by side is the best way to find the right balance between cost, appearance, and long-term performance. Key factors such as durability, weight, maintenance, and lifespan can vary significantly depending on the material you choose.
| Feature | Composite Slate | Synthetic (PVC/Polymer) | Rubber Slate | Stone-Coated Steel | Slate-Profile Asphalt |
| Appearance | Very realistic with natural textures | Clean, uniform slate look | Slightly softer, less stone-like | Highly detailed, sharp slate look | Least realistic |
| Cost Level | Medium–High | Medium | Medium | Medium–High | Low |
| Durability | High | Moderate–High | High | Very High | Moderate |
| Weight | Light | Light | Light | Very Light | Light |
| Maintenance | Low | Low | Low | Very Low | Moderate |
| Expected Lifespan | 30–50+ years | 20–40 years | 25–40 years | 40–70+ years | 15–30 years |
For the most authentic slate look, choose composite or stone-coated steel, while slate-profile asphalt is best for the lowest cost. Rubber and polymer offer a balance of durability and price, and storm-prone areas benefit from impact-resistant rubber or steel.
Comparing faux slate options using factors like cost, lifespan, weight, and realism makes it easier to choose the best roofing material for your needs. The right choice will give you the beauty of slate while matching your budget, climate, and long-term maintenance expectations.
Proper installation is just as important as choosing the right faux slate material. Following best practices helps ensure your roof performs well, lasts longer, and looks great.
A high-grade underlayment provides an extra layer of moisture protection beneath your faux slate tiles. It also helps prevent leaks and extends the life of the roof.
Good attic ventilation reduces heat and moisture buildup that can damage roofing materials over time. This improves energy efficiency and prevents premature aging.
Faux slate roofing requires precise fastening and alignment for best results. A professional installer helps avoid mistakes that could lead to leaks or tile damage.
Each faux slate product has specific installation requirements. Following them ensures warranty protection and optimal performance.
Some faux slate materials work better on steeper roofs. Making sure your roof structure matches the product helps prevent drainage and stability issues.
By following these installation tips and best practices, you can maximize the lifespan and appearance of your faux slate roof. A properly installed system delivers better protection, performance, and long-term value for your home.
Faux slate roofing is designed to be low maintenance, but regular care helps keep it looking good and performing well. Simple upkeep can prevent small issues from turning into costly repairs.
Clear leaves, branches, and dirt from the roof and gutters to prevent moisture buildup. This helps protect the surface and improve drainage.
Check for loose, cracked, or missing tiles following severe weather. Catching damage early prevents leaks and structural problems.
Use gentle washing to remove algae, mold, or stains. Avoid harsh chemicals that could damage the material’s finish.
Swapping out broken or worn pieces keeps the roof watertight. Quick repairs also maintain the roof’s overall appearance.
Cutting back overhanging branches reduces the risk of impact damage and excess debris. It also limits moss and algae growth from shade and moisture.
With simple, routine maintenance, a faux slate roof can last for decades while maintaining its attractive appearance. Regular inspections and basic cleaning ensure your investment stays protected and problem-free.
When planning a faux slate roofing project, understanding the typical installed costs helps homeowners make informed choices that balance budget and style. Costs can vary based on material, roof complexity, and local labor rates.
Installed Cost Comparison (per square foot)
Comparing these costs allows homeowners to choose a faux slate option that fits their budget while still achieving the desired look and performance. With careful planning, it’s possible to enjoy the beauty of slate without the steep price of natural stone.
A faux slate roof can be more affordable than natural slate, but smart planning and strategic choices can further reduce costs without sacrificing quality or appearance.
By carefully selecting materials, comparing quotes, timing installation, and planning efficiently, homeowners can save substantially on their faux slate roofing project while still achieving a durable, attractive roof.
Faux slate roofing offers the elegance of natural slate without the high cost or heavy structure. With options like composite, polymer, rubber, stone-coated steel, and slate-style asphalt, there’s a solution for nearly every budget and style, providing long-lasting protection and curb appeal.
By comparing materials, planning wisely, and following installation and maintenance best practices, homeowners can maximize value. Smart choices ensure a durable, attractive roof that enhances both the home’s appearance and long-term investment.
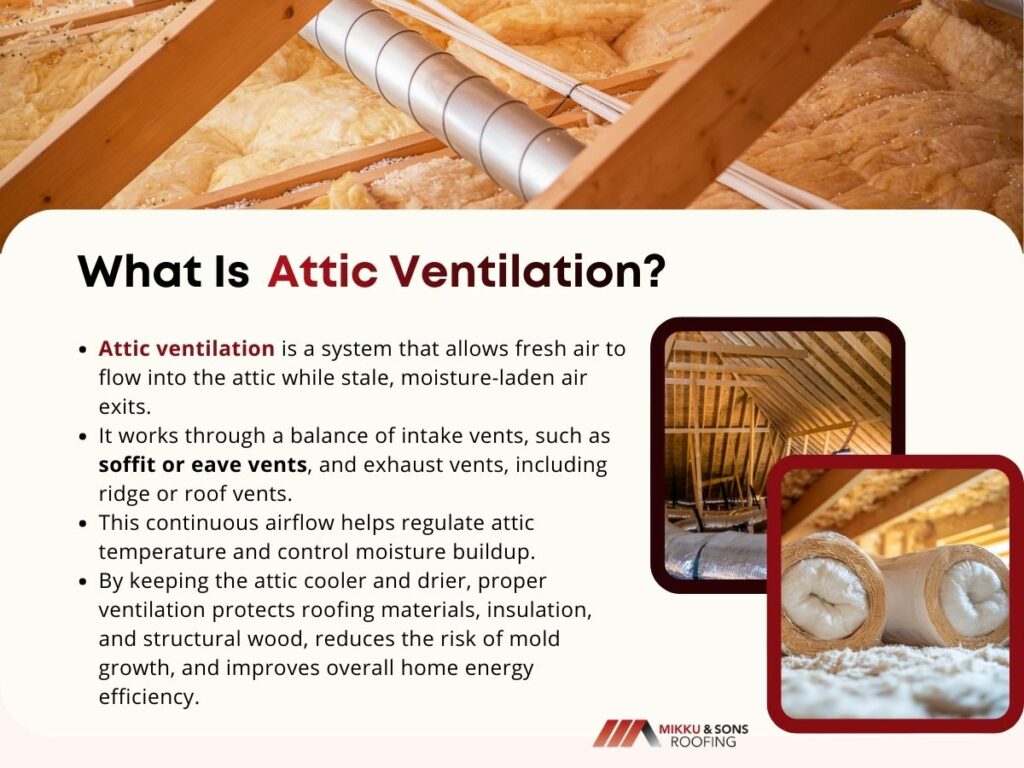
Yes, poor attic ventilation can cause mold. When warm, moisture-laden air becomes trapped in an attic with inadequate airflow, it condenses on cooler surfaces like roof decking and rafters, creating the damp conditions mold needs to grow. Over time, this hidden moisture can quietly spread mold, weaken structural materials, and even affect the air quality inside your home.
Can poor attic ventilation cause mold? In the rest of the article, we’ll cover how attic ventilation works, why moisture builds up, the warning signs of mold, and practical solutions to improve airflow. You’ll also find prevention tips, maintenance best practices, and guidance on when to call a professional to protect your home from costly mold damage.
Attic ventilation is the system that allows fresh air to enter and stale, moisture-laden air to exit your attic. It typically works through a balance of intake vents (like soffit or eave vents) that bring in cool outside air and exhaust vents (such as ridge or roof vents) that let warm, humid air escape.
This steady airflow helps regulate temperature and control moisture in the attic. By keeping the space cooler and drier, proper ventilation protects your roof, insulation, and structural wood from damage, reduces the risk of mold, and improves your home’s overall energy efficiency.
Poor attic ventilation traps heat and moisture, creating the perfect environment for mold to develop. Without proper airflow, damp conditions persist, allowing mold spores to settle, grow, and spread throughout the attic.
Everyday household activities release moisture that rises into the attic. When ventilation is inadequate, this moisture has nowhere to escape and becomes trapped, soaking into insulation and wood and creating ideal conditions for mold growth.
Warm, humid air in a poorly ventilated attic meets cooler roof surfaces and forms condensation. This repeated moisture buildup keeps rafters and roof decking damp, allowing mold colonies to take hold and expand.
Without proper ventilation, heat becomes trapped in the attic, especially during colder months. This leads to uneven temperatures that can cause snow on the roof to melt and refreeze, forcing water into the attic and increasing moisture levels.
Moisture trapped in the attic can saturate insulation, reducing its ability to regulate temperature and humidity. Damp insulation not only loses efficiency but also becomes a breeding ground for mold and mildew.
Poor ventilation allows airborne contaminants, including mold spores, dust, and organic particles, to remain suspended in the attic. These particles settle on damp surfaces and provide the nutrients mold needs to grow.
When moisture lingers due to poor airflow, wooden beams, rafters, and roof sheathing begin to absorb water. Over time, this weakens the structure and encourages mold to grow deep within the materials.
Poor attic ventilation allows moisture, heat, and airborne particles to accumulate, creating the ideal environment for mold. By improving airflow and controlling humidity, homeowners can significantly reduce the risk of mold and protect the integrity of their homes.
Mold grows in attics because the space often traps moisture and warm air, especially when ventilation is poor. When these conditions combine, they create an ideal environment for mold to develop and spread.
When moisture, warmth, and organic materials combine in a poorly ventilated attic, mold can easily take hold. Controlling humidity and improving airflow are the best ways to stop mold before it starts.
Mold in the attic can often go unnoticed until it causes damage or affects indoor air quality. Recognizing the early warning signs can help you address the problem before it spreads and leads to costly repairs.
A persistent, stale, or earthy smell coming from the attic is often the first indication of mold. Even if you can’t see it, this odor signals moisture and potential mold growth behind walls or in hidden areas.
Black, green, or white spots on rafters, beams, or roof decking indicate mold colonies forming. These discolorations often appear where moisture has been trapped over time.
Wet, clumped, or discolored insulation shows that moisture is accumulating in the attic. Damp insulation not only reduces its effectiveness but also provides a breeding ground for mold.
Excessive moisture in the attic can cause metal components to rust or corrode. Rusty nails, brackets, or HVAC components can be a sign of long-term humidity problems that support mold growth.
Stains, discoloration, or watermarks on ceilings or upper walls may indicate leaks or condensation from the attic. These signs often accompany mold growth in the underlying structure.
Increased allergies, coughing, sneezing, or respiratory irritation in household members can signal airborne mold spores from the attic. While not definitive, these symptoms combined with other signs suggest a mold problem.
Identifying these signs early can prevent mold from spreading and causing structural or health issues. If any of these indicators appear, inspecting your attic or contacting a professional is crucial to address the problem promptly.
Fixing poor attic ventilation is essential for controlling moisture, preventing mold, and protecting your roof. A well-ventilated attic allows fresh air to enter and stale, humid air to escape, keeping the space dry and balanced.
Soffit vents allow cool, fresh air to enter the attic from the eaves. If they are missing or blocked, adding or clearing them will greatly improve airflow and reduce moisture buildup.
Ridge and roof vents allow warm, moist air to escape from the top of the attic. When paired properly with intake vents, they create continuous airflow that helps regulate temperature and humidity.
Gaps around light fixtures, attic hatches, and ductwork allow moist indoor air to rise into the attic. Sealing these openings keeps humidity from entering and reduces the strain on your ventilation system.
Insulation should never cover soffit vents, as this prevents fresh air from entering. Using baffles or vent chutes helps keep air pathways open while maintaining proper insulation coverage.
Powered or solar attic fans can help remove excess heat and moisture when natural airflow is not enough. They work best when there is adequate intake ventilation to replace the air being exhausted.
Improving attic ventilation requires a balance of fresh air intake, proper exhaust, and sealed air leaks. When these elements work together, your attic stays dry, energy-efficient, and protected from mold and moisture damage.
Good attic ventilation keeps moisture under control, protects your roof, and helps prevent mold. These simple tips can improve airflow and keep your attic in a healthier condition.
Following these tips will help your attic stay dry, cool, and well-ventilated. Consistent maintenance and proper airflow are key to preventing mold and long-term structural damage.
While proper ventilation is essential, other strategies can further reduce the risk of mold and moisture damage in your attic. Combining these measures with good airflow helps create a healthier, longer-lasting home environment.
Leaky ducts can release warm, humid air into the attic, increasing moisture levels. Sealing these leaks ensures that conditioned air stays in your living spaces and prevents excess humidity from building in the attic.
Vapor barriers installed in the attic or between living spaces can block moisture from rising into the attic. This helps reduce condensation on roof surfaces and keeps insulation dry.
Ensure all vents from bathrooms, kitchens, and laundry rooms exhaust directly outside instead of into the attic. This prevents unnecessary moisture from entering the attic space.
Even small leaks can introduce significant moisture and encourage mold growth. Regularly inspect the roof and repair damaged shingles, flashing, or gutters to keep water out.
Properly installed and dry insulation regulates temperature and reduces condensation. Replace wet or compressed insulation to maintain effectiveness and prevent mold from developing.
Preventing mold in the attic goes beyond ventilation alone. By controlling moisture sources, sealing leaks, and maintaining insulation, you can significantly reduce the risk of mold and protect your home’s structure and indoor air quality.
Yes, poor attic ventilation can cause mold. Trapped heat and moisture create the ideal environment for mold to develop, which can damage wood, insulation, and roofing materials while also affecting the air quality in your home. Recognizing the signs early and understanding the risks is essential for protecting your attic and living spaces.
Addressing poor ventilation through proper airflow, sealing leaks, and maintaining insulation, combined with other moisture-control measures, can effectively prevent mold growth. Regular inspections and maintenance ensure your attic remains dry, healthy, and structurally sound, safeguarding your home from long-term damage.
Dark streaks on a roof show up slowly, then one day they’re all you can see from the street. At that point, pressure washing starts to sound like a quick fix as it works wonders on driveways and sidewalks.
A roof, though, is built in layers, designed to shed water, not take a direct hit from it. Is Pressure Washing a Roof Bad?High-pressure spray removes surface growth, but it can strip protective granules, force water beneath shingles, and loosen materials that were never meant to be pushed from below.
Is Pressure washing a roof bad? Pressure washing promises instant results, and that can be tempting when time is tight or curb appeal feels urgent. The roof may look cleaner in a single afternoon, but that clean look can come at a cost that shows up later as leaks, repairs, or a roof that suddenly seems to age faster than it should.
At a glance, a roof looks solid and fixed in place, built to take on years of sun, rain, and wind without much complaint. However, roofing systems rely more on careful layering and surface protection than brute strength.
Water is meant to flow across the surface and move away quickly. When water arrives with force and direction it was never designed to handle, the behavior of the materials changes in subtle but important ways.
Pressure washing introduces energy that roofing materials do not normally face. Instead of gravity guiding water downward, the spray pushes laterally and upward, which alters how surfaces respond.
That force does not spread evenly. Concentrated streams strike small areas with enough impact to disturb materials that appear stable from the ground, especially along edges, overlaps, and seams.
On asphalt shingles, pressurized water can dislodge protective granules that shield the underlying asphalt from sunlight. Those granules do not grow back, and once they wash away, the exposed surface absorbs more heat and wears faster.
A roof succeeds because water stays on the outside. Pressure washing changes that balance by pushing moisture against laps, joints, and penetrations with enough strength to bypass natural barriers.
Once water slips beneath the surface, it follows paths that are hard to predict. Gravity no longer works in your favor once moisture reaches the underlayment or decking.
Insulation can absorb moisture unnoticed, wood can swell or soften, and fasteners can begin to corrode. By the time stains or leaks appear, the original cause often feels disconnected from the damage, which makes diagnosis harder and repairs more extensive.
The effects of high-pressure cleaning rarely look dramatic right away. A roof can appear cleaner and intact while small failures begin beneath the surface.
Those early changes tend to blend in with normal wear, which allows problems to progress without drawing attention. Granule loss can look like routine aging and lifted shingle edges may settle back into place after drying, even though their seal weakens.
Minor shifts in flashing may not show until heavy rain tests the system. Pressure washing does not always break a roof in a single moment, but it can shorten the margin of safety that keeps everything working as intended.
Roofing materials share a common purpose, but they behave very differently under stress. Each system relies on its own method of protection, attachment, and water control.
What works for one surface can create problems for another, especially when force replaces passive water flow. Some materials show damage quickly, while others hide it until weather and time expose weak points.
Asphalt shingles depend heavily on their outer layer to perform correctly. That top layer shields the asphalt core from heat and sunlight, which helps regulate aging and flexibility.
High-pressure spray can remove this protective layer unevenly. Granules wash away faster in some areas than others, which creates patchy exposure across the roof surface.
Once exposed, the asphalt beneath hardens more quickly, loses flexibility, and becomes more prone to cracking. Adhesive strips that help shingles stay sealed can also weaken, which increases the chance of wind lift.
Tile roofs appear rigid and substantial, but they rely on precise placement and balance rather than strength alone. Each tile rests in position as part of a larger system designed to shed water through overlap.
Pressure washing can introduce stress where tiles were never meant to flex. Small fractures can form without visible breakage, especially along edges and corners.
Individual tiles may shift slightly, which opens pathways for water beneath the surface. Once alignment changes, surrounding tiles can lose support, increasing the risk of broader issues over time.
Metal roofs handle weather well when their protective finishes remain intact. These coatings prevent corrosion and help regulate heat absorption across the surface.
Pressurized water can strip or thin those finishes, particularly along seams and fastener lines. Exposed metal reacts more quickly to moisture and air, which raises the chance of corrosion.
Fasteners may loosen under repeated force, and sealants around penetrations can degrade faster. The roof may still look sound, but its ability to resist water and temperature changes can decline.
Slate is dense and long-lasting, but it does not tolerate sudden impact or flexing. Each piece relies on its natural strength and precise placement to function correctly.
Pressure washing can introduce localized stress that leads to cracking or edge breakage. Damage may not appear immediately, as slate can fracture internally before visible failure occurs.
Once a slate breaks or shifts, surrounding pieces can lose support.
Stone-coated roofing combines a metal base with an adhered stone surface. That layered design depends on strong bonding between materials to remain effective.
Pressurized water can weaken that bond over time. Stone granules may release unevenly, and the underlying coating can wear away faster than intended.
As layers separate, the roof loses both protection and uniform performance.
Immediate results can create a sense of reassurance. A clean surface suggests progress, and the roof may appear refreshed from the street.
That visual change can mask deeper shifts that take place beneath the surface layers. Small disruptions caused by force tend to compound as weather cycles repeat, which allows minor issues to evolve into larger structural concerns.
Roofing systems rely on surface integrity to manage heat, moisture, and movement. When that surface loses consistency, the materials beneath work harder to perform the same function.
Granule loss, weakened coatings, and loosened components all reduce the margin that protects the roof from daily exposure. As that margin narrows, aging accelerates.
Shingles may stiffen sooner, sealants can fail earlier, and protective finishes can wear away at a faster pace than expected.
Moisture does not need a visible leak to cause harm. Small amounts that enter beneath the surface can linger, especially in shaded or insulated areas.
Wood decking can absorb that moisture and lose strength over time. Insulation may compress or lose effectiveness, which affects temperature control inside the building.
Metal components can corrode quietly, weakening connections long before rust becomes visible.
Damage related to pressure washing rarely points back to a single event. Problems surface gradually, which complicates inspection and diagnosis.
Repairs often involve more than surface fixes. Sections of underlayment may require replacement, flashing may need adjustment, and compromised materials can demand partial tear-offs.
Costs tend to rise because the original source of damage blends into normal wear, which delays corrective action.
Roof warranties and insurance policies rely on proper care and approved maintenance methods. Cleaning practices that fall outside those guidelines can shift responsibility.
Claims may face challenges when damage traces back to improper pressure use. Manufacturers and insurers can view that damage as avoidable, which leaves repair costs uncovered.
What began as routine maintenance can turn into an expense that offers no protection or recourse.
A roof stays in good condition when cleaning supports its original design. The safest methods focus on removing buildup without disturbing surface protection or forcing water where it does not belong.
Gentle cleaning methods address the root of discoloration and organic growth instead of relying on impact. This approach reduces risk across all roofing types and preserves the systems that keep water moving in the right direction.
Soft washing uses low water pressure combined with cleaning solutions to treat organic growth and stains.
The approach avoids mechanical stress and preserves the roof’s layers and coatings.
Specialized chemical cleaners focus on removing biological buildup without harming roofing materials.
They neutralize contaminants and work with water to create a safer cleaning process.
Localized growth often appears in valleys, shaded areas, or sections near overhanging branches.
Manual methods allow precise control and minimize risk to surrounding materials.
Rinsing is essential to complete the cleaning process, but it must follow the slope and natural drainage patterns of the roof.
Controlled water flow maintains the integrity of the system.
Cleaning a roof safely affects how well your roof continues to protect the space beneath it. When you maintain the surface carefully, you reduce the chance of leaks developing, and that can save a lot of stress and expense later.
A roof that stays intact with its layers and coatings preserved keeps water where it belongs, instead of letting it seep inside and cause damage. Leaks that reach the interior often reveal themselves through stains, damp insulation, or warped materials.
Addressing a roof from the outside with gentle cleaning methods helps prevent these issues before they ever appear indoors. At the same time, knowing how to fix a leaking roof from the inside gives you a backup plan if water manages to get through.
