Fixing a leaking roof from the inside can be a temporary but crucial solution, especially during heavy rain or when immediate outside access is unsafe. The most effective way to stop a roof leak from the inside is to contain the water, locate the source, and apply a temporary patch using roofing tar or a rubber sealant. This internal approach won’t permanently fix the issue, but it can prevent water damage until proper exterior repairs are made.
Below, we’ll walk through step-by-step instructions on how to fix a leaking roof from the inside. It also includes materials you'll need, safety tips, and how to know when it's time to call a professional roofer. You’ll also learn the signs of roof leaks, common causes, and how to prevent them in the future.
A leaking roof doesn’t always begin with a dramatic water drip. Many leaks develop gradually, and by the time water starts pouring through the ceiling, underlying damage may already be extensive. Recognizing the early signs of a roof leak gives you a critical opportunity to stop the problem before it spreads.
Here’s a breakdown of common symptoms to watch for some obvious, some subtle, but all potentially linked to moisture intrusion from above.
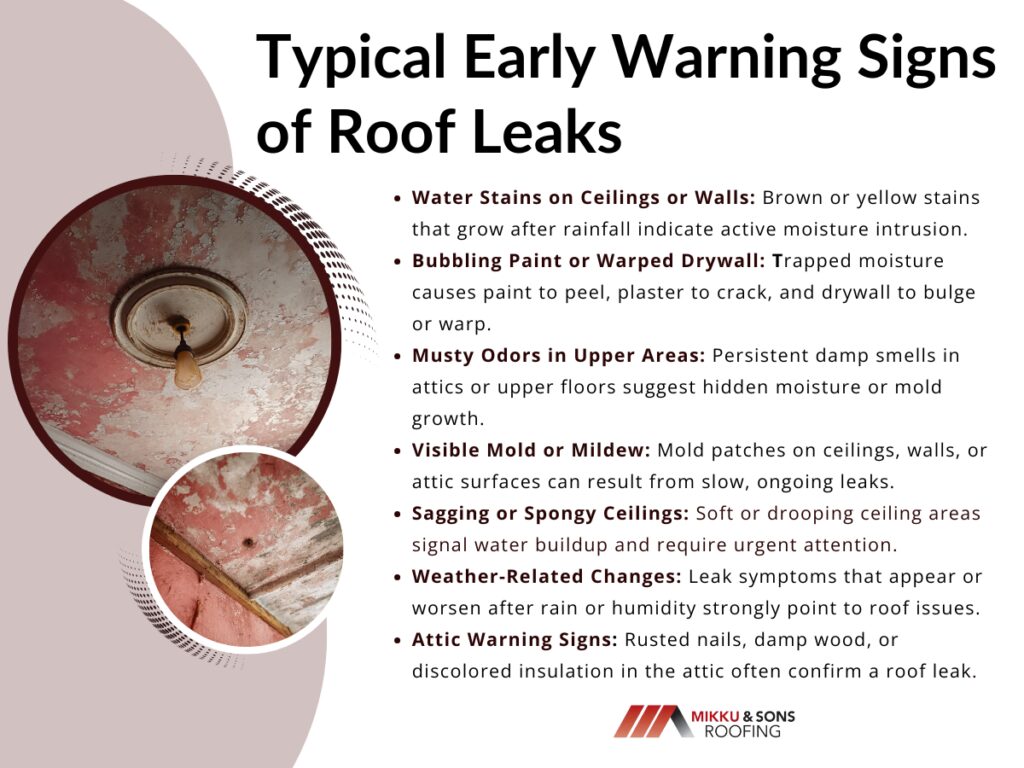
Perhaps the most well-known sign of a leak is the appearance of brown, yellow, or copper-toned stains on the ceiling or high on your walls. These irregularly shaped blotches often expand slowly over time, especially after heavy rainfall or snowmelt.
You may see a halo effect as moisture continues to seep into the drywall. Water stains can appear far from the actual leak because water travels along rafters or insulation before showing itself. A water stain that darkens after each storm is a strong indicator that the leak is still active.
Moisture trapped behind walls or ceilings often causes materials to warp, swell, or separate. You might notice paint that peels or bubbles along the ceiling line, or drywall that bulges outward slightly.
In older homes with plaster finishes, leaking water can lead to cracks or chipping, especially around corners and window trim. If your ceiling looks uneven or patchy, don’t ignore it moisture may be building up behind the surface.
Sometimes the first clue of a leak is something you smell. A persistent musty or earthy odor in your attic or upper-story hallway often signals mold or mildew growth. Even if you can’t see mold yet, the smell indicates lingering moisture possibly from a roof leak.
If the odor intensifies after a rainstorm or you’ve ruled out plumbing issues, it’s time to investigate the attic space for signs of wet wood or insulation.
Small mold patches on ceilings, walls, or attic surfaces can develop quickly in the presence of a slow leak. You might spot dark black spots, white powdery growth, or green blotches near roof vents, chimneys, or bathroom ceilings.
Even if mold appears far from the roofline, water could have traveled through framing or ductwork. Any indoor mold should be taken seriously, especially when combined with other leak symptoms.
If a portion of your ceiling feels soft when touched or visibly sags, there’s likely water pooling behind it. In severe cases, these areas may droop or bubble outward, forming a bulge in the drywall or plaster.
This can be dangerous not only structurally but also because of the risk of a sudden ceiling collapse. You may also notice drywall seams cracking or tape pulling away.
At this stage, the leak has likely been active for some time and needs urgent attention.
Do stains seem to grow after every storm? Does a smell return only during humid days? When signs of moisture appear, disappear, and reappear based on rain or outdoor temperature, that strongly points to a roof-related issue.
Some leaks may only be visible during wind-driven rain or after snow starts melting on the roof. Tracking the timing of these signs helps pinpoint the source and confirms that the roof is the likely entry point.
If you have attic access, use a flashlight to look at the rafters and underside of the roof deck. You may see rust around nails, damp wood, or dark trails that suggest water flow. Mold or mildew in insulation can also show up here before making its way into finished spaces.
Your attic can reveal clues before they show on interior ceilings, especially if the leak is small or seasonal.
Finding water dripping from your ceiling is stressful but staying calm and taking the right first steps can make a big difference. Your immediate goal should be to contain the leak and prevent further damage to your home’s interior.
As soon as you notice the leak, place a bucket or deep container directly underneath the drip to catch the water. If splashing becomes an issue, place a towel inside the bucket or lay a wooden board across the top to minimize noise and water spread.
Protect nearby furniture, rugs, and flooring by laying down plastic sheeting or absorbent towels. Move any electronics or valuables away from the area. It’s also wise to keep a mop or additional towels nearby in case the leak spreads.
If water is pooling above the ceiling drywall, you might see a swollen or bulging area forming. This is a warning sign of a heavy water pocket that could collapse suddenly. Use a screwdriver or utility knife to puncture the lowest point of the bulge and let the water drain in a controlled stream.
Be sure to have a bucket in place underneath before puncturing. While it might seem risky to poke a hole in your ceiling, controlled drainage is safer than waiting for a ceiling collapse.
After the immediate mess is under control, you can begin diagnosing the source of the leak and preparing for temporary or permanent repairs.
Tracking down the exact source of a roof leak is often harder than it sounds. Water doesn’t always drip straight down it can follow beams, wires, or insulation for several feet before emerging through your ceiling. That’s why the visible leak is rarely directly under the entry point on your roof.
If it’s safe to do so, inspect your attic during the rain or shortly afterward. Bring a bright flashlight and wear protective clothing, especially if insulation is involved.
Look for:
If you see a wet area on insulation, peel it back and follow the trail up the rafter or decking until it disappears. The highest visible wet point is typically closest to the actual roof entry.
For homes with heavy insulation or no attic access, locating the leak becomes trickier. In those cases, you may need to rely on a moisture meter or consult a roofing professional who can assess the situation more thoroughly from outside.
Once you've located the leak, it's time to gather the right tools for a temporary patch. Keep in mind this is a stopgap measure you'll still need to make permanent exterior repairs when the weather allows.
Here’s what you should have on hand:
Choose products labeled for wet application and waterproof sealing. Many hardware stores carry emergency leak patch kits that are ideal for quick indoor fixes.
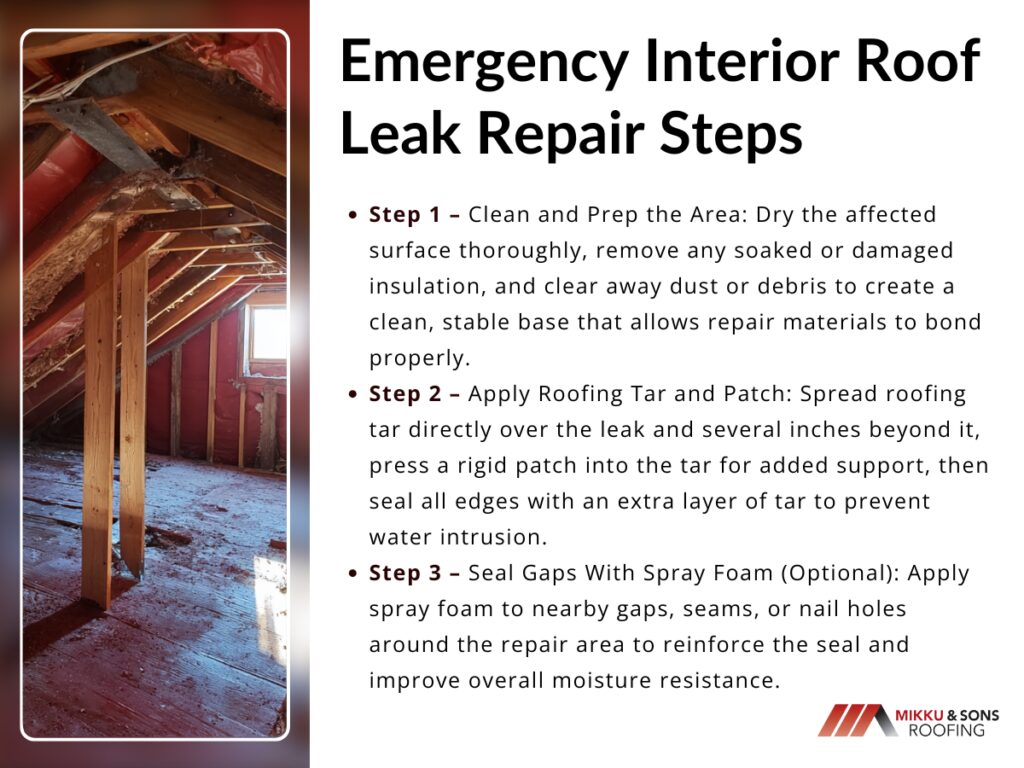
A successful interior roof patch requires careful application of materials and a clean, stable working area. Follow these steps to apply a temporary patch that can hold until a roofer makes a full exterior repair.
Use a cloth, sponge, or paper towels to dry the surrounding surface as much as possible. If insulation is soaked, remove it carefully and set it aside for later replacement.
Clearing debris and drying the wood gives your patch materials a better chance of adhering securely. Avoid using a heat source like a hairdryer in the attic it can be a fire hazard near insulation.
Use your putty knife to spread roofing tar directly over the leak point, pressing it into cracks or seams in the wood. Cover a radius of at least 6 to 8 inches around the leak to ensure a tight seal.
Next, press a piece of shingle, plywood, or metal patch over the tarred area. This gives structure to the patch and prevents further tearing or sagging.
Apply another thick layer of tar around the edges of the patch to lock everything in place. Smooth it down to remove air bubbles and gaps.
If there are visible gaps, joints, or nail holes nearby, spray foam insulation can add an extra layer of protection. It expands into crevices and dries into a solid, water-resistant barrier.
Just be cautious not to overfill excess foam can push materials apart or make later repairs more difficult. Allow the foam and tar to fully cure according to the product instructions before replacing insulation or sealing the attic again.
Fixing a leaking roof from the inside is only a short-term solution. The real fix involves exterior repairs or full roof replacement, especially if leaks are frequent or your roof is aging.
For reliable results, plan for a full inspection once the weather clears. A professional roofer can check the shingles, flashing, underlayment, and deck for damage that’s not visible from inside.
In some climates, replacing a roof during dry months like fall or early spring ensures better sealing and fewer delays.