The most expensive part of replacing a roof is usually the labor and structural work, not the shingles themselves. Many homeowners assume roofing materials make up the majority of the cost, but in reality, labor, tear-off work, hidden repairs, and installation complexity often consume the largest portion of the budget.
Depending on the roof type and condition of the home, these costs can quickly increase beyond the original estimate.Roof replacement is one of the biggest maintenance investments homeowners make.
While a new roof improves protection, energy efficiency, and property value, the pricing structure can feel confusing. Some roofs cost only a few thousand dollars, while others climb into tens of thousands.
The difference usually comes down to the roof’s size, slope, materials, accessibility, and the condition underneath the old roofing system. Understanding where the money goes helps homeowners prepare financially and avoid surprises during the project.
What is the most expensive part of replacing a roof? Once you know which parts of roof replacement cost the most, it becomes easier to prioritize quality, compare estimates, and make better long-term decisions.
Labor often accounts for 40 to 60 percent of the total roof replacement cost. Roofing is physically demanding, highly skilled work that requires safety precautions, technical knowledge, and careful installation methods.
Even a high-quality roofing material will fail prematurely if installed incorrectly. Roofing crews do far more than simply place shingles on a house.
They remove old materials, inspect the decking, install underlayment, secure flashing, seal vulnerable areas, and ensure proper ventilation. Each step takes time, precision, and coordination.
The complexity of the roof has a major impact on labor pricing. A simple single-story roof with few angles costs significantly less to replace than a steep roof with dormers, skylights, chimneys, or multiple valleys.
Complex roofs require additional cutting, custom flashing, harness systems, and slower installation speeds.
Roofing is considered one of the more hazardous construction jobs. Contractors must carry insurance, provide safety equipment, and comply with regulations. These operational costs are built into labor pricing.
Weather conditions also affect labor. Roofers often work in intense heat, wind, or cold conditions while handling heavy materials at dangerous heights. Experienced roofing crews charge higher rates because they reduce the risk of installation errors that can lead to leaks or premature failure.
Another reason labor is expensive is the time involved. A large residential roof may require several days or even a full week of coordinated work. Commercial roofs or specialty materials can take much longer.
The shape and design of the roof directly influence labor costs. Roofs with steep slopes require additional safety equipment and slower movement, increasing the time required to complete the job.
Features that increase labor expenses include:
Even the location of the property matters. Homes in urban areas or neighborhoods with limited parking and tight spacing may require extra setup time and specialized equipment.
Hiring skilled roofers may seem expensive upfront, but poor workmanship creates much larger problems later. Improper flashing installation, poor ventilation, or uneven shingle placement can lead to leaks, mold, structural rot, and higher energy bills.
Experienced contractors understand building codes, weatherproofing methods, and manufacturer requirements. Many roofing manufacturers also require certified installation for warranty coverage to remain valid.
Choosing the cheapest contractor often leads to additional repair costs within a few years, which ultimately makes the project more expensive in the long run.
Structural repairs are one of the most unpredictable and expensive parts of replacing a roof. Once contractors remove the old roofing materials, they sometimes discover hidden damage beneath the surface.
Water intrusion is the most common cause of structural issues. Leaks that go unnoticed for years can rot roof decking, weaken rafters, damage insulation, and create mold growth inside the attic.
Many homeowners receive an initial estimate only to face additional costs after the roof tear-off reveals hidden deterioration.
Roofers frequently uncover problems such as:
These issues cannot simply be covered with new shingles. They must be repaired before installation continues, otherwise the new roof will not perform properly.
Water damage spreads slowly over time. A small leak near flashing or vents may eventually affect large sections of the roof structure. Moisture weakens wood, encourages mold growth, and compromises the integrity of the home.
If homeowners switch to heavier roofing materials such as slate or concrete tiles, structural reinforcement may also be necessary. Heavier systems require stronger framing to support the additional weight safely.
Structural repairs are expensive because they involve carpentry work, additional materials, and more labor hours. In severe cases, contractors may need to rebuild sections of the roof framework entirely.
One of the smartest financial decisions homeowners can make is setting aside a contingency budget. Most roofing professionals recommend reserving an additional 10 to 20 percent of the project cost for unexpected repairs.
This extra budget reduces stress if hidden damage appears during the project. Without it, homeowners may face delays or financing challenges halfway through the replacement.
Roofing materials can become the most expensive part of the project when homeowners choose premium systems. While asphalt shingles remain relatively affordable, materials such as slate, metal, and clay tiles dramatically increase costs.
The material choice affects not only the upfront price but also installation requirements, durability, maintenance, and long-term value.
Different roofing systems perform differently depending on climate, aesthetics, and homeowner priorities.
Here is a general comparison of common roofing materials:
| Material | Cost Per Square Foot | Lifespan | Key Advantage |
| Asphalt shingles | $3–$5 | 20–30 years | Affordable and common |
| Metal roofing | $7–$12 | 40–70 years | Durable and energy efficient |
| Clay tiles | $10–$25 | 50–100 years | Long-lasting and attractive |
| Slate roofing | $15–$30 | 75–100+ years | Premium appearance and longevity |
| Wood shakes | $6–$12 | 25–30 years | Natural appearance |
Premium materials often require specialized labor as well. Slate and tile roofing installation is slower and more technically demanding, which further increases overall costs.
High-end materials offer durability and visual appeal, but they also increase labor requirements. Clay and slate tiles are heavy, fragile during installation, and require precise placement.
Metal roofing may seem straightforward, but standing seam systems require specialized equipment and trained installers. Improper metal installation can lead to expansion issues, noise problems, or leaks.
In many cases, homeowners pay more for the installation expertise than for the raw materials themselves.
Tearing off the old roof is another major expense homeowners often underestimate. Before new materials can be installed properly, contractors must remove existing roofing layers and inspect the structure underneath.
The cost of removal depends on roof size, roofing material, accessibility, and disposal requirements.
Several factors influence tear-off pricing:
Older homes sometimes contain several layers of roofing from previous renovations. Removing these layers takes more labor and increases disposal costs significantly.
Roofing debris is heavy and bulky. Contractors must rent dumpsters, transport waste, and pay landfill disposal fees. Materials such as asphalt shingles create substantial waste volume.
Some older roofs may even contain hazardous materials like asbestos, which require specialized removal procedures and significantly higher disposal costs.
Although overlay installations exist, covering old roofing materials with new shingles is usually not recommended. Skipping tear-off can trap moisture, hide structural damage, and shorten the lifespan of the new roof.
Proper tear-off allows contractors to inspect the decking thoroughly and create a stable foundation for the new roofing system.
Permits and building code compliance add unavoidable costs to roof replacement projects. While these expenses may not dominate the budget, they are critical for legal and safety reasons.
Local governments require permits to ensure roofing work meets structural and weather resistance standards.
Roof permits typically involve:
Building inspectors confirm that the installation meets local regulations regarding fire resistance, ventilation, drainage, and wind performance.
Older homes may require upgrades before a new roof can be approved. Contractors may need to improve ventilation systems, reinforce decking, or install additional moisture barriers to comply with modern codes.
These upgrades increase costs but improve the roof’s long-term safety and durability.
Some homeowners try to avoid permit costs, but doing so creates serious risks. Unpermitted roofing work can lead to fines, insurance problems, failed home inspections, and reduced resale value.
If problems develop later, insurance companies may deny claims related to improperly permitted work.
Reducing roof replacement costs is possible without choosing poor-quality materials or inexperienced contractors. Smart planning and informed decisions help homeowners balance affordability with durability.
The goal should not be finding the cheapest roof possible. Instead, homeowners should focus on getting the best long-term value for their budget.
A detailed inspection before replacement helps uncover hidden problems early. Contractors can identify structural concerns, moisture issues, and ventilation problems before the project begins.
This reduces surprise costs during installation.
Expensive roofing systems are not always necessary. Asphalt shingles remain a reliable option for many homes, especially when installed correctly.
Homeowners should balance aesthetics, durability, climate suitability, and maintenance requirements before choosing materials.
Obtaining multiple estimates helps homeowners compare pricing, warranties, and installation methods. The cheapest estimate is not always the best choice, especially if it excludes important components.
A good roofing quote should clearly explain labor, materials, tear-off costs, and warranties.
Roof replacements often uncover hidden problems. Having an emergency reserve helps homeowners handle unexpected repairs without delaying the project.
Financial preparation reduces stress and prevents rushed decisions.
Roofing demand is usually highest during warmer months. Scheduling replacement during slower seasons may reduce labor pricing and improve contractor availability.
However, weather conditions still need to be suitable for proper installation.
The most expensive part of replacing a roof is usually the labor, structural repairs, and hidden work beneath the shingles. While materials certainly affect pricing, much of the total cost comes from skilled installation, tear-off procedures, safety requirements, and correcting underlying structural issues.
Homeowners who understand these costs are better prepared to budget realistically and avoid unpleasant surprises during the project. Investing in quality workmanship and proper materials protects the home far longer than choosing the cheapest option available.
A roof is more than just shingles visible from the street. It is a complete system designed to protect the structure from water, weather, heat, and long-term deterioration. When installed correctly, a quality roof can provide decades of durability, energy efficiency, and peace of mind.
In the end, the true value of roof replacement is not measured only by the upfront price, but by how well the roof performs for years after the project is complete.
Properly disposing of old roofing materials starts with correctly identifying the waste, safely removing it from the structure, and ensuring it is sorted and delivered to the appropriate recycling or disposal facility. Doing this properly not only keeps the project site safe and organized but also helps reduce environmental harm and ensures compliance with local regulations.
This article also briefly covers the main types of roofing waste, safe removal practices, recycling options, professional disposal services, local regulations, environmental impacts, and cost considerations to guide a responsible roofing project from start to finish. Let's look at how to dispose of old roofing material properly.
Roofing replacement projects generate a variety of materials, and understanding what you are dealing with is the first step toward proper disposal. Each type of roofing waste requires different handling, recycling, or disposal methods to ensure safety and environmental compliance.
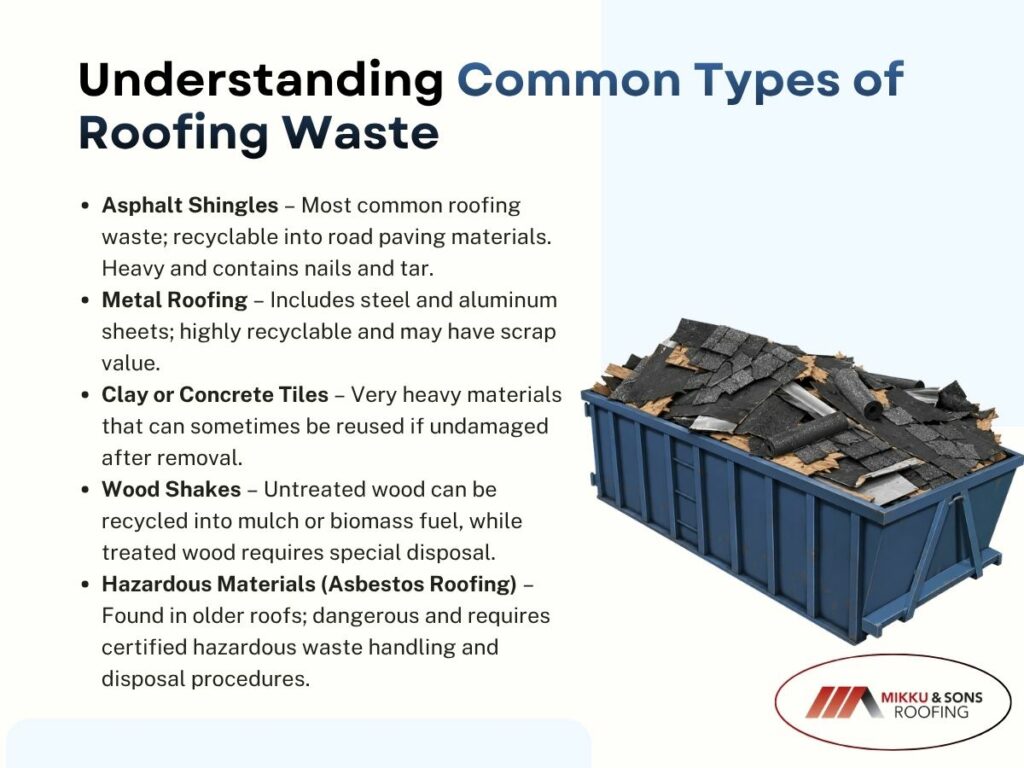
These are the most common roofing waste and are often recyclable into road paving materials. They are heavy and usually contain nails and tar, requiring careful handling.
Metal sheets such as aluminum or steel are highly recyclable and often have scrap value. They must be separated from other debris like wood or insulation before disposal.
Clay or concrete tile materials are very heavy and can often be reused if they remain intact after removal. Broken pieces are typically sent to construction waste or used as fill material.
Untreated wood shakes can sometimes be recycled into mulch or biomass fuel. However, treated wood must be disposed of properly due to chemical coatings.
Older roofs may contain asbestos, which is highly dangerous and requires certified hazardous waste removal. It should never be mixed with regular construction debris.
Understanding these waste types helps ensure proper sorting, safer handling, and more efficient recycling or disposal. Proper classification at the start also reduces costs and prevents environmental harm during the roofing cleanup process.
Safe removal and proper on-site handling of roofing materials are essential for preventing accidents, minimizing environmental impact, and keeping the worksite organized. Following structured procedures ensures that debris is managed efficiently from the roof down to final disposal.
Workers should always wear Proper Protective Equipment (PPE) such as gloves, safety goggles, hard hats, and dust masks when handling roofing materials. This protects against sharp objects, dust exposure, and falling debris.
Place tarps or protective sheeting around the base of the structure to catch falling materials. This helps contain debris and makes cleanup faster and more organized.
Separate shingles, metal, wood, and other materials into designated piles or containers. Early sorting improves recycling efficiency and reduces disposal costs.
Roofing nails, broken tiles, and metal edges can cause injuries if not handled properly. Using magnetic rollers and proper containers helps reduce these risks.
Dumpsters and bins should not be filled beyond their capacity to prevent spills and transport hazards. Proper load management also ensures compliance with hauling regulations.
Proper on-site handling not only improves safety but also makes the entire disposal process more efficient. When materials are managed correctly from the start, recycling becomes easier and overall project cleanup is significantly reduced.
Recycling roofing materials is one of the most effective ways to reduce construction waste and lessen environmental impact. Many common roofing components can be repurposed or processed into new materials instead of ending up in landfills.
Old asphalt shingles can be processed and reused in road construction and asphalt paving. This reduces landfill waste and helps conserve raw materials used in road projects.
Metal roofing materials such as steel and aluminum are highly recyclable and retain significant scrap value. They are melted down and reused in manufacturing new metal products.
Intact tiles can often be cleaned and reused in new roofing or landscaping projects. Broken pieces are sometimes crushed and used as fill or base material in construction.
Untreated wood shakes can be chipped into mulch or used as biomass fuel. However, chemically treated wood must be processed carefully and may not always be recyclable.
Some recycling centers specifically handle mixed construction debris, including roofing waste. These facilities sort and process materials to maximize recovery and reduce landfill disposal.
Recycling roofing materials helps lower disposal costs, reduces environmental strain, and supports sustainable construction practices. Choosing the right recycling method ensures that valuable materials are reused instead of wasted.
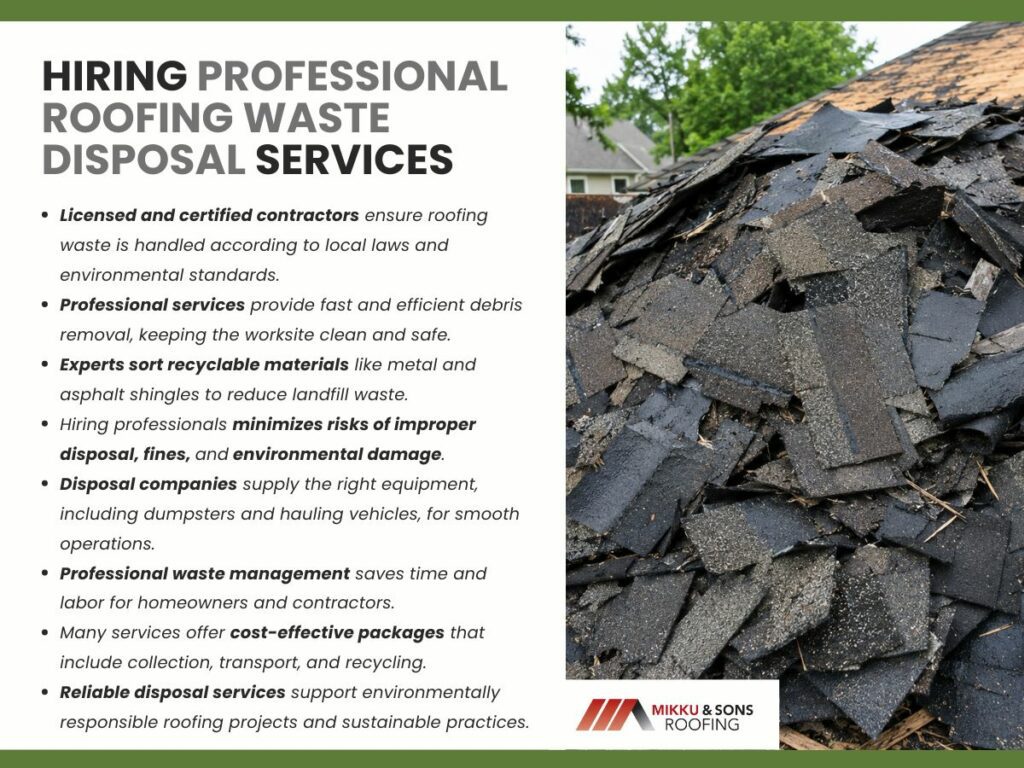
Hiring professional roofing waste disposal services is often the most efficient and compliant way to manage large amounts of roofing debris. These services handle collection, sorting, transport, and proper disposal, saving homeowners and contractors time and effort.
Overall, professional disposal services provide a reliable and hassle-free solution for managing roofing waste. They ensure safety, compliance, and efficiency while supporting environmentally responsible disposal practices.
Understanding and following local regulations for roofing waste disposal is essential to avoid penalties and ensure environmentally responsible practices. These rules vary by location and often dictate how materials must be sorted, transported, and disposed of.
Following local regulations helps ensure that roofing waste is handled safely, legally, and responsibly. Compliance not only avoids fines but also supports broader environmental protection efforts.
Improper disposal of roofing waste can cause significant environmental harm, affecting soil, water, air quality, and overall ecosystem health. Understanding these impacts highlights why responsible handling and disposal are essential.
Roofing materials are heavy and bulky, quickly filling up landfill space. This increases waste management pressure and reduces available disposal capacity for other materials.
Chemicals from roofing materials, such as asphalt or treated wood, can leach into the ground. This may contaminate soil and nearby water sources over time.
Burning roofing debris releases toxic fumes and particulate matter into the air. This contributes to air pollution and poses health risks to nearby communities.
Throwing away recyclable materials like metal or asphalt wastes valuable resources. This increases demand for new raw materials and further environmental strain.
Improperly dumped roofing waste can harm animals and damage natural habitats. Sharp debris and chemical exposure can threaten local ecosystems.
Improper roofing waste disposal has wide-ranging environmental consequences that extend beyond the construction site. Responsible management helps protect natural resources and supports long-term environmental sustainability.
Proper budgeting for roofing waste disposal is an important part of any roofing project, as costs can vary depending on materials, volume, and disposal methods. Planning ahead helps avoid unexpected expenses and ensures efficient waste management from start to finish.
Careful cost planning helps manage roofing waste disposal efficiently and prevents budget overruns. Considering material type, volume, transport, and recycling options ensures a more accurate and sustainable project budget.
Proper disposal of old roofing materials is an essential part of any roofing project, helping ensure that waste is managed safely, legally, and in an environmentally responsible way. Every stage - from identifying materials to safe removal and selecting appropriate disposal or recycling methods - contributes to a cleaner and more efficient process.
In the end, good planning, compliance with local regulations, and choosing sustainable options such as recycling or professional disposal services can help reduce both costs and environmental impact. Handling roofing waste correctly from start to finish supports safer job sites and promotes long-term environmental sustainability.
A foam roof typically needs to be replaced every 20 to 30 years, but that timeline depends heavily on maintenance, climate, and installation quality. Many property owners are surprised to learn that replacement is not always required at the first signs of wear, since recoating can extend the life significantly.
Understanding the difference between normal aging and serious damage is key to making the right decision. In most cases, consistent maintenance and timely recoating can delay full replacement and maximize the roof’s lifespan.
How often does a foam roof need to be replaced? This guide explains what affects foam roof longevity, how to spot warning signs, and when replacement becomes the smarter long term investment for property owners.
Foam roofing, also known as spray polyurethane foam roofing, is valued for its durability and seamless design. Unlike traditional roofing systems, it does not rely on seams or overlapping materials, which reduces the risk of leaks.
However, like any roofing system, it will eventually reach the end of its lifespan. The key is knowing whether replacement is truly necessary or if maintenance can extend its usability.
The most important thing to understand is that foam roofs are designed to last decades, not just a few years, when properly maintained. Many building owners mistakenly assume replacement is required once the surface shows wear, but that is not always the case.
In many situations, recoating restores protection and delays full replacement.
Most foam roofs last between 20 and 30 years. This estimate aligns with findings from the National Roofing Contractors Association in 2022, which reported that properly maintained foam systems often exceed their expected lifespan.
The foam itself is highly durable, and in many cases, it is the protective coating that wears down first rather than the underlying material. The thickness of the foam layer also plays a role in longevity.
Thicker applications tend to offer better insulation and durability, allowing the roof to withstand environmental stress more effectively. Over time, regular recoating helps preserve the structure and ensures the system continues performing as intended.
Recoating is one of the most valuable features of foam roofing systems. Instead of removing the entire roof, contractors can apply a new protective layer every 10 to 15 years. This restores the roof’s resistance to UV rays and moisture, effectively extending its lifespan without major disruption.
Full replacement becomes necessary when damage reaches beyond the coating. If the foam core is saturated with moisture or structurally compromised, recoating will not solve the problem. In those cases, replacing the entire system ensures long term durability and prevents further structural issues.
Several variables influence how long a foam roof lasts. While age is often the first consideration, it is rarely the most important one. Environmental exposure, installation quality, and maintenance practices all play a significant role in determining longevity.

The lifespan of a foam roof is shaped more by how it is maintained and protected than by its installation date alone. This means that two roofs installed at the same time may have very different outcomes depending on how they are cared for over the years.
Climate has a direct impact on foam roof performance. In regions with intense sunlight, UV radiation gradually breaks down protective coatings. A 2021 report from the U.S. Department of Energy highlighted that prolonged UV exposure is one of the leading causes of roofing degradation in warmer climates.
Rain and humidity also contribute to wear. While foam roofing is designed to resist water, long periods of standing water can weaken coatings and increase the likelihood of damage. In colder climates, repeated freeze and thaw cycles can cause expansion and contraction, placing additional stress on the roof.
The initial installation process sets the foundation for the roof’s lifespan. A poorly installed foam roof may develop problems early, even if the materials themselves are high quality.
Uneven application, inadequate thickness, or improper curing can all lead to reduced performance.Professional installation ensures that the foam is applied consistently and meets industry standards.
A well installed roof creates a seamless barrier that resists leaks and withstands environmental pressures. This reduces the likelihood of early replacement and improves long term reliability.
Maintenance is often the deciding factor in how long a foam roof lasts. Regular inspections help identify minor issues before they escalate into costly repairs. Most roofing professionals recommend inspections at least twice a year, along with additional checks after severe weather events.
Routine maintenance includes cleaning debris, checking for coating wear, and addressing small cracks or punctures. These simple actions help preserve the integrity of the roof and extend its lifespan significantly. Neglecting maintenance, on the other hand, allows damage to accumulate and increases the risk of early replacement.
Foot traffic is often overlooked, but it has a direct impact on the lifespan of a foam roof. Commercial buildings in particular may experience frequent rooftop access for HVAC maintenance, inspections, or equipment servicing.
Each instance of foot traffic can compress or damage the foam surface if proper walkways are not installed.Over time, repeated pressure can lead to surface wear, cracks, or even punctures in the protective coating.
This type of damage increases the risk of water infiltration and reduces the effectiveness of the roofing system. Installing designated walk pads and limiting unnecessary access can significantly reduce this risk and help preserve the roof’s condition.
The type and quality of coating used on a foam roof play a major role in its durability. Coatings act as the first line of defense against UV rays, moisture, and environmental wear.
Higher quality coatings, such as silicone or acrylic, offer better resistance and longer performance compared to lower grade materials.
Common foam roof coating options include:
According to a 2022 report by the Roof Coatings Manufacturers Association, premium coatings can extend roof life by more than a decade when properly maintained. Lower quality coatings may degrade faster, requiring more frequent reapplications and increasing long term costs. Choosing the right coating material from the start ensures better protection and reduces the likelihood of early replacement.
Knowing when to replace a foam roof requires careful observation and regular evaluation. While some issues can be repaired, others indicate deeper problems that require more extensive solutions. Recognizing these signs early helps property owners avoid more serious structural damage.
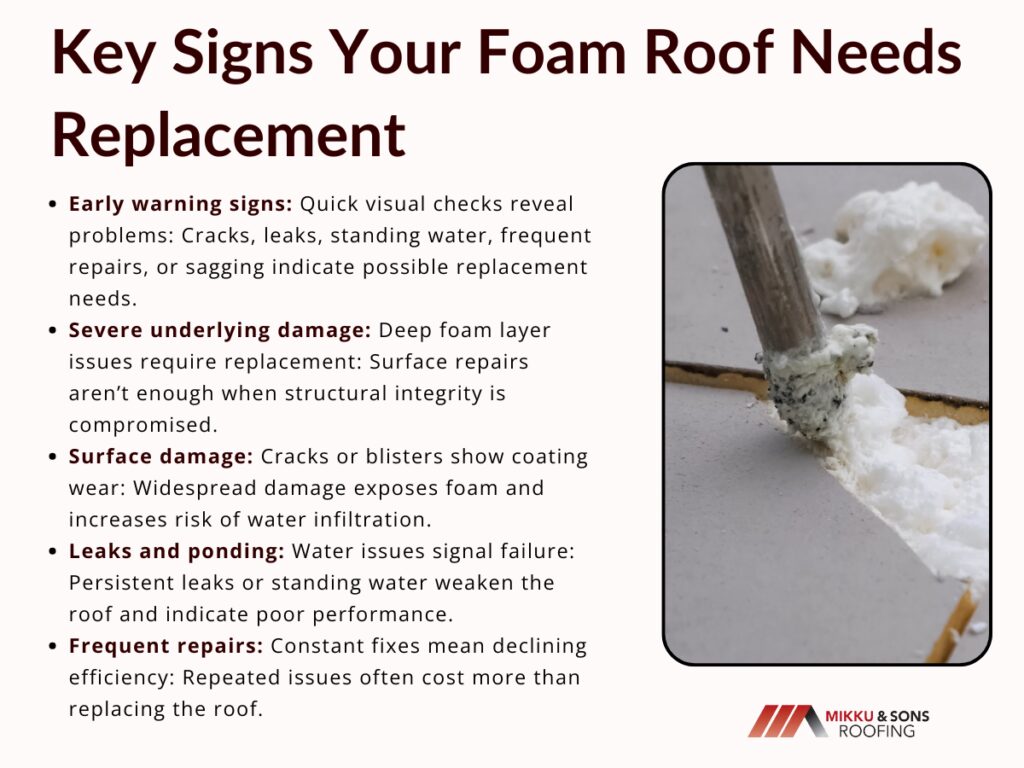
Instead of relying only on detailed explanations, some warning signs can be identified quickly during a basic visual check. These indicators help property owners decide when to call a professional for a closer inspection.
This quick checklist simplifies the evaluation process and complements the more detailed explanations that follow. It allows readers to quickly assess their situation before diving deeper into each issue.
When damage extends beyond the surface coating and compromises the foam layer, replacement becomes the most practical and reliable option. This distinction is essential for making informed decisions about roof care and investment.
Surface damage is one of the first indicators of wear. Small cracks or blisters may appear as the protective coating ages. While these issues can often be repaired, widespread damage suggests that the coating has deteriorated significantly.
When the coating fails, the foam underneath becomes exposed to environmental elements. This increases the risk of water infiltration and structural weakening. Addressing these issues early can prevent further damage, but severe cases may require replacement.
Leaks are a clear sign that the roofing system is no longer performing effectively. Even minor leaks can lead to significant problems if left untreated. According to a 2020 study by the Building Envelope Research Council, moisture intrusion is one of the leading causes of premature roof replacement.
Ponding water is another warning sign. While foam roofs can handle occasional water exposure, standing water over long periods can weaken the coating and lead to deterioration. Persistent ponding often indicates drainage issues that need to be addressed.
A roof that requires constant repairs may be nearing the end of its lifespan. While occasional maintenance is normal, repeated issues suggest that the system is no longer functioning efficiently.
Frequent repairs can become costly over time, often exceeding the cost of replacement. In these situations, investing in a new roof may provide better long term value and reduce ongoing maintenance concerns.
Choosing between recoating and replacement is a common challenge for property owners. Both options offer benefits, but the right choice depends on the condition of the existing roof and long term goals.
Recoating is typically the best option when the foam structure remains intact, while replacement is necessary when deeper damage affects the system’s integrity. Understanding the differences helps guide decision making and ensures the best outcome.
| Feature | Recoating | Replacement |
| Cost | Lower | Higher |
| Lifespan Extension | 10 to 15 years | 20 to 30 years |
| Installation Time | Shorter | Longer |
| Structural Changes | Minimal | Complete system renewal |
| Best For | Surface wear | Structural damage |
Recoating is less disruptive and can be completed more quickly, making it a practical choice for extending roof life. Replacement, while more expensive, provides a complete reset and eliminates underlying issues that cannot be resolved through surface treatments.
Extending the life of a foam roof is possible with consistent care and attention. Property owners who take a proactive approach often avoid premature replacement and reduce long term costs.
Consistent maintenance and timely intervention are the most effective ways to maximize the lifespan of a foam roofing system. Even simple steps can make a significant difference in overall performance.
Regular inspections allow property owners to monitor the condition of the roof and identify potential problems early. These inspections should focus on areas prone to wear, such as seams, edges, and drainage points.
By catching issues early, repairs can be made before damage spreads. This proactive approach helps maintain the roof’s integrity and prevents costly replacements.
Addressing minor damage promptly is essential for preserving the roof. Small cracks or punctures can quickly develop into larger problems if ignored. Timely repairs prevent moisture from entering the foam layer and causing structural damage.
This approach not only extends the life of the roof but also reduces overall maintenance costs. Property owners who stay on top of repairs often experience fewer major issues over time.
Protective coatings play a critical role in maintaining foam roofing systems. These coatings shield the foam from UV rays, moisture, and other environmental factors.
Reapplying coatings at recommended intervals helps preserve the roof’s performance.A well maintained coating layer can significantly extend the lifespan of the roof.
This makes recoating one of the most cost effective strategies for delaying replacement.
In real world scenarios, the timing of foam roof replacement depends on performance rather than age alone. While the general lifespan is 20 to 30 years, many roofs continue functioning beyond that range with proper care.
The key is evaluating the condition of the roof regularly and making decisions based on its performance.The decision to replace a foam roof should be based on its condition and functionality, not just the number of years since installation.
This approach ensures that property owners get the most value from their investment while maintaining a safe and reliable structure. Residential buildings often see longer lifespans due to less wear and limited foot traffic.
Commercial properties, on the other hand, may require earlier attention due to increased usage and environmental exposure. Industry guidance from the National Roofing Contractors Association recommends periodic evaluations to determine whether recoating or replacement is the best option.As property owners plan ahead, understanding replacement timing naturally leads to another important topic. Budgeting for foam roof replacement costs and exploring financing options can help ensure that when the time comes, the process is smooth and well prepared.
Arizona’s intense UV exposure and monsoon driven moisture cycles destroy asphalt shingles and tile underlayment far faster than national averages predict. Bad credit scores below 580 do not block every financing path for a roof replacement in this state.
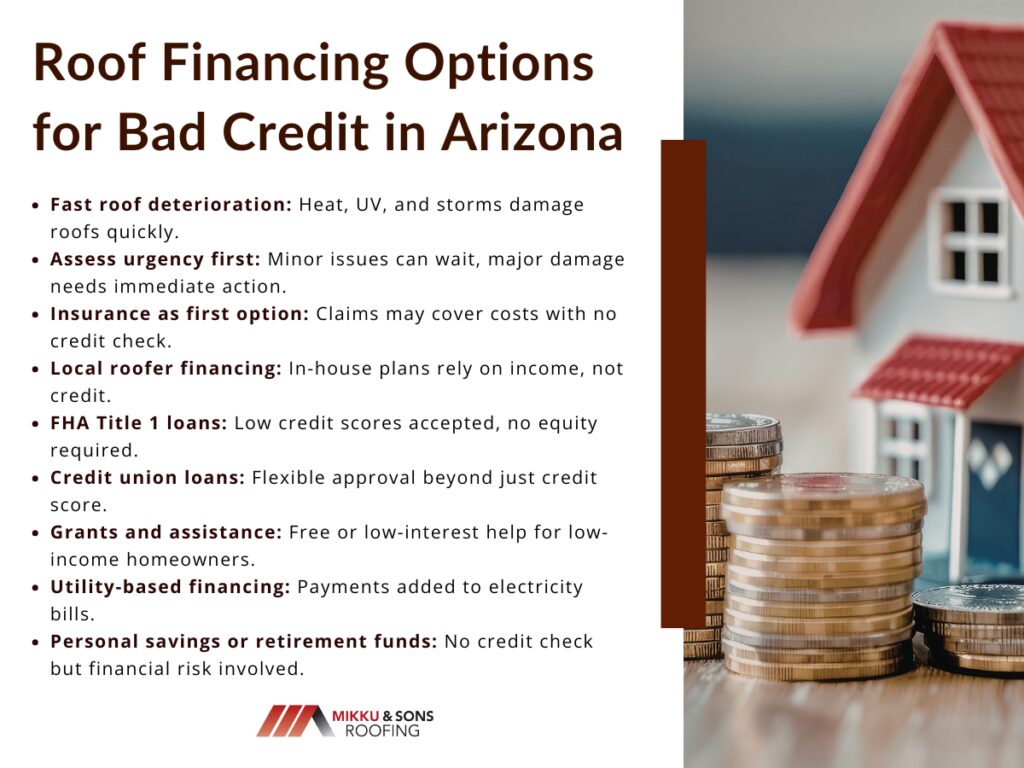
Insurance claim approvals for wind or hail damage can cover full tear offs with no credit check at all. Local Arizona roofing companies often offer in house payment plans that rely on income verification rather than your credit history.
FHA Title 1 loans require no home equity and accept scores as low as 580 for roof repairs or replacements. Weatherization assistance programs in Maricopa and Pima counties provide zero interest help to low income property owners regardless of credit. Let's look at how to finance a roof replacement with bad credit in Arizona .
Arizona's climate combines extreme heat with sudden moisture events that no standard roofing assembly can tolerate for long. The daily temperature swing on a Phoenix roof surface can exceed 80 degrees between dawn and afternoon, which cracks sealants and loosens fasteners over time.
Monsoon season introduces high winds that lift shingle edges and rain that finds every failed seam.
Arizona receives over 300 days of direct sunlight each year with UV indexes that regularly exceed 10. Asphalt shingles lose their oil content and become brittle within 10 to 12 years instead of the typical 25 year manufacturer warranty.
Wind speeds during an Arizona monsoon storm often reach 60 to 80 miles per hour in microburst patterns. These gusts create suction forces that pull tiles from their nails and peel back the edges of rolled asphalt products.
A roof deck that heats to 160 degrees in July then cools to 80 degrees at night expands and contracts repeatedly. This movement breaks the bond between roofing felt and decking, which allows water to travel underneath the visible surface layer.
A roof replacement in Arizona can wait under certain conditions but not under others. Misjudging the timeline leads to structural rot or ceiling collapse, especially after a late summer storm.
Three specific signs tell you to act immediately while other signs mean you have time to arrange financing.
A single small leak stain on an interior ceiling with no active dripping indicates a slow failure. Missing granules in gutters or a few cracked tiles on the ground suggest gradual wear rather than sudden failure.
A sagging roof deck visible from inside the attic or from the exterior signals structural compromise. Daylight seen through roof boards from below means the underlayment has failed completely and water entry is guaranteed.
An unsealed roof leak in July introduces humid outside air into a dry attic space. That moisture condenses on cool AC ducts at night and drips onto ceiling drywall, which accelerates mold growth within 48 hours.
Many people assume bad credit is the first hurdle for a roof replacement. In reality an insurance claim bypasses credit checks entirely because the policy pays the roofer directly.
Arizona's specific weather events create claim opportunities that other states rarely see.
A single windstorm that exceeds 50 miles per hour qualifies as a covered event under most standard policies. Hail damage that creates soft spots on asphalt shingles triggers full replacement approval rather than patch repairs.
Insurance adjusters look for a pattern of damage across the roof slope not just isolated hits. Arizona's monsoon season produces documented wind and hail events between June 15 and September 30 each year.
A denied claim can be appealed with a second inspection from an independent adjuster paid by you, not the insurance company. Arizona law allows policyholders to request a copy of the adjuster's report and the specific policy language used for the denial.
Local roofers in Arizona face the same heat and monsoon damage that you do on your property. Many of these companies have developed internal financing programs to keep work moving when banks say no.
These plans depend more on your job stability than your credit score.
The roofer takes a deposit of 25% to 50% and splits the remaining balance into three or four equal payments. Each payment is due on a specific date such as the first of the month regardless of when the work finishes.
Does the payment plan charge interest or is it a simple no fee split of the total price. What happens to the remaining balance if the roofer fails to complete the work on time.
A request for full payment upfront before any material arrives at your property signals high risk. An out of state phone number or a contract that lists a P.O. box instead of a physical Arizona address means you have no local recourse.
The federal government created Title 1 loans specifically for home repairs that protect the property's basic livability. Bad credit does not automatically disqualify an applicant because the loan requires no home equity and uses your income as the primary qualification.
Arizona has multiple FHA approved lenders who process these loans for roof replacements only.
The loan pays for a complete tear off and new roof installation but not for decorative upgrades like skylights or premium shingle colors. Single family homes qualify for up to $25,000 with a loan term of 20 years for a roof replacement.
Lenders typically approve scores between 580 and 620 with compensating factors such as low existing debt or steady employment. A score below 580 still allows approval if you put down 10 to 15 percent of the total cost as a cash deposit.
Credit unions in Maricopa County and Pima County process more Title 1 loans than national banks do. Desert Financial Credit Union and Arizona Central Credit Union both list Title 1 loans on their consumer repair finance pages.
Credit unions operate as nonprofit organizations that return profits to members as lower interest rates. A person with bad credit gets a fairer review at a credit union because loan officers look at your entire financial picture not just a three digit number.
Arizona has several credit unions that specialize in small personal loans for home repairs.
The loan officer reviews your monthly cash flow and your payment history with the credit union itself. A member who has kept a savings account active for two years earns more trust than a stranger walking in off the street.
Self-Help Federal Credit Union offers a Fresh Start loan product designed to help build or establish good credit. OneAZ Credit Union allows co signers on personal loans which improves approval odds significantly for roof financing.
A standard asphalt shingle roof on a 1,500 square foot Arizona home costs $8,000 to $12,000. A credit union personal loan of $10,000 with a 12 percent interest rate produces a monthly payment near $220 for five years.
Federal and state grant programs exist specifically for low income property owners who cannot afford emergency roof repairs. These grants do not require credit checks or repayment because the money comes from energy efficiency and safety funds.
Arizona's extreme heat qualifies roof replacements as a health and safety measure not just a home improvement.
The program covers roof repairs that stop air leakage and reduce cooling costs in summer months. Income limits are set at 200% of the federal poverty level which equals roughly $60,000 for a family of four.
Phoenix's Home Repair Program provides grants up to $10,000 for roof replacements on owner occupied homes. Tucson's Emergency Home Repair Program processes applications within 30 days for active leaks or structural damage.
Applicants must own their home and live in it as their primary residence with no second property. The typical wait time from application to approval runs 60 to 90 days which works for a slow leak but not an active collapse.
Arizona utility companies face high rates of unpaid bills when customers choose between electricity and roof repairs. Several providers now offer home repair loans that attach directly to your monthly electric service bill.
These programs use your payment history with the utility rather than your credit score for approval.
The utility company pays the roofer directly and adds a fixed monthly charge to your electric bill for two to five years. A missed payment triggers a utility shutoff warning instead of a collections call from an unknown lender.
Salt River Project runs a Home Improvement Loan Program that covers roof replacements up to $15,000. Tucson Electric Power partners with a local credit union to offer bill attached financing for customers with 12 months of on time payments.
The home must be in the utility's service territory and the account must show zero past due balances for the last six months. Roof repairs must address energy loss such as poor attic insulation or active leaks that force AC systems to run longer.
Retirement account rules allow penalty free withdrawals for primary residence repairs under specific conditions. A roof replacement qualifies as a necessary health and safety repair because a failed roof makes a home uninhabitable in Arizona's climate.
This option carries no credit check and no interest payments since you borrow your own money.
A 401k loan allows you to borrow up to 50% of your vested balance or $50,000 whichever amount is smaller. The repayment schedule takes five years with payments deducted automatically from your paycheck and interest paid back to your own account.
An IRA allows penalty free withdrawals for unreimbursed medical expenses or for a first time home purchase but not for roof repairs. A direct IRA withdrawal for a roof triggers a 10% penalty plus ordinary income tax on the amount taken.
A job loss during the repayment period converts the 401k loan into a taxable distribution with the full balance due by April of the next year. Borrowing $15,000 at age 40 removes that money from market growth which could cost $80,000 in lost retirement value by age 65.
Bad credit does not block every path to a new roof in Arizona because insurance claims and utility attached loans bypass credit checks entirely. Grants from local cities and weatherization programs offer zero interest help for low income owners who need immediate relief.
An FHA Title 1 loan accepts scores as low as 580 and the application process requires only three documents. Submit your most recent pay stubs, a property tax statement, and a written estimate from a licensed Arizona roofer to any FHA approved lender.
Approval takes two to four weeks for a government backed roof loan which is faster than waiting for a monsoon to turn a slow leak into a collapse. Start with a phone call to your local weatherization office or a credit union loan officer before your next storm hits.
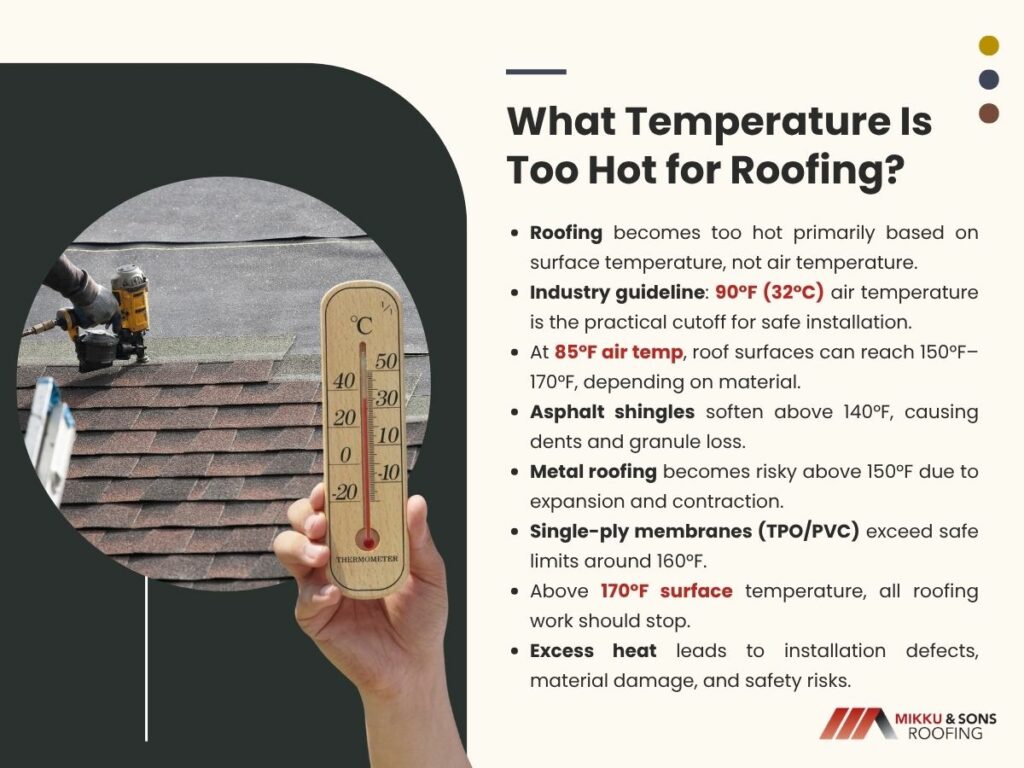
A roof surface under July sun often runs 30 to 40 degrees hotter than the reported air temperature. Each roofing material loses its structural integrity once that surface temperature crosses a specific threshold.
Thermal degradation starts well before a thermometer reads triple digits outside. A clear sky with an air temp of just 85°F can push dark asphalt shingles past 150°F, metal panels past 160°F, and single-ply membranes past 170°F.
A roof installed at the wrong temperature fails within months, not years. The failure traces back to one cause: installation outside the material's safe temperature range. What temperature is too hot for roofing? Let's find out.
The reported air temperature misleads most people. A roof assembly reacts to radiant heat from the sun, not just the ambient air around it.
The industry settled on 90°F as the practical cutoff. Above this point, installation defects become almost guaranteed rather than possible.
Surface temperatures on dark shingles can exceed 150°F at this air temperature. The asphalt binder loses stiffness and turns into a semi-fluid material under pressure.
Foot traffic leaves permanent indentations at these surface temps. Each step embeds granules deeper into the softened base layer.
Weather stations measure air temperature in shaded, ventilated boxes. A roof receives no such shade and faces direct radiative heating all day.
The difference between air temp and roof surface temp can reach 60°F on a clear day. A roofer who trusts only the weather report will install bad roofs repeatedly.
Roof surfaces hit their peak temperature by 11 AM on most summer days. Morning installation windows shrink fast once the sun gets high.
A roof that measured safe at 8 AM can fail the hand test by 9:30 AM. Crews lose productive hours not because the air got hot but because the shingles did.
Each defect traces back to one root cause. The surface temperature at install exceeded the material's safe working range.
Each roof material responds to extreme heat in a distinct way. The common factor across all types is a loss of structural integrity once a specific temperature threshold gets crossed.
Heat degrades the physical properties that make a roof waterproof and stable. Installation at improper temperatures guarantees premature failure regardless of material quality.
The asphalt binder liquefies above 140°F surface temperature. This liquid state allows the shingle to stretch, compress, and deform under any pressure.
Granules embed too deep into the softened layer. Loose granules then wash off and expose the bare asphalt to UV degradation.
Metal panels expand at a rate of approximately 1 inch per 100 feet per 100°F temperature rise. Installation in extreme heat causes panels to shrink and pull apart at seams once they cool.
Fastener holes elongate as the metal moves. Elongated holes create leak paths and loose fasteners that fail under wind load.
Single-ply membranes become overly soft and stretchy when surface temperatures exceed 160°F. A soft membrane tears easily from foot traffic or tool drops.
Seam welds made at extreme heat can fail later because the material contracts unevenly. Contracted seams pull apart at the weld line during the first cold night.
Torch-applied modified bitumen traps air between layers more easily in high heat. Trapped air expands and forms blisters that can span several feet.
Blisters rupture under foot traffic or from thermal cycling. Ruptured blisters expose the base sheet directly to weather.
Tiles absorb intense radiant heat but cannot expand uniformly due to their rigid composition. This non-uniform expansion creates internal stress that leads to hairline cracks.
A tile installed at peak heat then cools rapidly at sunset. Rapid cooling snaps tiles along those stress lines.
Surface temperature matters more than air temperature for every roof type. A roofer needs direct measurement tools and field tests to make the call.
Each method has a specific pass-fail threshold tied to the material being used.
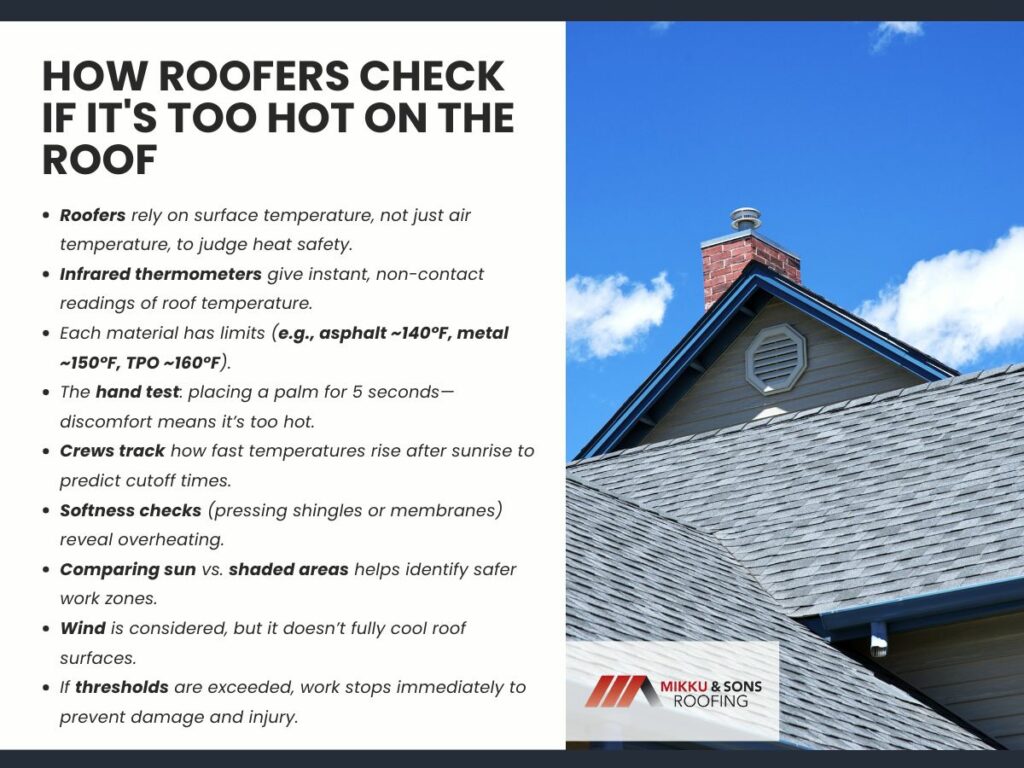
An infrared thermometer reads surface temperature from a distance without contact. The device measures radiant heat emitted by the roof covering.
Acceptable surface temps vary by material. Asphalt shingles fail above 140°F, TPO above 160°F, and metal above 150°F for installation.
A bare palm placed flat on the roof surface for 5 seconds gives a practical check. Any discomfort or urge to pull away signals unsafe conditions.
This test works for any material but lacks precision. A roofer uses it only as a preliminary screen before grabbing the thermometer.
The rate of temperature climb matters more than the peak number on some jobs. A roof that gains 2°F per minute after 9 AM will hit unsafe levels within an hour.
Crews track the rise rate to predict safe work windows. A steep rise rate forces an earlier shutdown than a gradual one.
A screwdriver handle pressed into asphalt shingles leaves no mark at safe temperatures. The same pressure at 150°F leaves a permanent dent.
For single-ply membranes, a thumb pressed into the surface indicates pliability. Excessive give means the membrane will tear under seam welding pressure.
Shaded roof sections run 20°F to 40°F cooler than adjacent sunlit areas. A roofer measures both zones separately and works only the shaded side.
Wind cools the surface but does not cool the core temperature of thick materials. A metal panel in full sun remains hot to the touch regardless of wind speed.
A roof surface in direct sun traps workers between radiant heat from above and conducted heat from below. The body loses its ability to cool itself through sweat once the surrounding temperature exceeds skin temperature.
Heat illness on a roof progresses faster than on ground level. No shade, no breeze at elevation, and no quick escape route exist for a crew member in distress.
The body diverts blood flow to the skin for cooling, which reduces blood supply to muscles and the brain. A worker feels weak, nauseous, and unsteady on their feet.
Heavy sweating depletes salt and water levels rapidly on a hot roof. Depleted electrolytes cause muscle cramps and loss of coordination.
The body's internal temperature can climb past 104°F within 30 minutes of sustained exposure. At this point, the sweating mechanism shuts down completely.
A worker with heat stroke stops sweating and shows confusion or slurred speech. This condition requires immediate medical evacuation.
Sweaty palms lose friction against tool handles and roof surfaces. A hammer or knife slips more easily when hands are wet.
Power tool triggers become harder to depress with fatigued hand muscles. A dropped tool from roof height creates a serious hazard for anyone below.
High core temperatures slow neural processing speed by a measurable margin. A worker who normally reacts in half a second now takes a full second.
That extra half second means the difference between catching a misstep or falling. Poor judgment also leads to skipped safety steps like tie-offs and edge warnings.
The body does not fully recover from heat exposure overnight. A crew that works four consecutive hot days starts each day already partially depleted.
Early warning signs get ignored as workers push through fatigue. The most serious heat incidents happen on the 5th day of a heat wave, not the first.
Each roofing material has a unique maximum surface temperature for safe installation. The guide below uses surface temperature measured with an infrared thermometer, not air temperature.
| Roofing Material | Maximum Safe Surface Temperature for Installation |
| Asphalt Shingles | 140°F (60°C) |
| TPO (Single-Ply Membrane) | 160°F (71°C) |
| PVC (Single-Ply Membrane) | 160°F (71°C) |
| Metal Panels (Steel or Aluminum) | 150°F (65°C) |
| Modified Bitumen (Torch or Self-Adhered) | 145°F (63°C) |
| Clay or Concrete Tile | 180°F (82°C) |
These thresholds come from manufacturer specifications and field failure data. Exceeding any of these numbers guarantees some form of defect or performance loss.
Safe surface range for asphalt shingles is 50°F to 140°F. Installation above 140°F causes permanent foot printing and granule loss.
Installation below 40°F prevents the seal strip from activating. A shingle installed too cold never bonds to the course below it.
Metal roofing installs safely between 40°F and 150°F surface temperature. The critical factor is thermal expansion, not material softness.
Panels installed at 150°F shrink by 1/8 inch per 10 feet as they cool. That shrinkage pulls screw fasteners through the panel holes.
TPO and PVC install best between 50°F and 160°F surface temperature. The membrane remains flexible enough for seam welding up to 160°F.
Above 170°F, the material stretches too easily under foot traffic. Stretched membrane sections create thin spots that puncture under gravel ballast.
Modified bitumen accepts installation from 40°F up to 145°F surface temperature. Torch applications require cooler base temperatures to avoid blistering.
Self-adhered modified bitumen fails above 130°F because the adhesive becomes too fluid. Fluid adhesive cannot form a permanent bond with the substrate.
Tile roofs install safely from 50°F to 180°F surface temperature. The tiles themselves do not soften or deform in extreme heat.
The danger lies in thermal shock from rapid cooling. A tile installed at 180°F that sees a sudden afternoon thunderstorm can crack across its length.
These shutdown points protect both the material and the crew. A roof installed within these ranges will perform as the manufacturer intended.
Heat ruins a roof long before the air temperature feels dangerous to a person standing on the ground. The safe installation window for most materials closes once surface temperatures cross 140°F, and any work above that point introduces defects that cannot be repaired later.
Metal panels installed on a 150°F surface shrink as they cool, which pulls fastener holes into elongated slots that leak water. That same expansion and contraction repeats daily, but proper installation lets panels move without tearing at the seams.
A roofer who ignores surface temperature today builds a roof that fails its first winter or its first heat wave, and no warranty covers that kind of preventable damage.
Arizona hard water can affect roof materials over time by leaving behind mineral deposits that gradually degrade roofing surfaces, drainage systems, and protective coatings. While it doesn’t usually cause immediate damage, the slow buildup of calcium and magnesium residues can accelerate wear, trap heat, and reduce the overall lifespan of common roofing materials in Arizona’s already harsh desert climate.
This article explains how hard water reaches roofs through irrigation, evaporative coolers, runoff, and maintenance, and its effects on shingles, tile, metal, flat roofs, and gutters. It also explores how it interacts with heat, UV, dust, and monsoon weather, along with prevention tips and the best roofing materials for Arizona conditions. Let's look at how Arizona hard water can affect roof materials over time.
Arizona is known for some of the hardest municipal and groundwater supplies in the United States. This water contains elevated levels of calcium and magnesium, which leave behind mineral deposits when water evaporates.
These deposits - often called scale - are harmless to humans in normal drinking use but problematic when water repeatedly contacts surfaces like metal, tile, asphalt shingles, and roof drainage systems.
Hard water alone doesn’t “destroy” roofs instantly, but it becomes a compounding stress factor when combined with Arizona’s already extreme climate conditions (heat, UV radiation, dust storms, and monsoon rain cycles).
Hard water doesn’t usually land on roofs directly in large volumes, but in Arizona it commonly reaches roofing systems through everyday home infrastructure and environmental interactions. These exposure pathways allow mineral-rich water to repeatedly contact roofing materials over time, leading to gradual buildup and long-term wear.

These rooftop systems continuously cycle water, and as it evaporates, it leaves behind mineral deposits on nearby roofing surfaces and components. Over time, this buildup can affect metal housings, flashing, and roof membranes.
Sprinkler systems that spray too high or are affected by wind can wet roof edges and tiles. When the water evaporates, it leaves behind calcium and magnesium residue that gradually accumulates.
Roof-mounted HVAC systems can release mineral-rich condensate or overflow if drainage lines become clogged. This repeated exposure can leave scaling on roofing materials below the unit.
During heavy rains, dust and debris on roofs mix with water, which later evaporates and leaves concentrated mineral deposits behind. This often occurs in valleys and low-drainage areas.
Roof cleaning or pressure washing with untreated hard water can leave streaks and residue if not properly rinsed. Over time, repeated washing with hard water can contribute to visible mineral buildup.
Hard water reaches Arizona roofs not through a single source, but through multiple small, repeated exposures that collectively lead to long-term mineral accumulation and surface stress.
Hard water affects roofing materials in Arizona in different ways depending on the surface type, durability, and exposure conditions. While the mineral buildup may look cosmetic at first, it can gradually influence performance, lifespan, and maintenance needs across various roofing systems.
Hard water leaves behind mineral deposits that trap dust and moisture on shingle surfaces, contributing to uneven wear. Over time, this can accelerate granule loss, which reduces the shingles’ ability to protect against UV radiation. In Arizona’s intense heat, this combination can significantly shorten shingle lifespan.
Mineral residue from hard water can create visible white scaling on tile surfaces and dull protective finishes. These deposits may also accumulate in overlapping channels, trapping debris and moisture. Over time, this can stress the underlayment beneath the tiles, which is critical for waterproofing.
Hard water can leave mineral crusts along seams, fasteners, and flashing edges, which may trap moisture against the metal surface. This increases the risk of corrosion and coating breakdown over time. In severe cases, it can contribute to weakening of seals and connection points.
Flat roofs are especially vulnerable because water tends to pool and evaporate slowly, concentrating mineral deposits in specific areas. This can lead to scaling along drainage paths and increased strain on seams. Persistent buildup may also contribute to clogged drains and localized membrane stress.
Hard water accelerates scale buildup inside gutters, reducing their ability to move water efficiently. When combined with dust and debris, this can lead to frequent clogs and overflow issues. Over time, poor drainage can cause water damage to fascia boards and roof edges.
Across all roofing types, hard water acts as a slow but persistent stressor that compounds other environmental factors in Arizona. While not immediately destructive, its long-term effects can significantly reduce roof performance and durability if not properly managed.
Hard water in Arizona rarely damages roofing materials on its own, but its biggest impact comes from how it interacts with other environmental stressors. This “damage multiplier” effect slowly intensifies wear and reduces overall roof performance over time.
Mineral deposits can retain and unevenly distribute heat on roof surfaces. This accelerates aging and surface breakdown under Arizona’s extreme temperatures.
Hard water residue traps dust and reduces reflective efficiency on roofing materials. This increases UV absorption and speeds up material degradation.
Mineral-coated surfaces tend to hold moisture longer during heavy rains. This raises the risk of leaks and water intrusion in vulnerable areas.
Hard water deposits act like a binding layer for fine desert dust. This leads to faster clogging of gutters and increased surface buildup.
Together, these interactions show how hard water amplifies existing roofing challenges in Arizona rather than acting as a standalone problem. The combined effects gradually increase maintenance needs and shorten roof lifespan.
If hard water exposure on roofs in Arizona is left unmanaged, its effects build slowly over time and often go unnoticed until more serious issues develop. The combination of mineral buildup, heat, dust, and moisture cycles can gradually weaken multiple roofing components and systems.
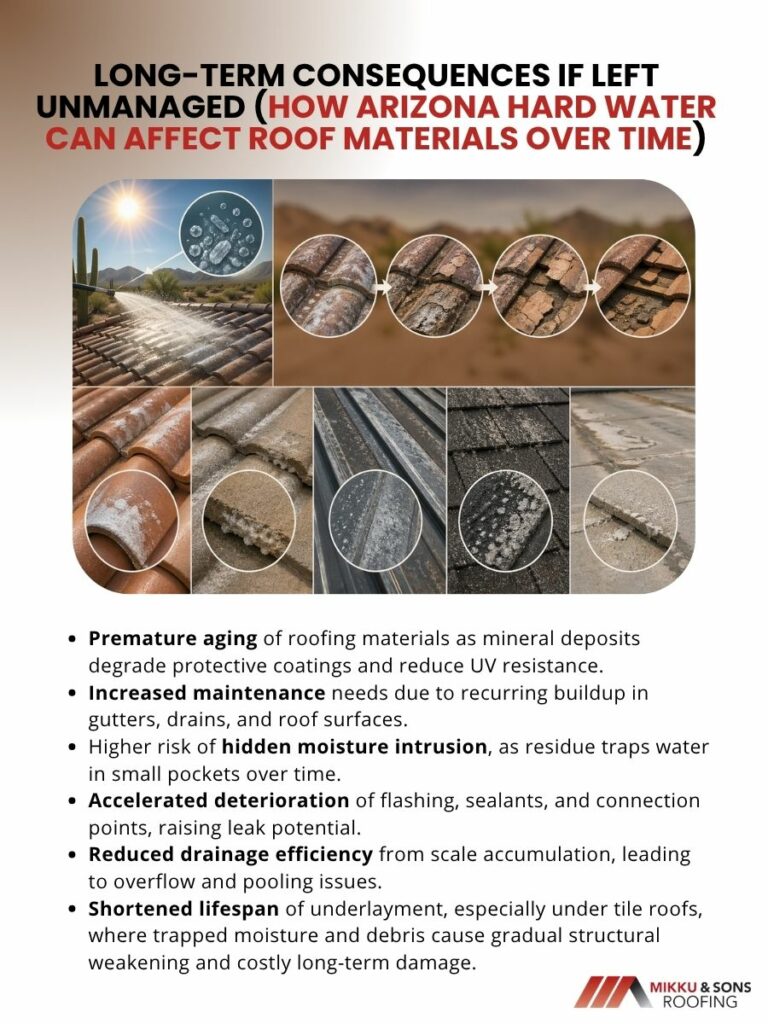
Hard water deposits can dull and degrade protective roof coatings, reducing their ability to reflect heat and resist UV damage. Over time, this leads to faster surface breakdown and visible wear.
Mineral buildup in gutters, drains, and roof surfaces causes more frequent clogs and cleaning needs. Homeowners may notice they need to service their roofing systems more often to maintain proper performance.
Hard water residue can trap moisture in small pockets on roofing materials. This increases the chance of slow, hidden leaks developing beneath the surface over time.
Mineral deposits can weaken sealants and stress metal flashing connections. As these components degrade, the risk of water penetration at joints and edges increases.
Scale buildup inside gutters and downspouts restricts water flow during rain events. This can lead to overflow, pooling, and unnecessary stress on roof edges.
Trapped moisture and debris can accelerate deterioration of the waterproof underlayment beneath tiles. Since this layer is critical for protection, its failure can significantly reduce overall roof lifespan.
Left unchecked, hard water contributes to a chain of gradual roofing issues that compound over time. While each effect may seem minor on its own, together they can significantly reduce roof durability and performance in Arizona’s harsh climate.
Preventing long-term roof damage from hard water in Arizona comes down to controlling exposure, improving drainage, and maintaining regular upkeep. While mineral buildup can’t be fully avoided in the environment, its impact can be significantly reduced with consistent maintenance and smart water management practices.
Adjust irrigation systems to prevent overspray from reaching roofs and siding. Ensure evaporative coolers and rooftop equipment are properly maintained to minimize leaks and uncontrolled water discharge.
Clean gutters and downspouts regularly to prevent mineral scale and debris buildup. Installing gutter guards can also help reduce clogging in high-dust environments like Arizona.
Softened or filtered water can reduce mineral deposits in systems like evaporative coolers or roof-adjacent equipment. This helps limit scaling that would otherwise accumulate on nearby roofing materials.
Schedule at least annual roof inspections to identify early signs of mineral buildup or drainage issues. Catching problems early helps prevent more costly structural damage later on.
Use professional roof cleaning services that understand how to handle mineral-heavy deposits safely. Avoid untreated hard water pressure washing, which can worsen scaling and leave residue behind.
Consistent prevention and maintenance are the most effective ways to limit the long-term effects of hard water on Arizona roofs. By managing water exposure and maintaining drainage systems, homeowners can significantly extend roof lifespan and performance.
Choosing the right roofing material in Arizona can help reduce long-term hard water effects. While no option is completely immune, some materials handle mineral buildup better than others.
Material choice and drainage design both matter in hard water environments. With the right system and upkeep, long-term damage can be minimized.
Hard water in Arizona is often overlooked when it comes to roof health, but its long-term effects become more apparent as it repeatedly interacts with extreme heat, dust, and intense sunlight. Over time, mineral buildup can contribute to surface degradation, drainage problems, and faster aging across different roofing materials.
Ultimately, hard water is not a direct cause of roof failure but a gradual contributing factor that worsens other environmental stresses. With consistent maintenance, proper water management, and routine inspections, homeowners can greatly reduce its impact and extend the lifespan of their roofs in Arizona’s harsh conditions.
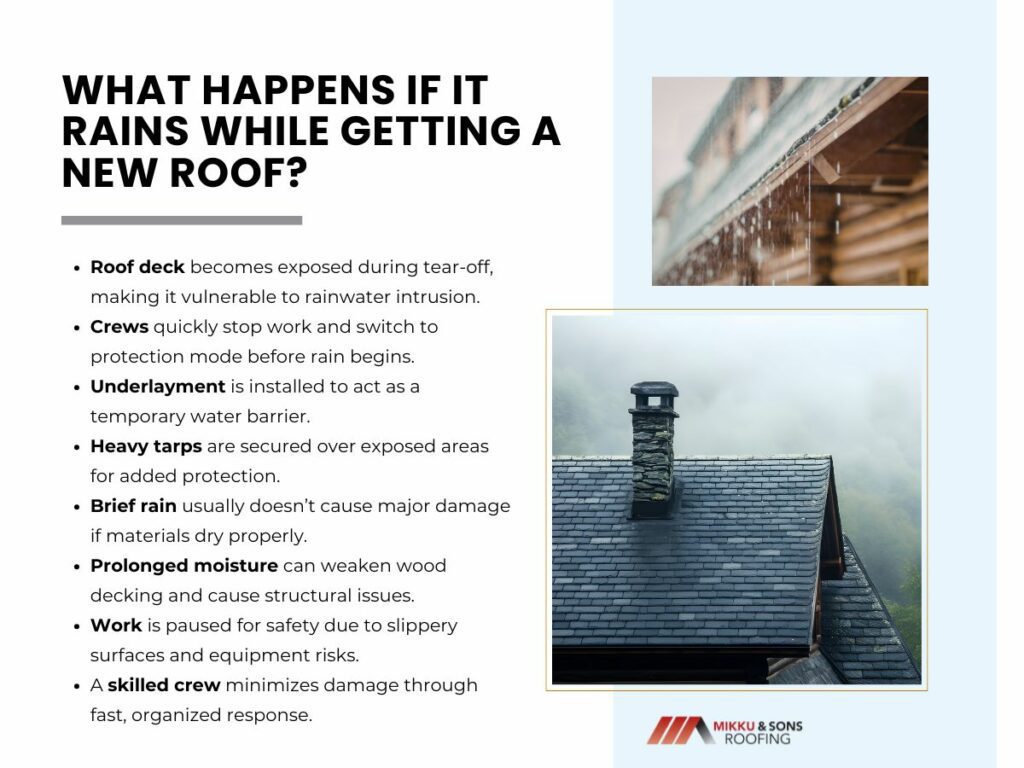
The tear-off process leaves a roof deck open and vulnerable, exposing the wooden surface directly to the elements. A sudden rain event turns the job site into a race against time, as water finds its way through every seam and staple hole left behind by the removed cladding.
Crews working along the ridge have only minutes to respond, quickly trading demolition tools for underlayment and heavy tarps before rain reaches the plywood below. Moisture intrusion during an active replacement does not guarantee structural failure, but it introduces a significant and unpredictable variable.
What happens if It rains while getting a new roof? Roof sheathing, typically made of oriented strand board or plywood, can tolerate limited exposure to moisture before swelling or weakening begins. A skilled crew proves its professionalism not by avoiding rain entirely, but by executing a controlled shutdown process that protects the interior.
The barometric pressure drops and the wind shifts, cues that a crew lead reads long before the first drop falls. Work does not stop when the rain begins, it stops when the clouds roll in and the light changes.
A well-drilled team transitions from production mode to protection mode in a sequence that prioritizes the interior space over the materials on the ground.
The crew lead makes the call based on radar data and visible sky conditions, not guesswork.
The goal at this stage is simple, stop making the problem worse. Every shingle pulled after the decision point is a square foot of deck left open to the incoming weather.
With the old material removed or partially removed, the crew unrolls the synthetic underlayment or felt paper over the exposed wood. This material serves as the primary water barrier until the finished shingles go down.
The roll is started at the low point of the roof section, the edge where water naturally runs off. Workers stretch the material tight across the deck to eliminate wrinkles that can pond water or catch wind.
Each successive row overlaps the one below it, usually by six inches, to create a shingled effect that sheds water away from the seams. Cap nails with large plastic washers fix the underlayment to the wood, the washers providing a seal around the nail shaft that a standard nail head cannot achieve.
For a fully exposed deck or a roof with complex intersections, underlayment alone proves insufficient against a heavy downpour. The crew deploys reinforced polyethylene tarps over the felt paper as a second line of defense.
The tarp must drape over the ridge and extend past the bottom edge of the roof to direct water into the gutters or away from the fascia. Workers lay lumber or spare shingle bundles on the tarp immediately after positioning to hold it against the wind.
They drive nails with large caps through the tarp and into the deck at strategic points, not every few feet, but enough to anchor it against a gust. The edges are checked for flapping, as a vibrating tarp in the wind can loosen nails and abrade the underlayment below.
Plumbing vents, chimneys, and skylights create natural weak points where water can bypass the temporary coverings.
These minutes of intense preparation determine whether the attic stays dry or the ceiling below suffers water stains. The crew works against the wind, knowing that once the rain hits hard, any correction becomes dangerous on the slick surface.
Water exposure during a roof replacement does not trigger an automatic failure of the structure. The materials used in modern roof construction possess specific tolerances for moisture that allow for brief encounters with rain.
The difference between a minor delay and a major repair lies in the duration of exposure and the speed of the drying cycle.
The wood deck, typically oriented strand board or plywood, acts as the structural base for the entire roofing system. These engineered wood products come from the factory with a moisture content between twelve and fifteen percent.
The danger zone begins when the deck remains covered by tarps or underlayment without airflow, trapping humidity against the wood surface. Prolonged contact with liquid water, measured in days rather than hours, leads to delamination of the OSB or checking of the plywood face.
Many observers mistakenly view asphalt shingles as the primary waterproofing layer of a roof assembly. The underlayment beneath the shingles actually serves as the critical barrier against water intrusion.
Synthetic underlayment consists of woven or spun polypropylene that repels liquid water while allowing water vapor to pass through the material. This vapor permeability proves essential when a roof gets wet during construction.
Moisture trapped in the wood deck can escape through the underlayment without causing bubbles or blisters in the material. The product is engineered to withstand exposure to the elements for up to six months in some cases, which means a single rain event falls well within its design parameters.
Water runs downhill, a simple principle that governs roof construction from the deck up. A properly installed temporary cover maintains this fundamental slope.
The overlapping pattern of underlayment installation creates a drainage plane that directs water toward the eaves. Each seam faces downward, allowing water to flow over the lap rather than forcing it uphill to find a gap.
The felt or synthetic layers act as a series of shingles themselves during the waiting period before the finished roof goes on. Water that contacts the sloped surface follows the path of least resistance to the edge of the roof and into the gutters or off the eaves.
Rain that persists beyond a passing shower forces the crew to leave the site entirely, leaving the structure in a state of suspended animation. The house wears a temporary skin of tarps and underlayment that must withstand wind, continued moisture, and the passage of time until conditions improve.
This waiting period tests the quality of the initial shutdown and the patience of everyone involved in the project.
A roof caught in an active tear-off phase receives a full tarp encapsulation that covers the entire structure in most cases. The house takes on the appearance of a package awaiting shipment, with blue or brown polyethylene stretched over every plane.
The tarp installation follows specific rules to ensure it remains in place during the storm.
A properly installed tarp system creates a sealed envelope that diverts water around the structure. An improperly installed system acts as a sail that catches wind and transfers stress to the attachment points, eventually failing at the most vulnerable seam.
Reputable contracting firms operate under strict safety policies that mandate work cessation during measurable precipitation. These protocols exist not as suggestions but as binding conditions for insurance coverage and company liability.
The Occupational Safety and Health Administration provides guidelines for working surfaces that lose traction characteristics in wet conditions. A roof that fails to meet minimum friction standards becomes a prohibited work surface under these regulations.
The crew supervisor bears the responsibility for enforcing the stop-work order regardless of project timelines or weather delays. Any worker injured on a wet roof triggers an investigation into whether the supervisor allowed work under unsafe conditions, which can result in fines and increased insurance premiums for the company.
Power tools and wet weather create a separate category of risk beyond simple falls from height.
The crew must secure or remove all equipment before leaving the roof, a process that takes time and requires careful movement on the deteriorating surface. A rushed equipment recovery in the first minutes of rain often causes more accidents than the rain itself.
A rain event during a roof replacement tests a contractor’s systems far more than any stretch of dry weather. A crew that performs a disciplined shutdown, properly secures the structure, and resumes work only when conditions are safe demonstrates the professionalism that prevents long-term leaks.
Choosing to stay home during the project gives the homeowner a clear view of how the crew handles unexpected conditions. Watching their response to sudden rain reveals more than any sales pitch, showing whether they act with urgency, apply protection correctly, and communicate clearly about next steps.
Being present also allows the homeowner to ask informed questions once work resumes. Noticing where water pooled or where coverings shifted helps turn a potential problem into a collaborative solution, ensuring the final roof reflects what was learned during the storm.
A metal roof often announces itself not with a leak, but with sound. On a clear morning, as the sun warms the panels, sharp pops or slow creaks echo through the attic, a simple sign of thermal expansion in motion.
That noise is the sound of the panel expanding. A steel or aluminum panel that runs 40 feet from eave to ridge can expand nearly three-quarters of an inch as the surface temperature rises from a cold morning to the heat of midday.
For the roof to perform well over decades, this movement cannot be restricted. It must be guided, given room to move, and allowed to occur without placing stress on the fasteners that hold the system together. Let's look at why metal roof expansion and contraction happens and why It matters.
Metal responds to temperature with a physical predictability that allows for precise engineering. Every material possesses a coefficient of thermal expansion, and for steel and aluminum, that rate is substantial enough to demand accommodation in any long-run installation.
A roof assembly does not experience uniform temperature across its surface. One section may sit in full sun while an adjacent valley remains in shade, which creates differential movement across a single plane.
Thermal movement occurs as heat energy transfers into the metal panel and increases the kinetic activity of its molecular structure. The molecules vibrate with greater intensity, which pushes against one another and expands the overall dimensions of the panel.
The reverse happens when temperatures drop. Molecular activity slows, the space between molecules decreases, and the panel contracts back toward its original measured length.
A standard 40-foot steel panel can experience a length change of approximately 0.40 inches for every 50-degree Fahrenheit temperature swing. Aluminum expands at roughly twice that rate, which can push movement past 0.75 of an inch under the same conditions.
Surface temperature on a dark-colored metal roof can climb 60 to 80 degrees above ambient air temperature on a summer afternoon. The panel then cools rapidly at nightfall, which forces a full cycle of expansion and contraction in a single 24-hour period.
A 10-foot panel moves a fraction of what a 40-foot panel moves, which means roof geometry directly dictates the required expansion strategy.
The very property that makes metal an effective roof, its ability to span long distances without intermediate support, also makes it susceptible to thermal stress.
Expanding metal does not simply grow soft and push outward. It exerts actual force measured in pounds per square inch when its movement meets resistance.
A restrained panel can generate enough force to shear a screw shaft, bend a standing seam clip, or bow the entire roof plane upward between fastening points. That force remains present for as long as the temperature holds and releases only when the panel cools or the restraint fails.
A metal roof does not manage thermal movement through luck or the flexibility of its panels. It relies on a specific set of components engineered to permit motion while maintaining a weathertight seal.
The attachment system determines whether the roof moves as a unified assembly or as a collection of stressed points. Two distinct fastener strategies exist, and each approaches the problem of motion from a different engineering philosophy.
A standing seam clip attaches to the roof deck with fasteners driven through its base plate. The clip features a raised tab or a set of wings that engage the seam of the metal panel above.
The panel locks onto the clip but does not fasten to it. This connection allows the panel to slide across the top of the clip as thermal expansion and contraction occur.
Each panel in a standing seam assembly sits within a system of interconnected seams that move together. The clips anchor to the deck at fixed intervals while the panels float above those anchor points.
The roof deck itself remains stationary. The panels above it shift position relative to the deck, which means the structure below never bears the stress of the moving metal above.
An exposed fastener roof uses screws driven directly through the panel face and into the substrate below. Each screw carries a neoprene washer that compresses against the metal to form a seal.
The washer serves a second function beyond sealing. Its compressible material allows the metal to shift slightly around the screw shaft without tearing at the hole.
The screw shaft creates a fixed point that restricts movement more than a sliding clip permits. Every screw becomes a point of resistance that the expanding metal must work against.
Long roof runs with exposed fasteners require careful screw spacing and strategic placement of expansion joints. Without those considerations, the cumulative force across dozens of fasteners can lead to elongated holes, loose screws, or buckled panels.
A roof built without accommodation for thermal movement does not fail all at once. It fails slowly, with small signs that accumulate until a single point gives way.
The materials themselves do not fail in most cases. The connections between them fail, which turns the roof from a unified system into a collection of components working against one another.
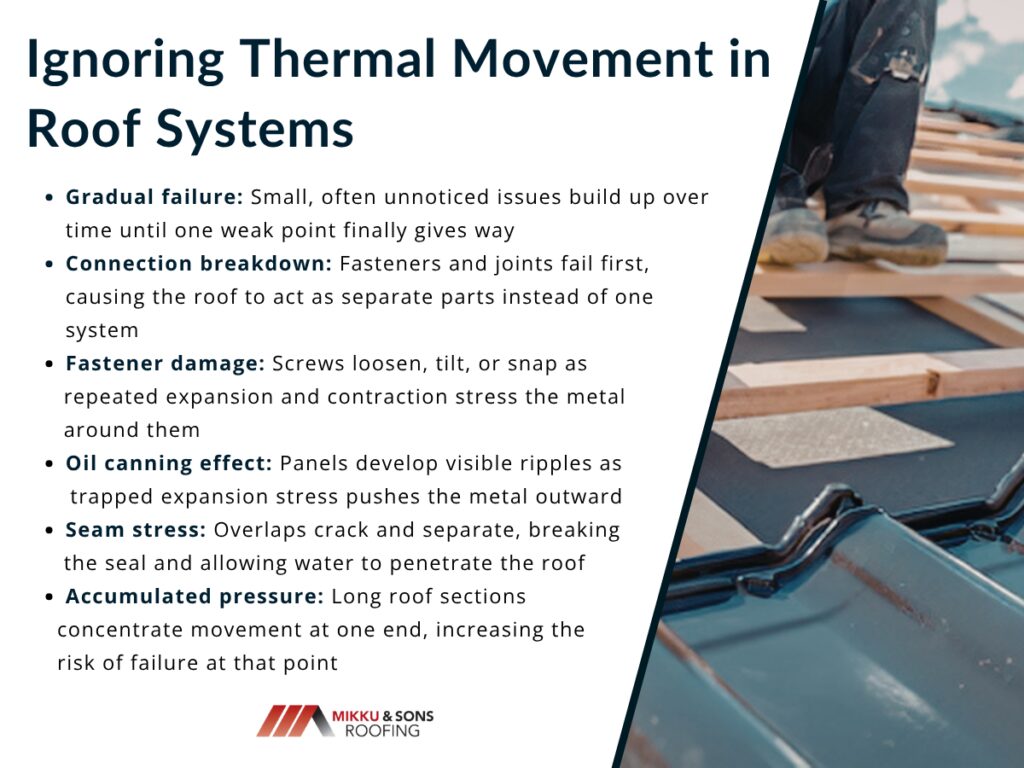
A screw driven too tight or placed without allowance for movement acts as a rigid anchor. The expanding panel pulls against that anchor with each temperature cycle until the metal around the screw head fatigues.
The result appears as a screw sitting at an angle or a washer pulled away from the panel face. In advanced cases, the screw head snaps off entirely or the panel tears open around the fastener hole.
Oil canning describes a visible distortion where flat areas of a panel develop wavy lines or ripples across the surface. The condition occurs when compressive stress from thermal expansion has no release point and instead pushes the metal outward.
The distortion is cosmetic in most instances but signals a deeper issue. It indicates the panel is under load that the fastening system failed to absorb.
End laps, where one panel overlaps another, carry particular risk in a system that does not account for movement. The two panels expand at different rates relative to their anchor points, which creates shear force across the overlap.
The sealant at these laps fails first. Cracks form in the sealant bead, followed by separation at the lap joint, which opens a direct path for water to enter the assembly below.
A 60-foot roof slope concentrates thermal movement at the lowest point if the top remains fixed. The eave receives the full accumulated expansion from every foot of panel above it.
That concentrated force can push gutters out of alignment, pop trim pieces loose, or lift the lower edge of the panel off the eave structure. The damage appears at the bottom of the roof, even though the cause originates across the entire slope.
Installation determines whether the engineered components perform as intended or become ornamental. A sliding clip delivers no benefit if the installer fastens the panel directly through the clip base.
The installation process requires knowledge of how each component interacts with the others across the full length of the roof. One error at the ridge can manifest as a failure at the eave years later.
Fastener schedules specify both the spacing between screws and the distance from panel edges. Too few screws invite wind uplift, while too many screws restrict the movement the panel requires.
The pattern matters as much as the count. Screws staggered in a zigzag pattern allow for more panel movement than screws set in straight rows across the panel width.
The ridge and eave serve as the primary release points for panel movement. A gap left between the panel end and the ridge flashing provides space for the panel to slide upward as it expands.
Closing that gap with a screw driven through the panel into the ridge board eliminates the release point. The panel then has no direction to move except outward into the plane of the roof.
A roof slope exceeding 40 feet requires an engineered slip joint where two panel runs meet. The joint uses a specialized flashing that allows the upper panel to overlap the lower panel while maintaining independent movement.
The two panels move separately from one another within the joint assembly. This breaks the total thermal movement into smaller segments that each component can manage.
The consequences of thermal movement extend beyond the roof assembly itself. The forces generated by expanding metal transmit through fasteners and into the framing below.
A roof that moves as designed protects the structure beneath it. A roof that fights against its attachments transfers stress to components never intended to bear that load.
The roof deck sits directly beneath the metal panels and receives the full effect of fastener stress. Repeated tension and compression cycles can elongate screw holes in plywood or OSB, which reduces the holding strength of every fastener in that area.
A deck with compromised fastener grip no longer provides a secure base for the roof assembly. The panels above then move with even less resistance, which accelerates the wear on the remaining sound fasteners.
Thermal expansion pushes outward at the eaves and rakes with measurable force. That force transfers to the fascia board, the gutter system, and any wall flashing where the roof terminates.
Fascia boards can bow outward over time under repeated seasonal expansion cycles. Gutter hangers can pull loose from the fascia, and wall flashings can separate from the siding or masonry they were meant to seal against.
A panel that never experiences forced restraint will not develop fatigue cracks at fastener locations. The metal remains in its original condition because it never bore stress beyond what its material properties can accept.
The fasteners themselves last longer when they only seal and hold rather than resist. A screw that never fights against panel movement maintains its original shear strength for the full duration of its service life.
Thermal movement is not a flaw in metal roofing. It is a property that the material exhibits with consistency and predictability, which makes it possible to engineer around with precision.
The difference between a roof that performs for decades and one that shows early signs of failure rests entirely on whether that movement was accommodated or resisted. The components exist to manage it, the methods are established, and the physics are not negotiable.
Arizona shows the most extreme version of this equation. The temperature difference between a summer afternoon and a desert night can exceed 50°F in a single day, forcing a full expansion and contraction cycle on the roof every 24 hours.
Metal roofs have become a popular choice across the United States because of their durability, energy efficiency, and long service life. Homeowners appreciate that metal roofing systems can last decades longer than traditional shingles while also resisting fire, wind, and harsh weather.
Yet one concern often surfaces after installation: the sound of rain hitting the roof. Many people worry that storms or heavy rainfall may sound louder indoors. This has led to growing interest in specialized coatings marketed as sound deadening paint for metal roof applications.
These paints claim to reduce vibration and dampen noise created when rain strikes metal panels. The key question, however, is whether they truly make a noticeable difference in residential settings. Does sound deadening paint for metal roofs actually work? Let's find out.
Metal roofs often receive a reputation for being noisy, but the reality is more nuanced. In many homes, the level of rain noise depends less on the roofing material and more on how the entire roof structure is built.
A well designed roofing assembly with insulation and proper decking can significantly reduce sound transmission. When those elements are missing or minimal, vibrations from rainfall may travel more easily into living spaces.
The most important factor affecting rain noise is not the metal panel itself but the structure and insulation beneath it.
When raindrops strike a metal roof panel, they create small vibrations across the metal surface. Those vibrations move through the panel and into the underlying components of the roof.
If the metal panels are installed over solid decking with insulation below, much of the vibration energy is absorbed before it reaches the interior of the home. If the panels are attached to open framing with little insulation, sound waves can travel more freely through the structure.
The path of the sound usually follows a simple chain. Rain impacts the metal surface, causing the panel to vibrate. The vibration transfers to roof fasteners and framing components.
From there, the sound moves into the attic space and eventually reaches ceilings and walls inside the house.
Several structural conditions can increase how loud rain sounds inside a building, and most of them relate to how the roof system is assembled rather than the metal itself.
Thinner gauge metal panels tend to vibrate more easily when struck by rain or hail. This increased vibration can create sharper, more noticeable noise compared to thicker, more rigid panels.
Metal roofing installed without plywood or OSB decking allows panels to flex more freely. This flexibility increases vibration, which can amplify sound as it travels through the structure.
Insulation plays a key role in absorbing sound waves before they reach interior spaces. When insulation levels are low, more of the vibration and airborne noise passes directly into the home.
Open framing or gaps in the roof structure can create pathways for sound to travel more easily. These openings reduce the barriers that would otherwise help contain or absorb noise.
Roof systems without layers such as drywall ceilings or insulated attic floors provide fewer obstacles to sound transmission. In contrast, finished ceilings help dampen noise before it enters living areas.
The Metal Construction Association noted in its 2022 roofing guidance that properly installed metal roof systems with attic insulation often produce interior noise levels comparable to asphalt shingles, reinforcing that construction quality matters more than the material itself.
Acoustic roof coatings are designed to reduce the vibration that occurs when rain strikes a metal surface. These coatings are applied directly to metal panels and form a thick, flexible layer that absorbs some of the impact energy from rainfall.
Manufacturers often promote these paints as a way to dampen sound while also protecting the roof from weather and corrosion. These coatings are designed to dampen vibration rather than completely block sound from entering the building.
Most sound dampening roof paints rely on elastomeric polymers or rubber like compounds that remain flexible after curing. When a raindrop hits the roof, the flexible coating slightly compresses and absorbs a portion of the vibration energy.
This reduces the amount of resonance traveling through the metal panel.Some products also include ceramic microspheres or insulating fillers. These microscopic particles create tiny air pockets inside the coating, which may help scatter vibration waves and reduce their intensity.
The result is not silence but a reduction in the sharp vibration that metal surfaces sometimes produce during rainfall. Because the coating absorbs part of the impact energy, the panel may resonate less than it would without the coating.
Sound dampening coatings were originally developed for industrial and commercial settings rather than residential homes. Factories often apply vibration dampening coatings to large metal surfaces on machinery or building structures.
Shipping containers, industrial equipment enclosures, and metal storage buildings frequently use these coatings to reduce resonance.The reason they are common in industrial environments is simple.
Large unsupported metal panels tend to vibrate easily, and coatings can help control that vibration. In residential construction, however, the roof typically includes insulation, decking, and interior ceilings that already perform some sound dampening.
Because of this difference, the effectiveness of the coating can vary depending on the building design.
Applying acoustic roof paint usually involves several preparation steps. First, the metal roof surface must be thoroughly cleaned to remove dirt, grease, or oxidation.
Any existing rust may need to be treated before the coating is applied.After cleaning, a primer is sometimes applied to improve adhesion.
The acoustic coating is then sprayed or rolled onto the roof in one or more thick layers. Many products require a curing period during which the coating forms its flexible structure.
Proper coverage is important because the thickness of the coating directly affects its vibration dampening ability.
The effectiveness of acoustic coatings depends on several factors, including roof structure, panel thickness, and the amount of insulation already present. While these coatings can reduce some vibration, they rarely eliminate the sound of rain entirely.
Most homeowners experience modest sound reduction unless the coating is combined with other noise control measures.
Research into vibration dampening materials has shown that coatings can reduce resonance in metal surfaces. A 2019 acoustic evaluation by the National Research Council Canada examined vibration damping coatings applied to metal panels.
The study found that these coatings lowered resonance levels but did not completely remove impact noise caused by rainfall. The findings suggest that coatings work best when used alongside structural sound barriers such as insulation or solid decking. When used alone, the improvement may be noticeable but limited.
In many residential situations, the coating may soften the sharpness of rain impact rather than dramatically lowering the overall noise level. The difference may be subtle during light rain but slightly more noticeable during heavier storms.
Because human perception of sound varies widely, some homeowners report meaningful improvement while others notice little change. This difference often depends on how the roof was originally constructed.
| Noise Reduction Method | Typical Effectiveness | Best Use Case |
| Sound deadening roof paint | Low to moderate | Minor vibration reduction |
| Attic insulation upgrades | High | Residential homes |
| Solid roof decking | High | New construction |
| Acoustic underlayment | Moderate to high | Metal reroofing projects |
This comparison highlights an important point. Acoustic paint can help reduce vibration, but structural improvements often provide a larger impact on indoor noise levels.
Although coatings may not completely eliminate roof noise, they can still provide value in certain situations. Buildings with large exposed metal panels may benefit more from vibration dampening than traditional homes with insulated attics.
Acoustic coatings tend to work best on structures with thin metal panels or limited insulation.
There are several types of buildings where sound dampening roof paint may provide noticeable benefits.
In these situations, the coating helps reduce the resonance that occurs when rain hits a wide, unsupported metal surface. Even a small reduction in vibration can make these spaces feel quieter.
In residential homes with well insulated attics, the coating may have limited impact on interior noise. Most sound reduction in these buildings comes from insulation and structural barriers rather than surface coatings.
If a home already has thick attic insulation and drywall ceilings, the metal roof above it may not contribute much noise to the living space in the first place. Applying an acoustic coating in these situations may produce minimal change.
Another scenario where coatings may not help significantly is when the roof panels are already installed over solid decking. The decking itself often reduces vibration enough that additional dampening from paint becomes less noticeable.
Because coatings alone rarely solve noise concerns, many roofing professionals recommend addressing the entire roof assembly when trying to reduce sound.
Structural improvements often have a greater effect than surface treatments. Insulation, decking, and underlayment layers typically have the biggest influence on how much rain noise reaches the interior of a home.
Insulation is one of the most effective sound barriers inside a roof system. Fiberglass, mineral wool, and cellulose insulation all help absorb airborne sound waves before they reach interior ceilings.
According to the U.S. Department of Energy insulation guidance published in 2021, properly installed attic insulation not only improves energy efficiency but also helps reduce noise transmission between roof structures and living spaces.
Increasing insulation depth can significantly reduce the sound of rainfall inside a home.
Some metal roofs are installed over open framing or purlins rather than solid decking. While this method works well for barns and industrial buildings, it can allow vibrations to travel more easily into the structure.
Installing plywood or oriented strand board decking beneath metal panels creates a solid barrier that reduces vibration and resonance. The decking also provides additional structural support for the roof system.
Roof underlayment sits between the metal panels and the roof deck. Some modern underlayment materials include acoustic properties designed to absorb vibration.
These materials help dampen the sound created when rain impacts the roof surface. When combined with insulation and solid decking, acoustic underlayment can noticeably reduce interior noise levels.
Acoustic roof coatings are often marketed as a simple solution for rain noise on metal roofs, but their real world performance depends on how the roof is constructed. These coatings can reduce vibration and soften the sharp resonance that sometimes occurs when rain hits metal panels.
However, they rarely act as a complete noise barrier on their own. In most residential homes, the biggest improvements come from insulation, roof decking, and underlayment systems working together to absorb sound.
Understanding how each layer of a roof contributes to sound control helps homeowners make informed decisions before investing in specialized coatings. When evaluating noise concerns, it is helpful to consider the entire roofing structure rather than focusing on a single product.
For those still dealing with noticeable rainfall noise indoors, the next step involves exploring practical installation strategies and design choices that directly address the sound of rainfall itself, which leads naturally to the topic of how to reduce rain noise on a metal roof and the construction methods that make the greatest difference.
Replacing the roof on a small house typically takes about 1 to 3 days for a professional roofing crew to complete, depending on the roof size, materials used, and weather conditions. In many cases, a straightforward roof with asphalt shingles and minimal structural issues can even be finished within a single day, making roof replacement a relatively quick home improvement project.
How long does It take to replace a roof on a small house? This article outlines the roof replacement timeline, from inspection and tear-off to installation and cleanup. It also covers factors that affect project duration, tips to speed up the process, and signs that a small house may need a roof replacement.
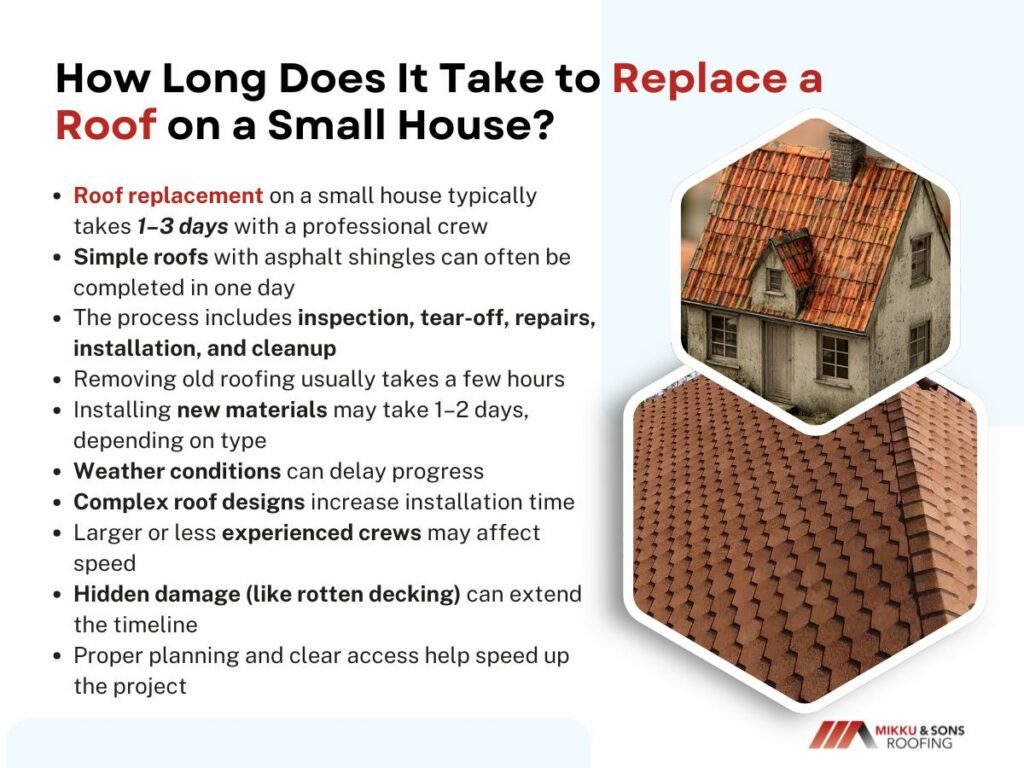
Replacing the roof on a small house is often quicker than homeowners expect. Smaller roofs with simple designs can usually be completed fast, though the timeline depends on materials, complexity, weather, and crew size.
In most cases, the actual roof replacement work for a small house takes between 1 and 3 days when performed by experienced contractors under normal conditions.
Roofing timelines often vary depending on the size of the home and the total roof surface area. Smaller homes require less material and labor, which helps speed up the installation process.
| House Size | Estimated Roof Replacement Time |
| Small house (under 2,000 sq ft) | 1–3 days |
| Medium house (2,000–4,000 sq ft) | 2–4 days |
| Large house (4,000+ sq ft) | 4–7 days |
For many small houses with simple roof structures and asphalt shingles, roofing crews can complete the project within a single day if no structural issues are discovered.
The type of roofing material used also plays a major role in determining how long the installation will take. Some materials are lightweight and easy to install, while others require more precision and labor.
| Roofing Material | Average Installation Time (Small House) |
| Asphalt shingles | 1–2 days |
| Wood shingles | 2–4 days |
| Metal roofing | 2–5 days |
| Clay or concrete tiles | 4–7 days |
| Slate roofing | 6–10 days |
Asphalt shingles remain the most common roofing material for residential homes because they are affordable, durable, and relatively quick to install.
Replacing a roof involves several important steps to ensure the new roofing system is installed properly and lasts for many years. While the installation itself may only take a day or two for a small house, the full process includes inspection, preparation, installation, and final checks. Understanding each stage helps homeowners know what to expect during the project.
The process begins with a professional inspection to evaluate the condition of the existing roof. Contractors check for damaged shingles, leaks, ventilation issues, and the condition of the roof deck. This step helps determine whether a full replacement is needed and allows the contractor to provide an accurate estimate.
After the inspection, homeowners choose roofing materials, review estimates, and schedule the project with the contractor. Depending on the contractor’s availability and local permit requirements, this stage can take a few days to several weeks. Proper planning ensures the materials and crew are ready before work begins.
On installation day, the roofing crew begins by removing the existing shingles and underlayment. This step exposes the roof deck so contractors can inspect the structure underneath. For small homes, the tear-off process usually takes a few hours.
Once the old roofing materials are removed, the roof deck is inspected for damage such as rot or weakened boards. Any damaged sections must be repaired or replaced to provide a stable foundation for the new roof. Minor repairs may take only a few hours, while larger issues can extend the project timeline.
Next, the crew installs protective layers such as waterproof underlayment and drip edges. Flashing is also placed around chimneys, vents, and other roof openings to prevent water leaks. These components play a crucial role in protecting the roof from moisture damage.
After preparation is complete, the new roofing material—such as asphalt shingles, metal panels, or tiles—is installed. For most small houses using asphalt shingles, this step can often be completed within the same day. More complex materials may require additional time for proper installation.
Once the new roof is installed, the crew removes debris and uses magnetic tools to collect nails around the property. The contractor then performs a final inspection to ensure the roof is properly installed and sealed. This step ensures the roof meets safety and quality standards.
Although the actual roof installation on a small house may only take a day or two, the entire replacement process includes several important stages. From inspection and preparation to installation and cleanup, each step ensures the new roof is durable, safe, and ready to protect the home for many years.
While many small house roof replacements can be completed within a few days, the exact timeline can vary depending on several conditions. Certain structural, environmental, and logistical factors can either speed up the project or cause unexpected delays.
Larger roofs require more materials and labor, which naturally increases the installation time. Even for small houses, additional roof sections or extensions can slightly extend the project duration.
Roofs with multiple slopes, dormers, skylights, or chimneys require more detailed work and careful installation. These features slow down the process because contractors must install flashing and materials precisely around them.
Different roofing materials require different installation techniques and timeframes. For example, asphalt shingles are quicker to install, while materials like slate or tile require more time and specialized labor.
Rain, strong winds, or extreme temperatures can delay roofing work because crews need safe and dry conditions to install materials properly. Poor weather may temporarily pause the project until conditions improve.
A larger and more experienced roofing crew can typically complete the work faster and more efficiently. Smaller crews may take longer to finish the same project due to limited manpower.
Several factors can influence how long it takes to replace a roof on a small house. By considering elements such as roof size, materials, weather, and crew experience, homeowners can better understand potential timelines and prepare for possible delays during the roofing project.
Many homeowners wonder whether they need to leave their house while the roof is being replaced. In most cases, you can remain at home during the project, although there may be some temporary inconveniences such as noise and vibrations.
In most situations, homeowners can safely stay in their house while the roof is being replaced. However, preparing for temporary noise, limited outdoor access, and general activity around the home can make the process more comfortable and less disruptive.
Although roof replacement on a small house is usually completed quickly, a few simple preparations can help the project run even more smoothly. By planning ahead and working closely with your contractor, homeowners can reduce delays and make the installation process more efficient.
Selecting materials before the project begins prevents delays caused by last-minute decisions or supply shortages. This allows the contractor to order and prepare everything ahead of time.
Removing vehicles, patio furniture, and outdoor items gives the roofing crew easy access to the house. A clear workspace helps contractors move equipment and materials more efficiently.
Branches that hang over the roof can slow down the installation process and create obstacles for workers. Trimming them beforehand improves safety and makes roof access easier.
Maintaining clear communication with your roofing contractor helps ensure everyone understands the schedule and project details. Addressing questions early can prevent misunderstandings or delays during the work.
Planning the project during a season with stable weather reduces the risk of rain or storms interrupting the work. Good weather conditions allow roofing crews to complete the installation faster.
Taking a few simple steps before the project begins can help speed up the roof replacement process. Proper preparation, clear communication, and a safe work environment allow roofing crews to complete the job efficiently while maintaining high-quality results.
Knowing when to replace your roof can prevent costly damage and extend the life of your home. Recognizing the warning signs early helps homeowners take action before minor issues become major problems.
Recognizing these signs early allows homeowners to plan for a roof replacement before extensive damage occurs. Acting promptly can protect the home, maintain curb appeal, and ensure long-term structural integrity.

Replacing the roof on a small house is a manageable project that can usually be completed within a few days, especially for simple roof designs and common materials like asphalt shingles. By understanding the timeline, the steps involved, and the factors that can affect installation, homeowners can plan effectively and minimize disruptions during the process.
Proper preparation, clear communication with your roofing contractor, and attention to key details - such as roof complexity, weather, and crew efficiency - can help ensure a smooth and timely replacement. With the right approach, a new roof not only protects your home but also enhances its value and longevity for years to come.
