Replacing your roof is one of the most important investments you'll make in your home. In Arizona, where the sun is relentless, and summer temperatures regularly exceed 100°F, your roofing choice plays a major role in protecting your home and regulating indoor temperatures. Among the most popular and affordable roofing options in the state are asphalt shingles.
But how much does it actually cost to install an asphalt shingle roof in Arizona? The answer depends on several variables, from the type of shingles you choose to the size and slope of your roof. In this blog, we break down everything you need to know on asphalt shingle roof cost in Arizona, including average prices, influencing factors, and smart ways to cut costs without compromising on quality.
Asphalt shingles are composite roofing materials made from a fiberglass base mat coated with asphalt and topped with mineral granules. Their combination of affordability, durability, and visual appeal makes them the go-to roofing choice for millions of homeowners across the U.S., and Arizona is no exception.
There are three main types of asphalt shingles available on the market:
In Arizona, architectural shingles are the preferred option for most homeowners due to their extended lifespan and improved resistance to sun damage. Their layered design helps insulate homes against the scorching heat, which can reduce energy costs over time.
As of 2025, homeowners in Arizona can expect to pay between $3.50 and $6.50 per square foot for a complete asphalt shingle roofing installation. This price includes labor, materials, underlayment, flashing, and disposal of old materials.
For a standard single-family home with a roof size of about 2,000 square feet, this translates to:
The wide range in pricing reflects differences in material quality, labor availability, project complexity, and additional work required (like replacing roof decking or installing ventilation).
It’s worth noting that while the initial cost of asphalt shingles is lower than many alternatives, they may need to be replaced more frequently, especially under Arizona’s punishing heat.
For a comprehensive overview of roofing costs across Arizona, including cities like Phoenix, Tucson, and Flagstaff, refer to our Roofing Cost Calculator.
The total cost of an asphalt shingle roof installation in Arizona is shaped by a variety of factors. From the physical structure of your home to the quality of materials and the labor market in your area, each element plays a role in the final quote. Here's a closer look at the most impactful cost drivers:
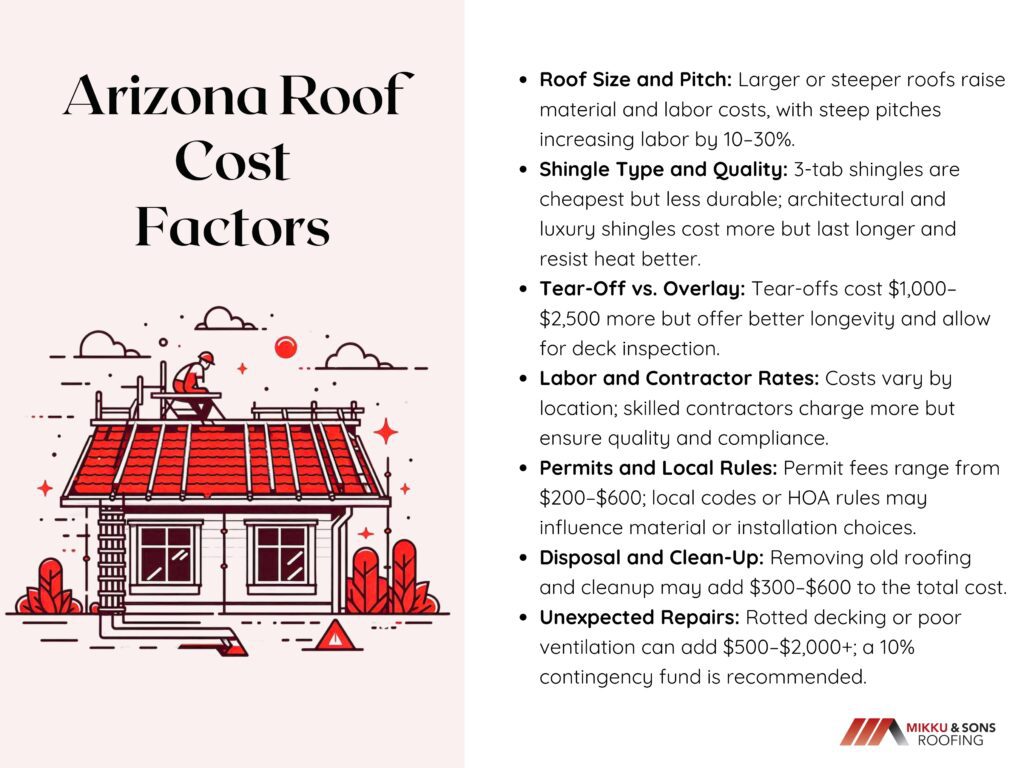
The size of your roof is one of the most straightforward cost factors larger roofs require more shingles, underlayment, flashing, and labor. However, it’s not just the square footage that matters. The pitch (or steepness) of your roof can significantly increase labor costs.
A steeply pitched roof is harder and more dangerous to work on, often requiring specialized safety gear like harnesses, scaffolding, or roof jacks. These precautions slow down installation and increase man-hours, adding anywhere from 10% to 30% to labor costs compared to a flat or low-slope roof.
Not all asphalt shingles are created equal. The most budget-friendly option, 3-tab shingles, costs less upfront but offers a shorter lifespan (around 15–20 years) and less resistance to Arizona’s harsh UV rays.
Architectural shingles, which are thicker and more dimensional, cost more but last 25–30 years and provide better heat resistance. Luxury shingles mimic high-end materials like slate or cedar and offer premium durability—but at a premium cost. Shingles with UV-reflective granules or energy-efficient coatings can help reduce cooling costs in Arizona’s brutal summer, offering long-term value despite a higher initial price.
You'll need to decide whether to tear off the existing roof or lay new shingles over it. An overlay is cheaper and quicker but not always recommended. Tear-offs involve removing the old shingles, inspecting the roof deck, and starting fresh, ensuring proper ventilation, flashing installation, and better long-term performance.
Tear-offs usually add $1,000 to $2,500 to your total project cost but are worth the investment if your roof deck is aging or damaged.
Labor rates vary widely across Arizona. In metropolitan areas like Phoenix, Scottsdale, or Tucson, higher demand, increased traffic, and elevated living costs often translate to higher contractor rates.
In rural areas like Sierra Vista, Kingman, or Prescott, labor may be more affordable, but you might face limited contractor options or longer scheduling times. Hiring a licensed, experienced roofer may cost more ranging from $50 to $85 per hour but ensures better craftsmanship, warranty options, and code compliance, potentially saving you thousands in future repairs.
Most municipalities in Arizona require a roofing permit, with fees typically ranging from $200 to $600, depending on the city and the scale of the project.
Cities like Tempe or Mesa may also have specific energy efficiency or HOA guidelines that affect material choices or installation methods. Always verify whether these costs are included in your contractor’s estimate to avoid surprises.
Roofing debris, including old shingles, nails, and underlayment, must be properly disposed of. Some contractors include this service in their total bid, while others charge separately for dumpster rental and haul-away services. Expect to pay an additional $300 to $600 for clean-up and disposal, especially if multiple layers are being removed.
During installation, hidden issues such as rotted decking, damaged flashing, or inadequate ventilation often surface. Addressing these problems can add $500 to $2,000 or more to your budget, depending on the extent of repairs. It’s smart to set aside a contingency fund about 10% of your total budget to handle these unexpected but essential fixes.
Roofing costs in Arizona vary significantly depending on your location, with factors such as climate, labor availability, housing density, and local regulations influencing the final price.
When selecting a roofing material for your Arizona home, understanding how different options perform in the desert heat, monsoon rains, and high UV exposure is key. Here’s how asphalt shingles stack up against the alternatives:
Asphalt shingles are the most widely used roofing material in Arizona, thanks to their affordability and ease of installation. Depending on the type 3-tab, architectural, or luxury, costs typically range from $3.50 to $6.50 per square foot. They offer a lifespan of 15 to 30 years and, with proper attic ventilation, can hold up well in Arizona's intense heat.
Clay tiles are a signature of Southwestern architecture, offering strong thermal resistance and a unique desert aesthetic. However, they’re among the most expensive options, with installation costs between $10 and $20 per square foot. Their weight also means many homes require roof reinforcement before installation.
A slightly more budget-friendly alternative to clay, concrete tiles cost around $8 to $15 per square foot. They're just as heavy but also highly durable and fire-resistant, making them a solid long-term investment for Arizona's arid climate.
Metal roofs are gaining popularity for their modern look and energy efficiency. Reflecting solar heat, they can lower cooling bills significantly. Expect to pay $7 to $12 per square foot, with lifespans reaching 40 to 70 years.
Common in contemporary and adobe-style homes, flat roofs like TPO or modified bitumen systems run between $4 and $9 per square foot. While sleek and space-efficient, they need regular maintenance to avoid pooling and leakage.
Wood shakes are less common in Arizona due to fire risk and poor resistance to UV exposure. They cost $8 to $14 per square foot, require frequent upkeep, and are generally not recommended for hot, dry climates.
Installing a new asphalt shingle roof in Arizona is a significant investment, but it's one that pays off in both comfort and home value. With 2025 costs ranging from $7,000 to $14,000 depending on your home’s size, roof complexity, and material choice, understanding all the influencing factors can help you plan wisely and budget effectively.
Whether you're upgrading from an aging roof or building a new home, asphalt shingles offer a reliable and affordable solution that suits Arizona’s challenging climate. Be sure to conduct thorough research, select a trustworthy contractor, and choose shingles that strike a balance between cost, aesthetics, and long-term performance.
If you're living in Arizona, there's a good chance your home has a flat roof. They're a practical choice for the dry, sunny weather and the wide, open skies we get to enjoy most of the year.
But like anything that takes a beating from the sun day in and day out, flat roofs eventually wear down. If yours is starting to show signs of aging like leaks, cracks, or bubbling materials, you’re probably wondering how much it's going to cost to replace it.
Costs can swing quite a bit depending on the materials you choose, how big your roof is, and even how easy it is for a roofer to get up there. But knowing what to expect can help you be in control of the whole process.
Living in Arizona means dealing with a lot of heat and sunshine, and your roof handles more of that than almost any other part of your home. Flat roofs have become part of how homes are built to handle desert life.
If your home has one, you probably already know that flat roofs don’t look like the pitched roofs in other parts of the country. You’ll notice flat roofs all over Arizona, from Phoenix to Tucson and even in smaller desert towns.
The dry climate makes flat roofs a smart option. There’s very little rainfall throughout the year, so the design doesn't need to shed water as quickly as it would in wetter places.
Getting a flat roof replaced isn’t something most homeowners plan for ahead of time. When it needs to happen, you might see water stains on the ceiling or notice your energy bills going up.
Then the question naturally comes up, "What's this going to cost?" One contractor might quote you one price, while another gives you something completely different.
Flat roof replacement costs in Arizona usually fall somewhere between $5 to $12 per square foot, depending on the material and job complexity. So if your roof is about 1,500 square feet, you could be looking at $7,500 on the low end and up to $18,000 or more for higher-end materials or extra labor.
This cost usually covers tear-off, new material, labor, cleanup, and basic warranty. Some contractors may include extras like coatings or minor insulation upgrades, but not all do.
That’s why it helps to ask for itemized quotes so you can compare more accurately.
You may not think about your roof’s shape very often, but it plays a big role in pricing. A simple rectangular layout with easy access costs less to replace than a roof with lots of angles, obstacles, or air conditioning units in the way.
Smaller roofs don't always mean smaller bills, either. The cost per square foot can go up on smaller homes because fixed costs like setup, equipment, and crew labor stay about the same.
On the other hand, larger roofs may benefit from bulk pricing, but they still take more time and materials.
Sometimes it might look like your whole roof needs to be replaced, but the damage could be limited to just one section. A good roofing contractor should tell you whether a full replacement is needed or if a partial fix can hold up safely.
Keep in mind, though, patchwork solutions might seem cheaper at first but can end up costing more if the problems spread. Once you're replacing a large portion of the roof, it usually makes more sense to do it all at once for better results and warranty coverage.
Flat roof replacement costs can vary a lot, even from house to house on the same street. You might hear a neighbor paid one amount, then find yourself staring at a much higher estimate for what seems like the same job.
There are several factors that directly affect how much you end up paying..
Some materials cost more because they last longer, perform better in heat, or take more skill to install.
These materials work well in heat and can lower cooling costs, but installation needs to be done right. The type you go with plays a big role in both the upfront cost and long-term value.
Getting materials and equipment up to your roof isn’t always easy. If your home is tall, tucked between buildings, or surrounded by landscaping, expect that to show up in your quote.
Roofers may need lifts, extra crew members, or special gear to safely reach the work area. The easier your roof is to access, the less you’ll pay in labor and setup costs.
On the flip side, tricky setups can increase labor time and raise the total by hundreds, or sometimes thousands, of dollars depending on how complex the job becomes.
If your current roof needs to be stripped down before the new one can go on, that adds to both time and cost. Tear-off jobs create extra labor and waste, which means more time, equipment, and disposal fees.
Some roofs might have multiple layers that need to be removed, especially on older homes. Leaving the old material in place can save money in some cases, but it’s not always the best move.
Many roofing systems work best when applied to a clean surface. Skipping tear-off might limit your warranty or reduce the lifespan of the new roof.
The roofing material you go for not only depends on its looks and your budget, but also how it works with the desert heat, how long it lasts under pressure, and long-term maintenance.All options are different, as well as all homes.
It also helps you spot when a contractor is upselling something that might not be right for your situation.
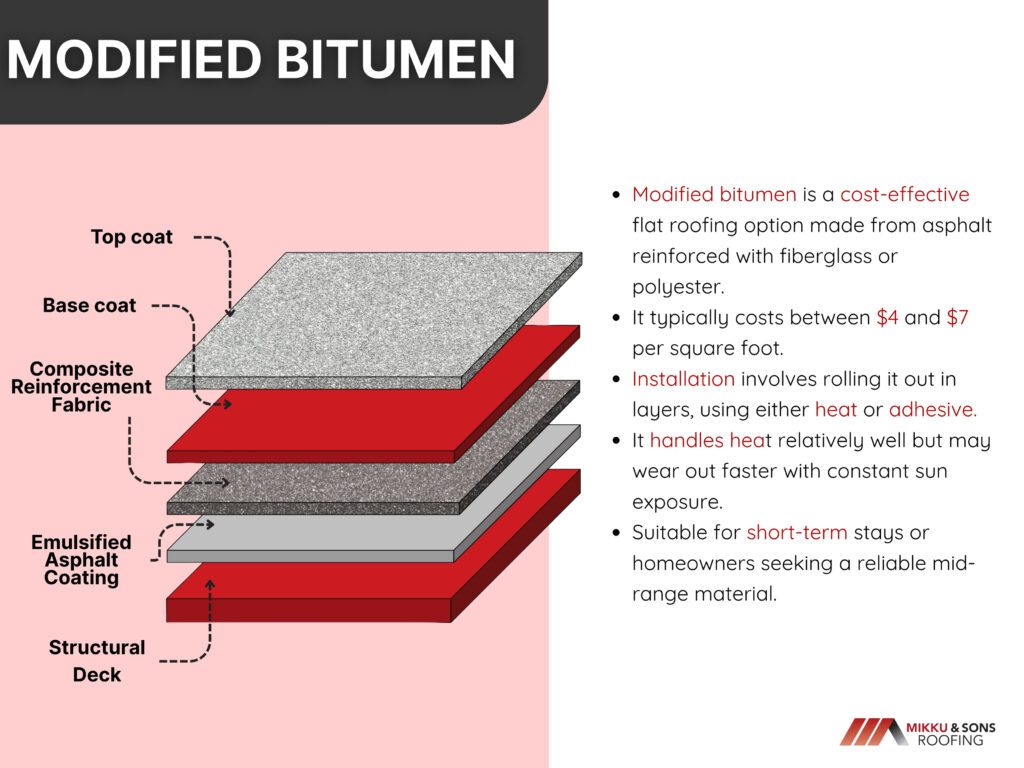
Modified bitumen is one of the more affordable flat roofing options and has been around for decades. It’s made from asphalt and reinforced with either fiberglass or polyester.
Installers roll it out in layers, and it can be applied using heat or adhesive, depending on the method. Price-wise, it tends to fall between $4 and $7 per square foot, making it appealing for budget-conscious homeowners.
It handles heat fairly well but may wear out sooner than other materials under constant sun exposure. It can still be a good fit if you're planning to stay in your home short-term or looking for a reliable mid-range option.
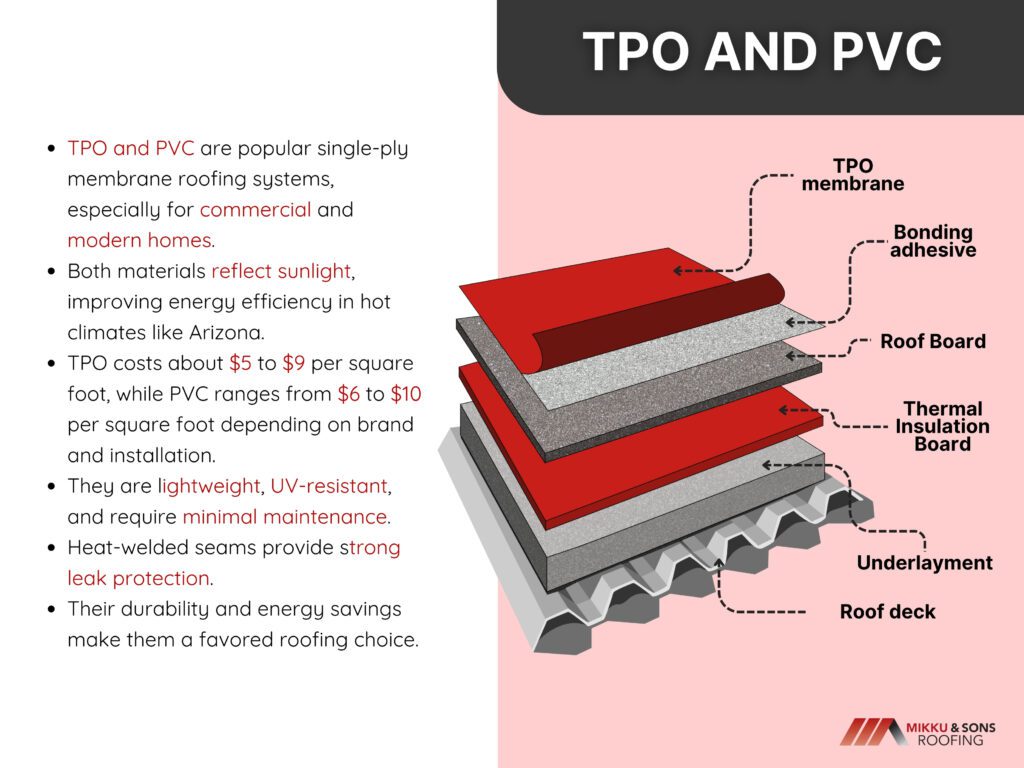
TPO (Thermoplastic Olefin) and PVC (Polyvinyl Chloride) are both single-ply membrane systems that have grown in popularity, especially in commercial and modern residential buildings. These materials reflect sunlight and help with energy efficiency, which can be a big help during Arizona summers.
TPO usually costs around $5 to $9 per square foot, while PVC might edge higher at $6 to $10 per square foot depending on the brand and installation method. Both are lightweight, resistant to UV rays, and require minimal maintenance.
They can also be heat-welded at the seams, which helps prevent leaks.
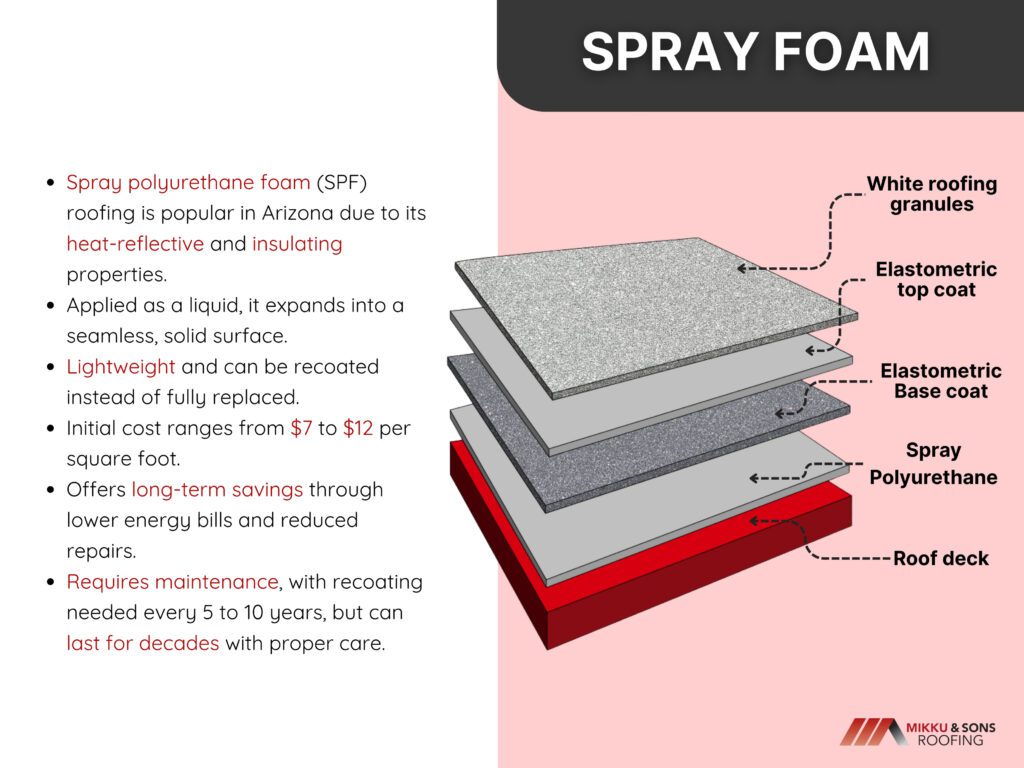
Spray polyurethane foam (SPF) roofing is a favorite in Arizona for a reason. It’s sprayed as a liquid and then expands into a solid, which creates a seamless surface that insulates and reflects heat extremely well.
It’s also lightweight and can be recoated over time rather than replaced completely. The initial cost usually runs between $7 and $12 per square foot, but many homeowners find that it pays off through lower energy bills and fewer repairs.
It does require regular maintenance, usually recoating every 5 to 10 years, but it can last for decades when taken care of properly.
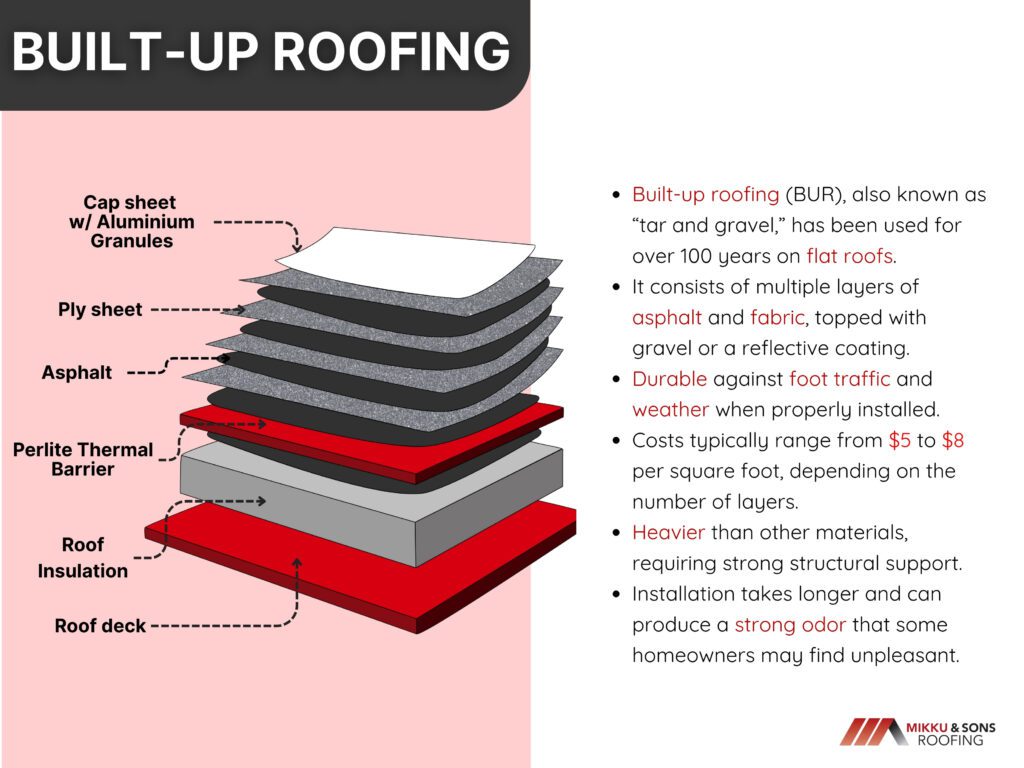
Built-up roofing, often called “tar and gravel,” has been used on flat roofs for over a century. It’s made by layering asphalt and fabric, then finishing it off with gravel or a reflective coating.
BUR holds up well to foot traffic and can resist damage from the elements when installed correctly. The cost ranges from $5 to $8 per square foot, though it can vary depending on how many layers are applied.
It’s heavier than other options, so your structure needs to support the weight. It can also take longer to install and may have a stronger smell during application, which some homeowners find bothersome.
Timing your roof replacement right can make a noticeable difference in how smooth the process goes. Planning ahead gives you more flexibility with scheduling, which often leads to better pricing and better results.
Roofing crews aren’t scrambling, materials are easier to get, and you’re not competing with dozens of other rushed jobs.
Most Arizona homeowners find that spring and fall are the best times to replace a flat roof. These seasons bring mild temperatures, low humidity, and fewer weather disruptions.
Crews can work more comfortably and efficiently, which speeds things up and reduces labor strain. In the spring, you’re ahead of the intense summer sun. In the fall, you’re past monsoon season.
Both windows give you a chance to get the job done without battling extreme conditions that can slow progress or impact the quality of the installation.
Summer might seem like a good time since the weather is dry, but Arizona summers can be brutal on roofing crews and materials. Some types of roofing, like foam, need specific temperature ranges to cure properly.
Working in extreme heat can also be unsafe, leading to longer project times or limited daily work hours. That said, some contractors offer seasonal deals during the hotter months when demand is lower for flat roof work compared to shingle or pitched roofing.
If you’re flexible and your roof isn’t in urgent condition, it could still be worth exploring summer pricing.
Between July and early September, Arizona’s monsoon season brings short but heavy bursts of rain, wind, and dust. These storms make it harder to stay on schedule and increase the risk of water damage during an open-roof project.
Most contractors avoid booking full roof replacements during this period unless absolutely necessary. If your roof already has damage or a leak, you’ll still want to reach out.
A good contractor may be able to install a temporary cover or emergency fix until the weather clears enough to start the real work.
Flat roofs come with some clear advantages, especially in Arizona. They tend to be easier to inspect, more efficient with cooling, and often give you extra usable space that sloped roofs can’t.
That said, there are also times when a sloped roof might make more sense for your home’s layout, your neighborhood’s style, or even your long-term plans. If you're still on the fence about which direction to take, comparing flat and sloped roofs side by side can help you figure out what fits your needs best.
The two types serve different purposes and come with their own trade-offs, so understanding those differences could be just as important as knowing the cost of a flat roof replacement.
Choosing the right roof style is a crucial decision when designing or renovating a house. It significantly impacts the aesthetic appeal, functionality, and overall cost of your home. Among the myriad of roof designs, the gable and gambrel roofs stand out as popular choices, each offering distinct advantages and disadvantages.
Understanding their characteristics is essential to determine which style best suits your needs and preferences. This article focuses on gable roof vs. gambrel roof, exploring design, benefits, drawbacks, and factors to consider when making your final decision.
Understanding the fundamental structure and appearance of both gable and gambrel roofs will provide valuable context for evaluating their pros and cons. Each has a distinct architectural identity, and knowing how they’re built can help clarify why they perform differently under various conditions.
A gable roof is one of the most straightforward and widely used roof styles, known for its simplicity and effectiveness. It consists of two sloping sides that rise to meet at a central ridge, forming an inverted "V" shape. These slopes run directly from the ridge down to the eaves, creating a peak at the top and open vertical sides known as gable ends. The angle of the slopes can vary depending on climate, aesthetic preferences, and structural needs, but the basic triangular form remains consistent.
Gable roofs are celebrated for their clean lines, symmetry, and versatility. The gable ends can be a prominent visual feature and often house windows (such as gable dormers) or decorative elements like shiplap siding, wood trim, or even small balconies. Their straightforward shape makes them adaptable to a range of house styles—from modest cottages to grand colonial homes. Additionally, they can be oriented in different directions (front-gable, side-gable, or cross-gable) to suit various layouts and architectural designs.
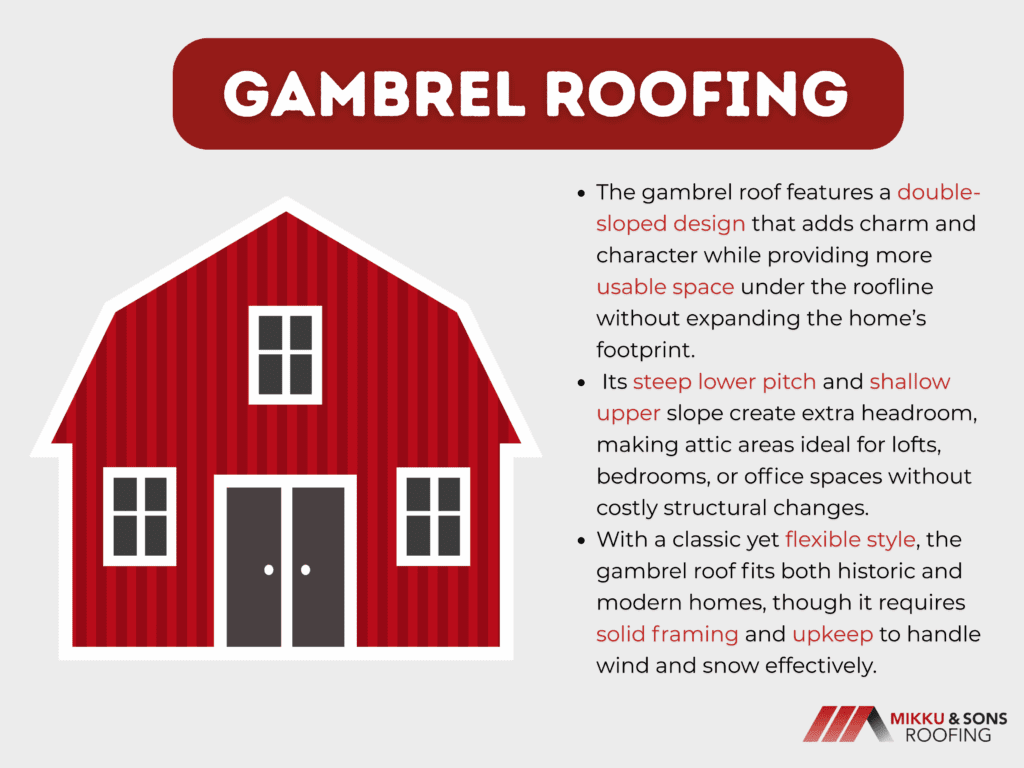
A gambrel roof—commonly seen on barns and colonial-style houses—is more complex in structure but offers enhanced functionality. Each side of the roof is divided into two distinct slopes: a steeper lower slope and a gentler upper slope. This dual-pitch design increases the internal volume of the attic or upper floor, making it ideal for maximizing headroom and storage space without increasing the overall height of the building.
While sometimes mistakenly called a "mansard roof," it's important to note that a gambrel roof has only two sides, whereas a mansard roof slopes down on all four sides of the building. The gambrel’s shape provides a classic silhouette and is a staple in Dutch Colonial, Georgian, and American barn architecture.
Gambrel roofs offer a visually striking profile thanks to the dramatic break between the two slopes. This design often creates a more rounded or curved aesthetic, especially when dormer windows or eaves are incorporated. It gives off a sense of nostalgia and tradition, frequently evoking pastoral charm or early American design cues. The broad, overhanging eaves can also add decorative detail and provide additional protection from the elements.
Each roof style offers its own benefits and limitations depending on factors like climate, cost, and desired aesthetics. Below is a side-by-side look at the strengths and potential drawbacks of both gable and gambrel roofs to help guide your decision.
Gable roofs are simple to build, cost-effective, and highly efficient at shedding water and snow. Their clean lines work well with a wide variety of home styles, and they offer good ventilation options.
These roofs can be more vulnerable to wind damage, especially if not properly braced, as strong gusts can put pressure on the gable ends. They also offer limited attic space compared to other roof designs.
Gambrel roofs provide significantly more usable interior space, making them ideal for attics, lofts, or storage. Their unique appearance adds character and a classic architectural charm to homes and outbuildings.
The complex structure and additional joints make gambrel roofs more expensive to build and maintain. They are less effective in areas with heavy snow or high winds, where the roof may be more prone to leaks or structural stress.
Gable roofs are simple, durable, and budget-friendly—great for most homeowners. Gambrel roofs offer extra space and unique style, ideal for those wanting both function and character. Choose based on your climate, budget, and how you’ll use the upper space.
Selecting the right roof style involves more than just appearance—it requires evaluating practical aspects that impact your home’s performance and livability. Below are key factors to weigh when deciding between a gable or gambrel roof.
If you live in an area with heavy snow or rain, a gable roof’s steep slope provides better runoff and reduces the risk of water damage. In contrast, a gambrel roof may struggle in such conditions, as its flatter upper slope can accumulate snow and moisture more easily.
Gambrel roofs are ideal if you need more upper-level living space, such as an attic, loft, or extra storage, without increasing the overall building height. Gable roofs, while functional, typically offer less usable attic space due to their sharp pitch and triangular shape.
Gable roofs are more affordable and faster to construct due to their straightforward design and fewer materials. Gambrel roofs, while offering more space, involve complex framing and additional support, leading to higher construction and maintenance costs.
Gable roofs are versatile and fit with nearly any home style, from modern to traditional. Gambrel roofs, on the other hand, create a more distinctive, nostalgic look that complements historic or country-style homes.
The simple design of a gable roof makes it easier and less expensive to maintain over time. Gambrel roofs may require more upkeep due to their additional joints and slopes, which can be prone to leaks and wear.
Choosing between a gable and gambrel roof depends on your unique needs and environment. Consider climate, space, cost, and design preference carefully to ensure your roof not only looks good but functions well for years to come.
A gable roof is a reliable and time-tested option that suits a wide range of homes and environments. Below are scenarios where a gable roof would be the most practical and beneficial choice for homeowners.
The steep slopes of a gable roof allow rain, snow, and debris to slide off easily, reducing the risk of water pooling and roof damage. This makes it an excellent choice for areas with harsh weather and seasonal precipitation.
Gable roofs are typically more affordable to design and build because of their straightforward structure and fewer materials. If you're working within a tight construction budget, this style offers great value without sacrificing quality.
With their clean lines and classic triangular shape, gable roofs blend seamlessly with many architectural styles. Whether you're building a cottage, colonial, or modern home, the gable roof offers a look that’s both traditional and adaptable.
The simplicity of a gable roof translates to fewer components and joints, which lowers the chances of leaks or structural issues. This makes inspections, repairs, and routine maintenance more straightforward and cost-effective.
Choose a gable roof if you're prioritizing affordability, durability, and low maintenance, especially in climates with significant rainfall or snowfall. It’s a versatile and dependable option that suits both practical needs and timeless aesthetics.
A gambrel roof is an excellent choice for homeowners seeking both visual character and functional space. Its distinctive shape and added upper-level room make it ideal for specific architectural goals and lifestyle needs.
The dual-slope design of a gambrel roof creates more headroom and floor space in the upper portion of your home. This makes it perfect for adding an extra bedroom, home office, or spacious storage area without increasing the home's overall height.
Gambrel roofs add instant charm and character, particularly to farmhouse, Dutch Colonial, and rustic-style homes. If you're looking to make your house stand out with a classic, eye-catching design, a gambrel roof delivers.
This roof style is especially practical for barns and detached garages, where the extra overhead space can be used for hay lofts, workshops, or storage. Its wide, functional interior makes it a favorite for agricultural and utility structures.
Because gambrel roofs are less ideal in heavy snow or wind-prone areas, they’re best suited for moderate climates. In regions with mild weather, you can enjoy their benefits without significant concerns about structural stress or water retention.
Opt for a gambrel roof if maximizing space and adding a traditional, elegant touch to your home are top priorities. With the right setting and purpose, this roof style offers both beauty and functionality in equal measure.
Choosing between a gable roof and a gambrel roof comes down to balancing function, style, and personal needs. Gable roofs are simple, cost-effective, and perform well in harsh weather, making them ideal for a wide range of climates and home styles. Gambrel roofs, while more complex, offer greater interior space and a charming, traditional look—perfect for those wanting added attic room or a distinctive design.
Ultimately, your choice should reflect your climate, budget, and how you plan to use your space. Both roof types have unique benefits, and understanding their differences will help you make a decision that enhances your home’s comfort, style, and value.
Living in Phoenix means your roof takes a beating from the intense sun, sudden storms, and seasonal monsoons. Over time, this wear adds up—making repairs not just likely but necessary. Understanding what impacts roof repair costs and how to avoid costly mistakes can save you thousands.
In this guide, we’ll break down flashing essentials, common issues, and practical maintenance tips every Phoenix homeowner should know to keep their roof in top shape. So, what exactly is flashing on roof , and why is it so essential to the health of your home?
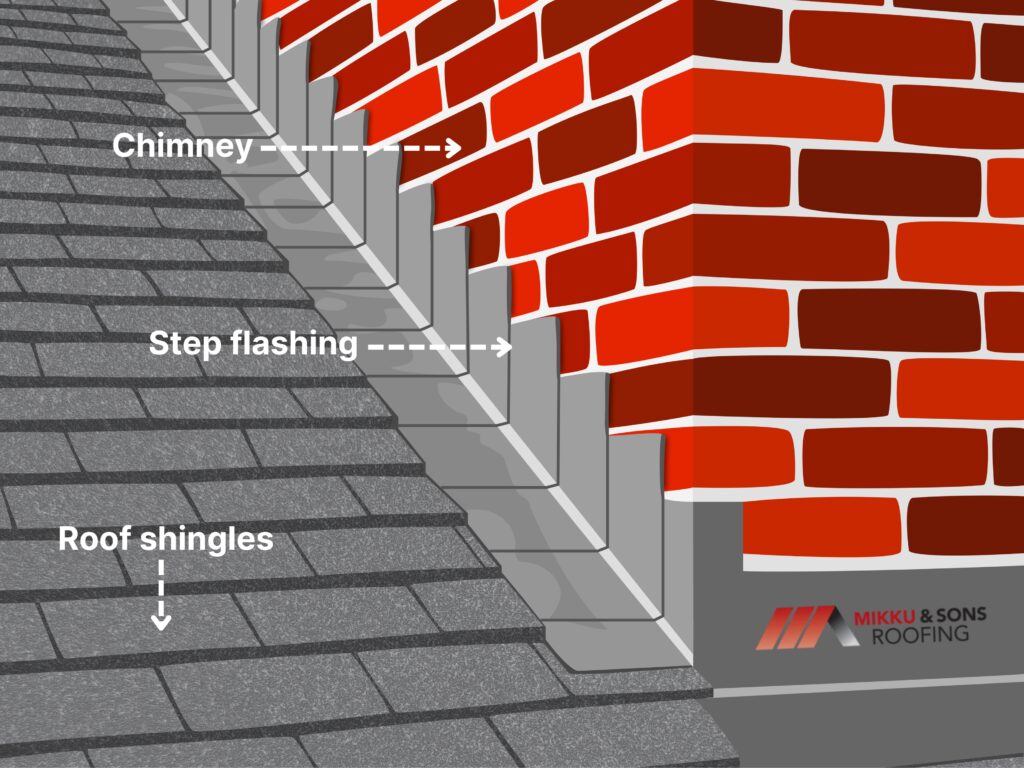
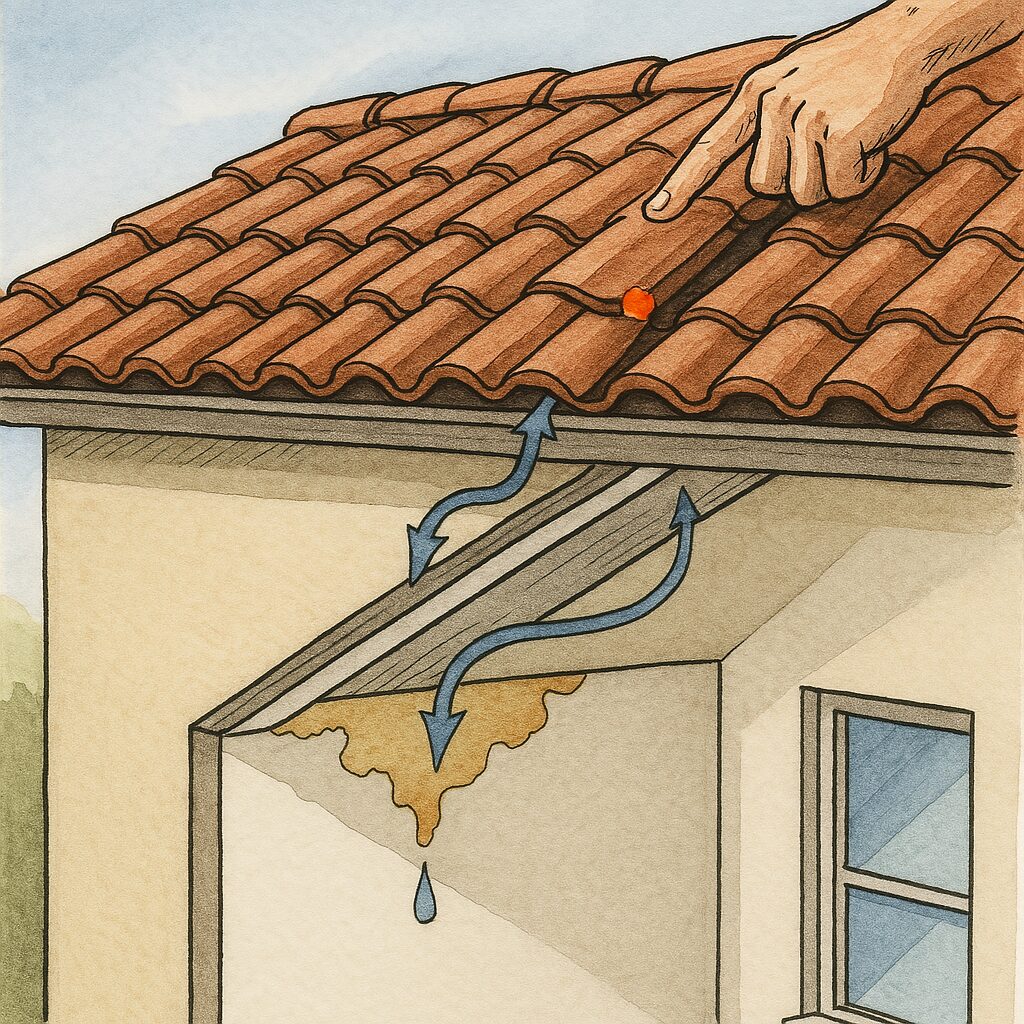
Roof flashing is a thin material—usually made of metal like aluminum, copper, or galvanized steel—that’s installed in areas of your roof that are especially prone to leaks. It’s typically found around chimneys, skylights, roof valleys, vents, and where the roof meets vertical walls. Its main job? To direct water away from seams and openings so it doesn’t sneak into your home. “Parts of a Roof Diagram” is often used to help homeowners understand where flashing fits into the broader roofing system.
Flashing acts as a barrier that keeps rain and melting snow from getting underneath shingles or other roofing materials. Without it, even the smallest gap could become a major entry point for moisture. Over time, that leads to rot, mold, and expensive water damage.
Flashing doesn’t get much attention, but it’s one of the most important parts of your roofing system. The role of roof flashing in leak prevention becomes especially clear when dealing with tricky areas like chimneys or skylights. While shingles or tiles shed most of the water, flashing protects the places those materials can’t. It handles the tricky areas—like corners, curves, and junctions—that are otherwise vulnerable to water intrusion.
Here’s why flashing matters so much:
Whether you're building a new home, replacing an old roof, or doing routine maintenance, never overlook your flashing. If it's loose, rusted, or missing, it could leave your home exposed. A quick inspection or repair now can save you thousands later.
Bottom line? Flashing may be out of sight, but it should never be out of mind.
Roof flashing comes in several types, each designed to protect specific areas of your roof where leaks are more likely to occur. Understanding the different kinds helps you spot problems early and keep your roof in good shape.
1. Continuous (Apron) Flashing
This type runs along a roof edge or dormer and directs water down and away. It includes expansion joints to allow the metal to flex as the roof naturally shifts with temperature changes.

2. Step Flashing
Step flashing is used where the roof meets a vertical surface like a wall or chimney. Small L-shaped pieces of metal are layered between each row of shingles, guiding water safely down the roof instead of letting it sneak into gaps.
3. Drip Edge Flashing
Installed at the edges of the roof, drip edge flashing helps water flow into the gutters instead of seeping underneath the roof deck. It also prevents erosion and blocks pests from getting under the roofing material.
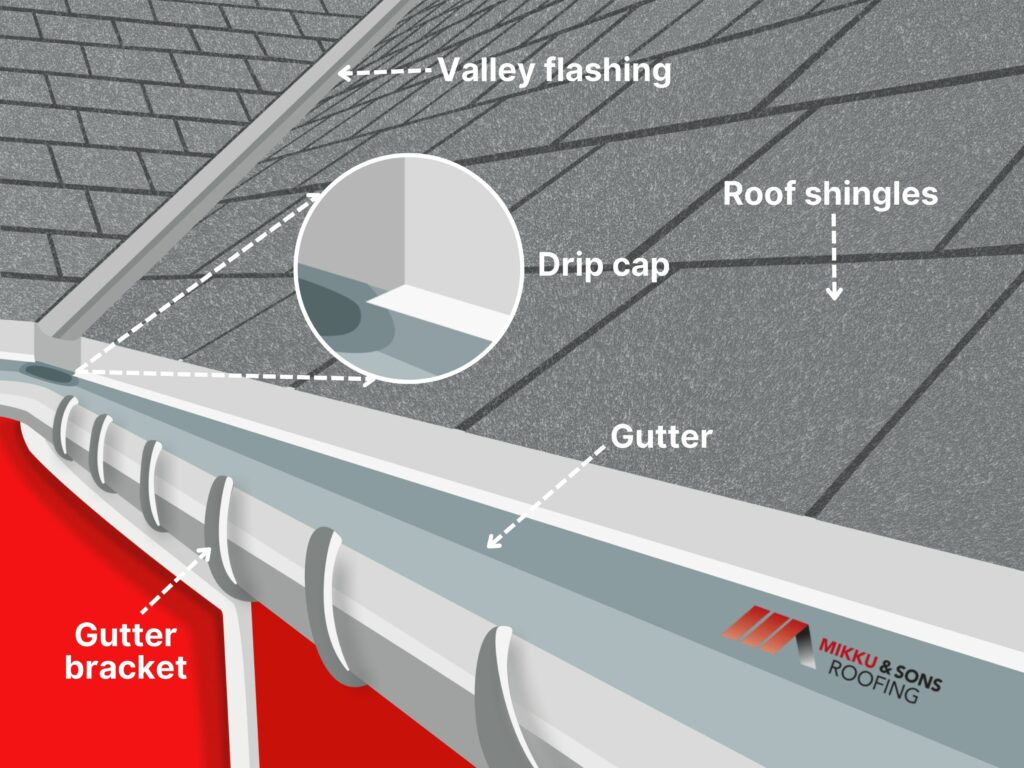
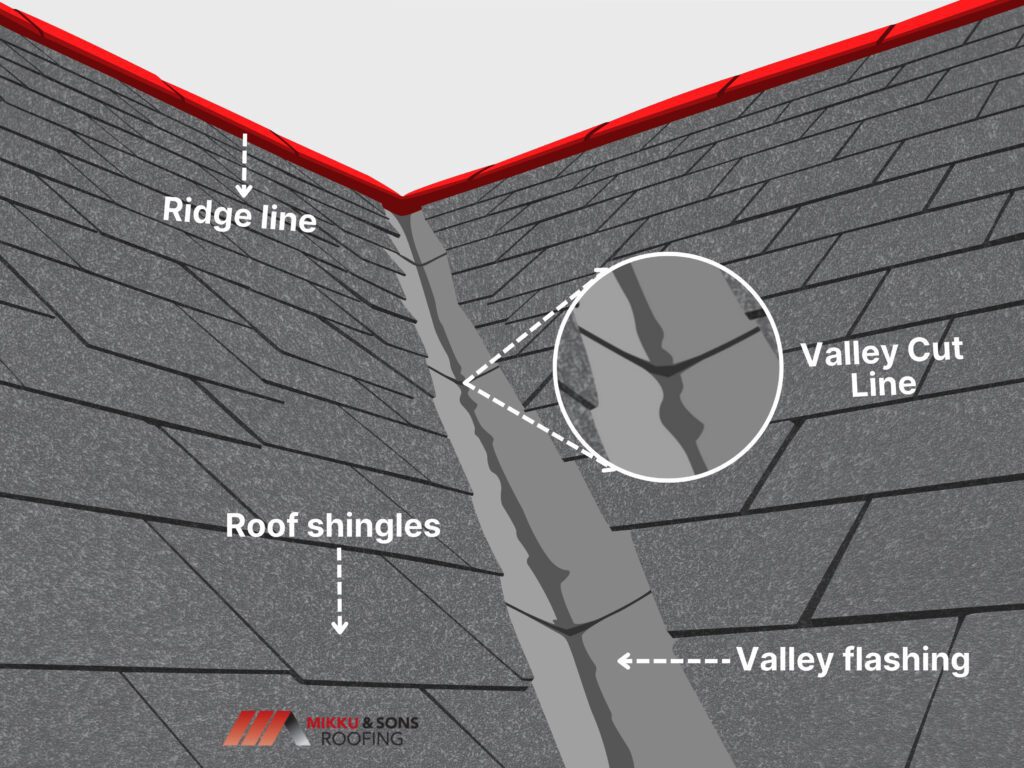
4. Valley Flashing
Valley flashing is placed where two roof slopes meet to form a valley. These spots collect a lot of water during storms, so the flashing ensures it’s funneled safely off the roof without pooling or penetrating shingles.
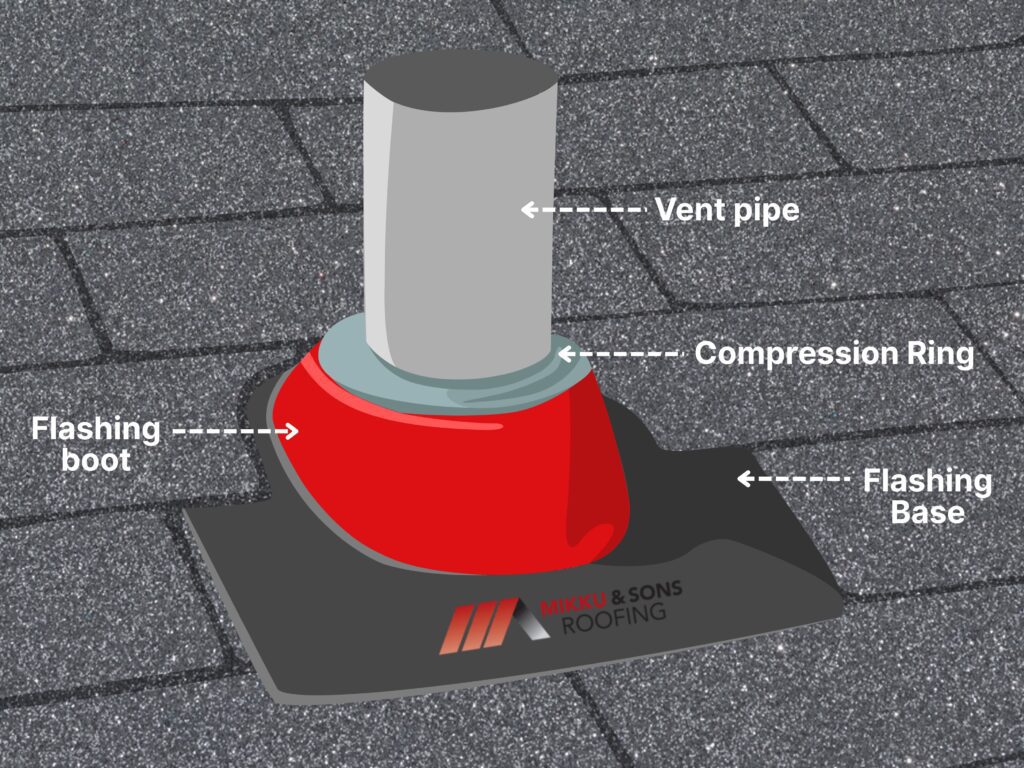
5. Vent Pipe Flashing
Vent pipes that come through the roof—like plumbing or exhaust vents—need special flashing to seal around them. This flashing usually includes a rubber or metal collar that hugs the pipe tightly.
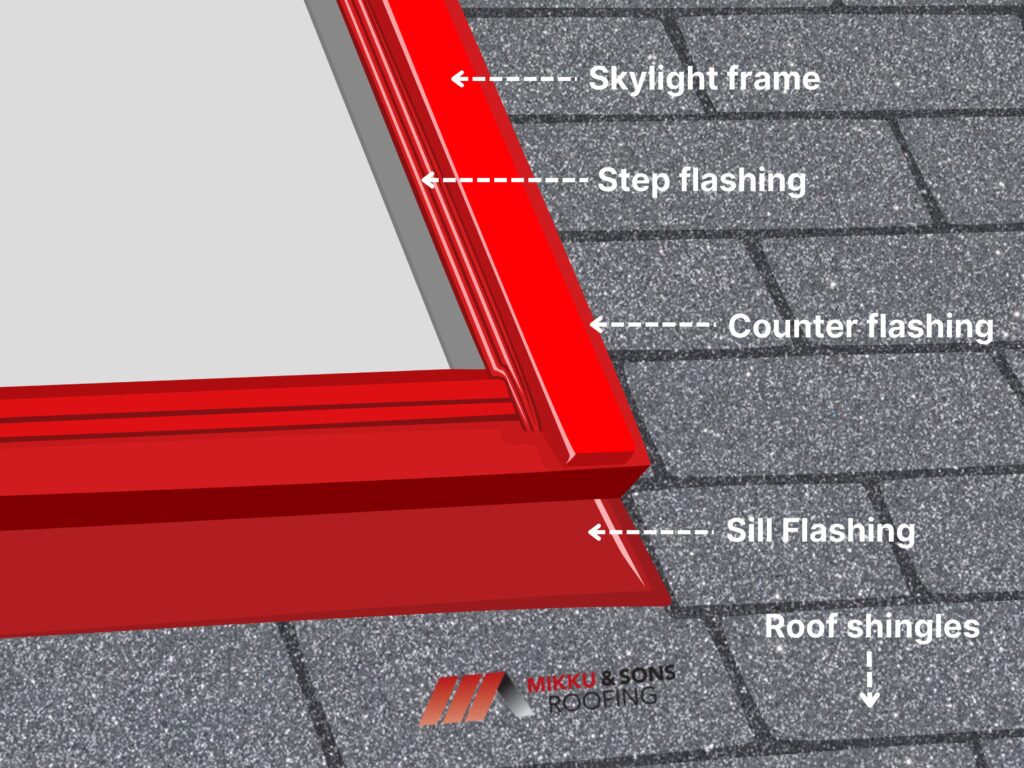
6. Skylight Flashing
Skylight flashing is custom-fitted around skylights and includes multiple components that protect the seams and corners, where leaks are most likely to form.
Flashing can wear out, shift, or become damaged over time—especially in areas with extreme weather. Knowing what to look for can help you catch problems before they lead to leaks or structural damage.
If you're wondering how to fix a leaking tile roof, checking the flashing should be one of your first steps.
Even the best roofing materials won’t perform well if the flashing is installed incorrectly. Flashing is your roof’s first line of defense against leaks at seams and junctions, but when it's poorly installed, it can do more harm than good. Here are some common mistakes to avoid:
1. Using the Wrong Type of Flashing
Not all flashing is the same. For example, step flashing should be used along vertical walls, while valley flashing should be used for roof valleys. Using the wrong type can leave gaps that water easily slips through.
2. Overlapping Issues
Flashing should be layered so water flows down and away from the roof—not back into it. If the metal pieces are installed without the proper overlap or in the wrong direction, water can get trapped and seep underneath the roofing materials.
3. Skipping Sealants
Sealants like roofing cement or caulk are often used to reinforce flashing around tricky areas. Failing to seal gaps, edges, or fasteners can allow water to sneak in and start causing damage over time.
4. Nail Placement Mistakes
Fastening flashing in the wrong spot—such as through the middle instead of the top edge—can allow water to penetrate through the nail holes. Nails should be placed strategically so the upper roofing materials protect them.
5. Poor Integration with Shingles
Flashing should be installed in conjunction with shingles, not just on top or underneath them. Improper layering allows water to get under the shingles and bypass the flashing completely.
6. Reusing Old Flashing During Roof Replacement
The cost of changing chimney flashing can vary, but it's a worthwhile investment if the existing one is rusted, loose, or missing entirely. Some contractors try to save time or money by reusing old flashing. This can lead to early failure, especially if the existing flashing is corroded, bent, or wasn’t installed correctly the first time.
Keeping your flashing in good shape doesn’t require a lot of work, but it does require consistency. Here are some tips to help you maintain your roof flashing and prevent leaks:
1. Schedule Regular Roof Inspections
At least once a year—and after any major storm—have your roof inspected by a professional. They’ll look for loose, damaged, or corroded flashing before problems get worse.
2. Check for Rust or Corrosion
Flashing is usually made from metal, which can rust over time. If you see signs of rust, it may be time to replace the flashing or at least clean and treat it with a rust-resistant coating.
3. Reseal as Needed
Sealant or caulk around flashing can dry out and crack over time. Resealing those areas ensures water stays out. This is especially important around chimneys, skylights, and vents.
4. Clear Out Debris
Leaves, sticks, and other debris can collect around flashing, especially in valleys or at roof edges. This can trap moisture and lead to deterioration. Keep those areas clean to avoid unnecessary wear.
5. Address Minor Damage Quickly
If you spot a loose piece of flashing or a small crack in the sealant, don’t wait. Small issues can quickly escalate into full-blown leaks and expensive repairs.
6. Avoid DIY Repairs Without Experience
It’s tempting to fix things yourself, but improper repairs often make problems worse. When in doubt, call a qualified roofer who knows how to handle flashing correctly.
Roof flashing may not be the most visible part of your roof, but it plays a critical role in preventing water damage and extending roof life. From identifying early signs of failure to avoiding installation mistakes, these insights help Phoenix homeowners stay ahead of costly repairs. Whether you’re budgeting for flashing replacement or maintaining what’s already there, proper care ensures long-term protection. When in doubt, consult a roofing professional—your home is worth the investment.
With your home in mind, you probably think about the kitchen, living room, or even your lawn, but what about your roof? It does its job every single day, protecting everything underneath it without much attention.
When something goes wrong like a missing shingle, roof tile or a slow leak the roof becomes the center of focus. You get left trying to figure out what part of your roof even needs fixing.
That’s why understanding the different parts of your roof comes in handy. You need a basic idea of what’s up there to save you time, money, and stress. Think of it like getting to know the anatomy of your home.
Your roof is built with layers, each playing a different role in protecting your home. These parts work together to manage moisture, support weight, and shield your house from wind, sun, and snow.
| Layer | Location | Purpose | Common Materials |
| Decking | Bottom-most layer | Structural support for all roof materials; holds weight of shingles, snow, etc. | Plywood, OSB (Oriented Strand Board) |
| Underlayment | Between decking & covering | Moisture barrier; protects against wind-driven rain | Felt paper, Synthetic sheets |
| Roof Covering | Topmost visible layer | Weatherproof shield; gives roof its appearance | Asphalt shingles, Metal, Clay tiles, Wood shakes |
When you know what’s stacked up there, it becomes easier to spot issues, ask the right questions, and stay in control during repairs or upgrades. Most of what keeps your roof working properly isn't even visible from the outside.
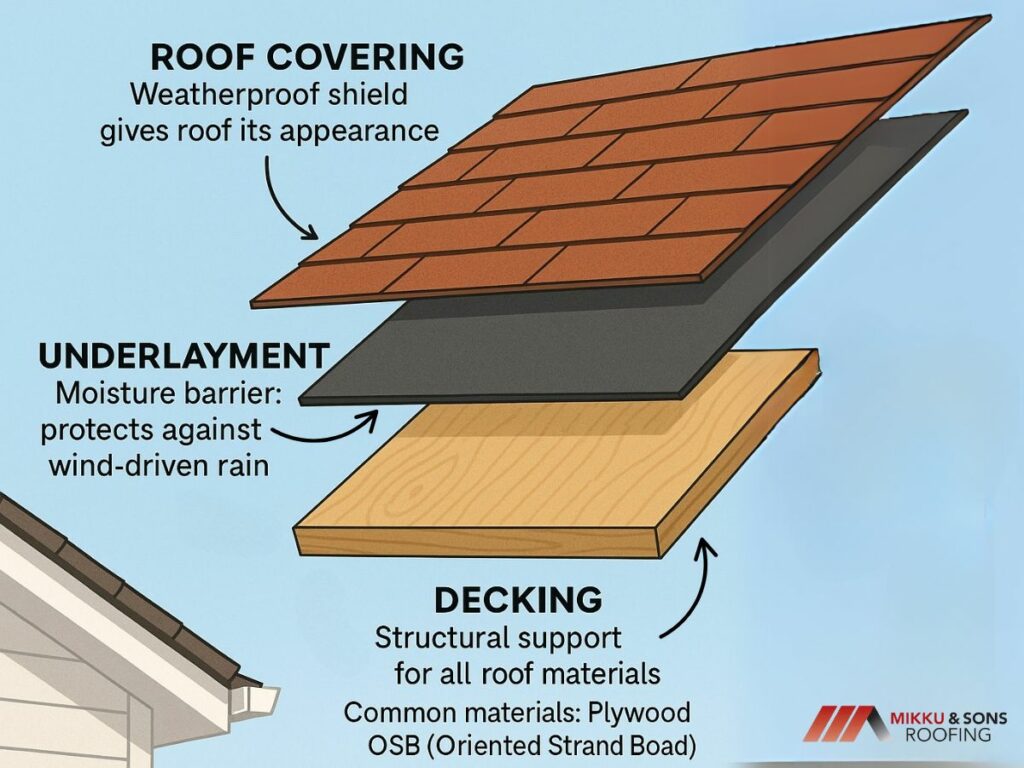
Before anything else goes on your roof, the decking comes first. This is what supports everything above it, including the weight of shingles, underlayment, and even snow in the winter.
Decking usually covers the entire structure, creating a flat and solid surface for the rest of the roofing materials. You may never see this part of your roof unless there's major work being done, but it is important.
Weak or rotted decking can make the whole system less stable and put your home at risk for leaks or sagging. That’s why roofers always check the condition of the decking during major repairs or replacements.
Right above the decking lies the underlayment. This layer adds a second line of defense against water, especially in case wind drives rain under your shingles.
It’s installed between the base and the top layer, but without it, water could slip through even the smallest gaps. There are a few different types of underlayment materials, including felt and synthetic options.
Each one has its own set of pros and cons, but all of them aim to prevent moisture from getting into the structure of your home.
This is the part you see when you look up at your house from the driveway. Shingles, tiles, or panels make up the outermost layer and take the full force of the weather.
They’re built to keep water out, reflect sunlight, and give your home a finished look. Your choice of roof covering often depends on your local climate, budget, and personal taste.
Asphalt shingles are one of the most common, but you might also come across metal panels, clay tiles, or wood shakes depending on where you live.
A roof is shaped by lines, edges, and meeting points that do more than add structure. These spots tend to be where water collects or changes direction, which makes the
m more vulnerable to leaks and wear.
| Feature | Location on Roof | Function | Common Problems |
| Eaves | Roof edge (overhang) | Directs rainwater away; allows attic ventilation | Clogs, rot, poor ventilation |
| Fascia | Visible board at eaves | Holds gutters; protects edge of decking | Warping, water damage, pest intrusion |
| Ridge | Peak where two slopes meet | Allows ventilation through ridge vents | Cap shingles loosening, leaks |
| Hip | Sloped edges between sections | Adds structure; protects meeting points of different roof slopes | Wind damage, misaligned shingles |
| Valley | Inward angle where slopes meet | Channels rainwater down to gutters | Debris buildup, leaks, rusted flashing |
It’s easy to think your roof cladding is doing all the work, but areas like roof edges and ridges carry just as much weight in keeping your home protected. They control how water moves, how air flows out, and how everything stays sealed at the seams.
The eaves are the bottom edges of your roof that hang past the side walls of your house. They help move rainwater away from the structure and give space for ventilation under the roof.
The part you actually see from the ground is usually the fascia board, which runs along the edge and holds up the gutters. The fascia also protects the edge of the decking from moisture, pests, and anything else that shouldn’t be getting inside your roof.
When this part starts to rot or pull away, water can slip in and do more damage than you’d expect. That’s why it’s a good idea to keep an eye on it and make sure it doesn’t look warped, soft, or cracked.
The ridge is the highest point of your roof, where two sides meet at the top. It runs along the peak and needs to stay sealed to keep out water while still allowing air to flow through.
Hips are similar, but they’re found on the sloping edges where different roof sections meet. Both ridges and hips can get hit hard by wind and weather.
That’s why special shingles, caps, or vents usually cover these areas to keep everything watertight. If those start to shift or wear out, leaks tend to start right along these lines, so it’s worth checking them after storms or heavy snow.
Valleys are the places where two slopes meet at an inward angle, forming a low line that rainwater naturally follows. Since so much water flows through here, valleys are one of the first places that start to show wear or leak when things go wrong.
Roofers usually reinforce these areas with metal flashing or extra layers of protection, but even then, debris like leaves and branches can build up and trap moisture. Cleaning them out and making sure nothing looks cracked or rusted can keep you ahead of most issues that start in these low points.
Your roof also helps your home breathe and stay dry in ways that aren’t always obvious. Two key systems help make that happen, ventilation and drainage.
| Component | Role | Common Types | Why It Matters |
| Vents | Allows airflow in attic; removes heat/moisture | Ridge vents, Soffit vents, Box vents | Prevents mold, prolongs roof life, reduces energy costs |
| Gutters | Collect water from edges and direct it safely away | K-style, Half-round | Prevents leaks, wood rot, and foundation damage |
| Downspouts | Carry water from gutters down to ground level | Round, Square, Flexible extension pipes | Keeps water from pooling near the home |
Without them, heat builds up in your attic, moisture lingers, and water ends up where it shouldn’t be.
Hot air rises, and your attic collects more of it than any other part of your house. Without proper ventilation, that trapped heat can cause your shingles to age faster and raise your energy bills.
It can also lead to condensation, which soaks into insulation and wood, slowly causing damage over time. Roof vents allow fresh air to come in while letting warm, moist air escape.
There are several types, including ridge vents, box vents, and soffit vents. The layout of your home and roof shape usually determines which ones you’ll have.
Once rain hits your roof, it needs a clean path to move off and away from your home. Gutters and downspouts catch water along the roof’s edge and carry it down and out, keeping it from pooling near your foundation or spilling onto your porch.
Clogged or sagging gutters can cause water to back up, leading to leaks, wood rot, and even cracked concrete around the base of your house. Regular cleaning, secure fasteners, and making sure water flows the right direction are small tasks that go a long way in keeping everything dry where it should be.
The shape and profile of your roof can affect not only the look of your home but also how well it stands up to weather and other elements. Each type of roof profile has its own advantages, depending on where you live, the style of your home, and your specific needs.
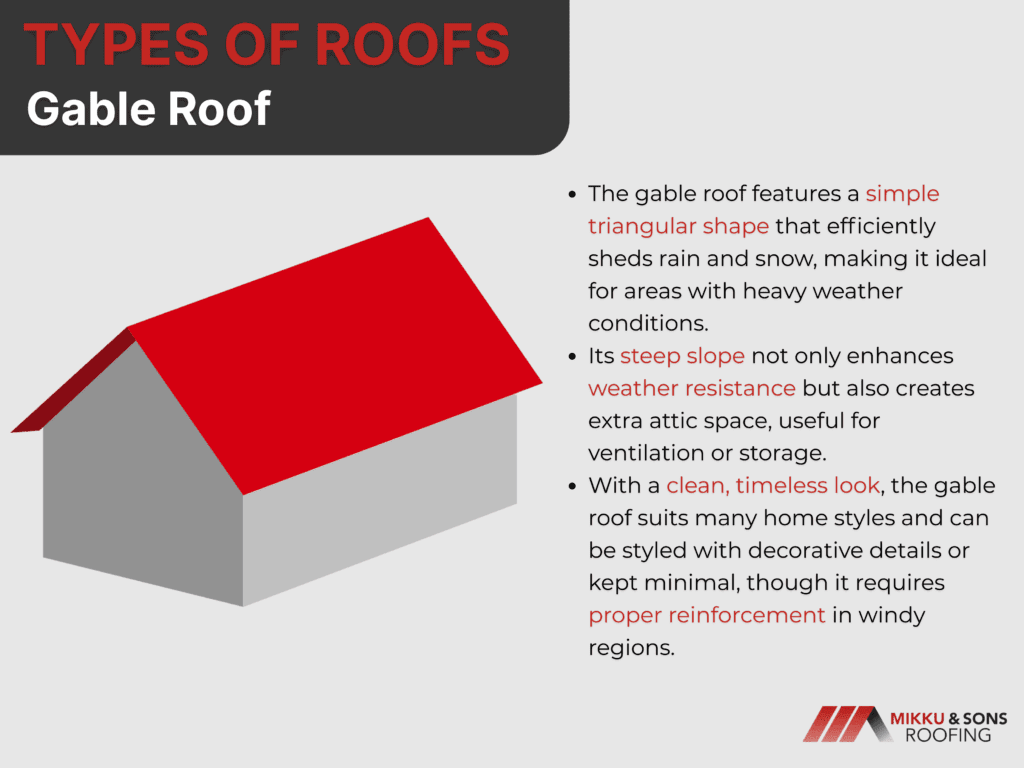
The gable roof is one of the most recognizable and commonly used styles. Its simple triangular shape makes it effective at shedding rain and snow, which is why you’ll find it in places with heavy weather.
The steep slope also provides extra attic space for storage or ventilation. Besides its practicality, a gable roof offers a clean, timeless look.
You can dress it up with decorative touches or keep it minimal, making it perfect for various home styles. The only thing to keep in mind is that gable roofs can be vulnerable to strong winds, so make sure the structure is properly reinforced in storm-prone areas.
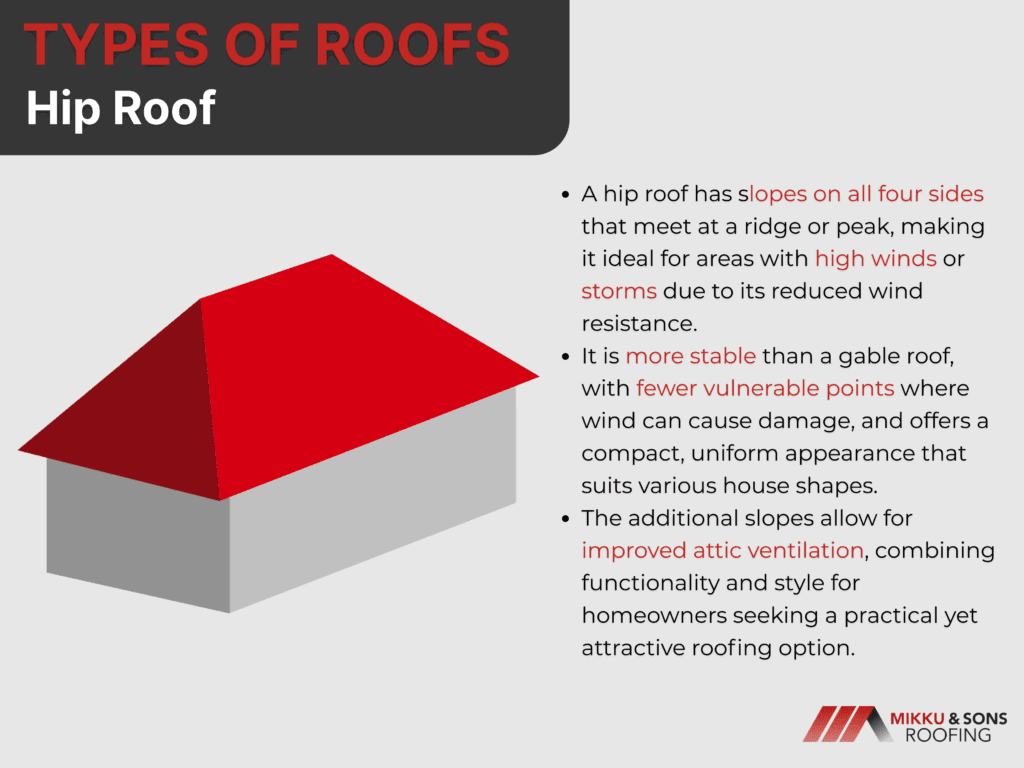
A hip roof has slopes on all four sides, meeting at a ridge or a peak. This style is especially beneficial in areas that experience high winds or storms because the angled sides reduce wind resistance.
Hip roofs are more stable than gable roofs, with fewer points where wind can catch and cause damage.The design offers a more compact, uniform look, which can work well with a variety of house shapes.
The added slopes also provide extra space for attic ventilation, making it an excellent choice for homeowners who want to keep their roof functional and stylish.
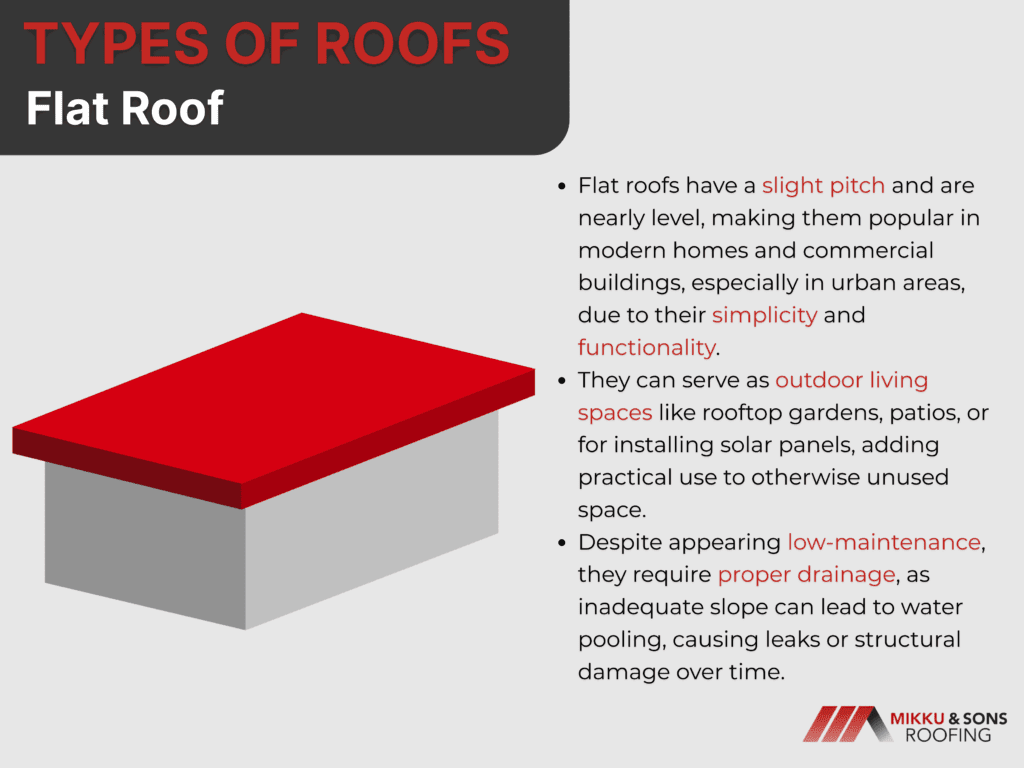
Flat roofs, as the name suggests, have a very slight pitch that’s almost level, making them ideal for modern homes or commercial buildings. They are typically seen in urban areas and are valued for their simplicity and functionality.
You can also use a flat roof for outdoor spaces like rooftop gardens, patios, or even solar panels. While flat roofs might seem low-maintenance, they do require attention to ensure proper drainage.
Without the right slope, water can pool on the surface, leading to leaks or structural damage over time.

The mansard roof is a French-inspired design that features steep sides, with the upper section being almost vertical. The style often includes dormer windows and creates a lot of extra living space in the attic, perfect for a loft or additional rooms.
It’s a great choice if you want a roof profile that maximizes space while offering a distinctive look. Mansard roofs can be more expensive to install than simpler designs due to their complexity, but the trade-off is added space and a unique aesthetic.
They also work well for homes that need more upper-floor space but have limited footprint size.
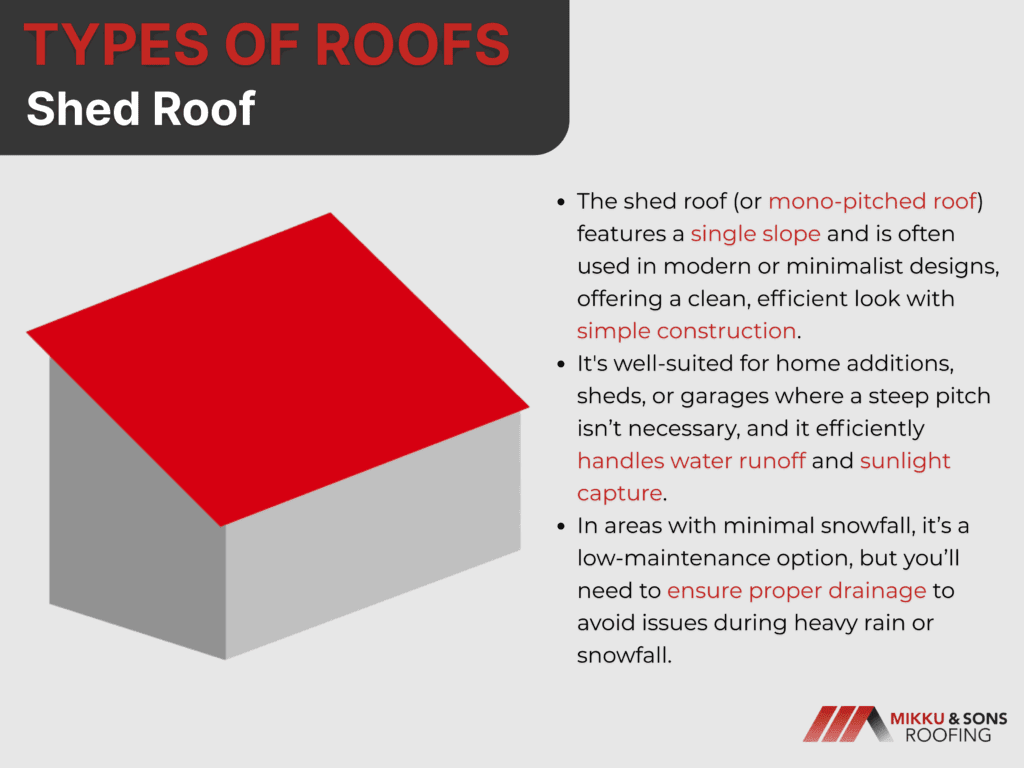
The shed roof, or mono-pitched roof, has one single slope and is commonly seen in modern or minimalist designs. It’s a straightforward, no-frills roof profile that’s perfect for those who want clean lines and efficient design.
Shed roofs are ideal for home additions, sheds, or garages, where a steep pitch isn’t needed. Though simple, shed roofs can be quite effective in terms of water runoff and sunlight capture.
In areas with minimal snowfall, they’re a great low-maintenance option. Just keep in mind that you’ll need to ensure proper drainage, especially in heavy rain or snow conditions.
Once you start seeing your roof as a system instead of just a cover, everything begins to make more sense. You start noticing small details, like where water drains, how air escapes, or what’s happening at the edges.
And that brings up a bigger question you’ve probably thought about: How much does a new roof actually cost? Once you understand what your roof is made of and how each part plays a role, that question becomes more than just a number.
It makes you factor in various costs, from decking repairs to underlayment, ventilation, and even extra features like flashing or skylights. So the next time you hear about someone getting a new roof or think about it for your own home, you won’t be left guessing.
When you're thinking about your next home project one of the biggest decisions you'll face is the roof. It might not be the flashiest part of your house, but it’s one of the most important.
The right roof can shape the way an entire house looks and feels. And one of these types is the gambrel roof.
You’ve likely seen this kind of roof before, even if you didn’t know its name. That iconic double slope, the one you often spot on old barns or charming countryside homes, has been around for ages.
There’s something about the shape of a gambrel roof that instantly catches the eye. It doesn’t follow the usual lines you see on most homes, which gives it a unique presence.
From the street, it gives your house a distinct profile, one that often sparks curiosity or even compliments from visitors or neighbors.
A gambrel roof is made using two different slopes on each side. The upper section starts at a shallow angle, while the lower section drops more steeply. This break in slope creates more headroom inside and forms that classic silhouette that often gets mistaken for a barn roof at first glance.
The internal framework relies on a series of trusses or rafters that support the change in pitch. Because of the way the weight is distributed, the design can open up the space beneath it, which can make it easier to build an attic or a loft-style second floor.
The gambrel roof goes back hundreds of years and was first used in colonial homes and Dutch-inspired architecture. The design solved a simple problem: how to get more usable space without adding more stories.
It worked so well that it never really went out of style. Today, this roof design still shows up in all kinds of homes, from cozy countryside retreats to updated suburban builds.
Homeowners who choose this style usually aren’t just looking for something that looks different. They want something that works differently too. And in many cases, it does.
It’s easy to overlook the roof when you’re trying to make the most of your living space. Most people focus on square footage at ground level, but not above.
A gambrel roof adds extra room in a way that feels smart, not excessive. You aren’t forced to expand the foundation or add a full second floor just to squeeze in a little more living area.
The sharp lower slope combined with the gentler upper angle creates a larger and more usable upper floor. Instead of tapering off like traditional pitched roofs, this one stretches out the sides, giving you more vertical space.
That design can give you taller walls in your attic or loft area, which makes it easier to stand, walk, and furnish the space comfortably. This kind of structure works especially well when you’re trying to build in an attic bedroom, home office, or even a studio space.
It gives you more options without the construction costs of adding an entirely new level to your home.
With the added room a gambrel roof can give, you aren’t stuck with a narrow crawl space or awkward corners. The interior becomes flexible enough to shape around your needs.
It could become a full guest suite, a playroom, or just a spot where you finally have space to stretch out and focus. And because this roof opens up the interior so effectively, you might be able to skip that costly home addition you were considering.
You end up saving on materials, time, and labor while still gaining functional space that feels intentional. That kind of design choice can make a real difference when you're planning how to grow into your home instead of out of it.
Some roof styles come and go depending on trends or what the market is pushing. But a gambrel roof has a look that seems to fit no matter what year it is.
There’s a reason it’s stuck around for generations. It brings a certain charm to a home without feeling forced or overly styled.
The gambrel roof has strong roots in American architecture, especially in older colonial and Dutch-style homes. That influence still holds up today, adding a softer, more welcoming shape to a house, which makes it feel lived-in and personal.
While sharp modern angles or flat lines can feel cold to some, this design brings warmth just by the way it’s shaped. It can also break up the monotony of standard rooflines in neighborhoods where every house starts to look the same.
A home with a gambrel roof tends to catch the eye in a good way, offering a familiar shape that still feels a bit unexpected. It’s simple, but not boring.
With the right materials and finishes, the roof fits into newer builds just as well. Think wood accents, metal roofing, or clean trim lines that give it a more updated feel while keeping its original charm intact.
The versatility of this design also gives you room to play with your exterior style. It can support dormer windows, wrap-around porches, or even large picture windows without throwing off the balance of the roof.
When the weather turns rough, your roof becomes the first thing standing between you and the elements. You want something that not only holds up but actually helps your home deal with heavy rain, snow, and everything in between.
The lower portion of the gambrel roof comes in at a sharp angle, which helps move water and snow off faster. Water doesn’t have much time to sit and seep in, and snow doesn’t get the chance to pile up too heavily before gravity takes over.
That sloped design can reduce the chances of leaks, ice dams, and the kind of water damage that turns into bigger repairs down the line. Even in climates where winter hits hard, this kind of roof can handle the weight better than many flatter designs.
As long as it’s built properly and kept in good shape, the structure can stay strong under pressure without requiring constant cleanup or maintenance every time it snows.
When water drains off quickly and snow doesn’t have a chance to pile up, your roof doesn't have to work as hard to stay intact. That can mean fewer repairs over the years and less strain on the materials themselves.
You also avoid issues like rot or mold in the roof deck, which often show up when moisture has nowhere to go. Good drainage helps your whole house, not just the roof.
You’re less likely to deal with leaks around windows, water pooling near the foundation, or unexpected drips showing up inside. It’s one less thing you have to worry about every time the weather turns, and that peace of mind counts for a lot.
Budget always matters, no matter how big or small the project is. When you're looking at different roof styles, the cost can add up fast, especially once materials, labor, and time start stacking together.
A gambrel roof can offer a little relief, without cutting corners where it counts.
The shape of a gambrel roof makes the most out of a relatively simple frame. Because it uses fewer support beams compared to more complex roof styles, it often cuts down on the amount of lumber needed.
And since the slopes create more room inside the roof itself, you may not need to frame out a whole separate floor to get that usable space. This efficiency also means fewer materials for the outer layer.
The surface area is often smaller than it looks, due to the angles doing the work of adding volume.
Since the gambrel design follows a predictable structure, experienced builders can usually put it together faster than more complicated or custom roof styles. That speed can translate into fewer workdays, which means fewer hours on the clock and less spent on labor overall.
It also helps that many contractors are already familiar with this design. It doesn’t require specialty skills or niche materials, so you’re not stuck hiring someone at a premium just to get the job done right.
Every design choice comes with its own set of trade-offs. A gambrel roof can offer a lot, but it’s not always the perfect fit for every home or location.
Before you start sketching plans or talking to a contractor, it’s worth thinking through a few key details that could affect your build.
Gambrel roofs work best in certain regions more than others. In areas with high winds or frequent storms, the broad, tall shape can sometimes catch more air than a low-profile roof would.
This doesn’t mean it’s a bad option in storm-prone places, but it does mean you’ll want a solid framing plan and possibly some reinforced materials to keep things secure. Moist, coastal climates can also affect how long certain roofing materials last.
If you’re using wood shingles or other natural materials, they may need extra care in areas with a lot of rain or humidity. Local weather patterns can help guide which version of a gambrel roof works best for your home.
Not every neighborhood allows for bold roof designs, especially if you live in a place with strict homeowners’ association rules or tight building codes. Some areas have height restrictions, material guidelines, or requirements that your roof fits a certain “look.”
A gambrel roof can sometimes stretch those limits depending on how it’s built. Before you commit to the design, it’s smart to check with your local planning department or builder.
The last thing you want is to fall in love with a layout and find out it doesn’t meet zoning rules or neighborhood expectations. A little research upfront can save you the hassle of changing plans mid-build.
A gambrel roof can give you more space, a unique look, and practical benefits like better drainage and potential cost savings. But it also asks for thoughtful planning, especially when it comes to climate, structure, and maintenance.
Thinking about the bigger picture can also help you narrow down your options. Gambrel roofs fall under the category of sloped roofs, but they’re just one of many types out there.
It’s helpful to step back and consider how sloped roofs in general compare to flat ones. They each come with their own pros and trade-offs, and knowing how they stack up side by side can make your decision feel a lot more grounded.
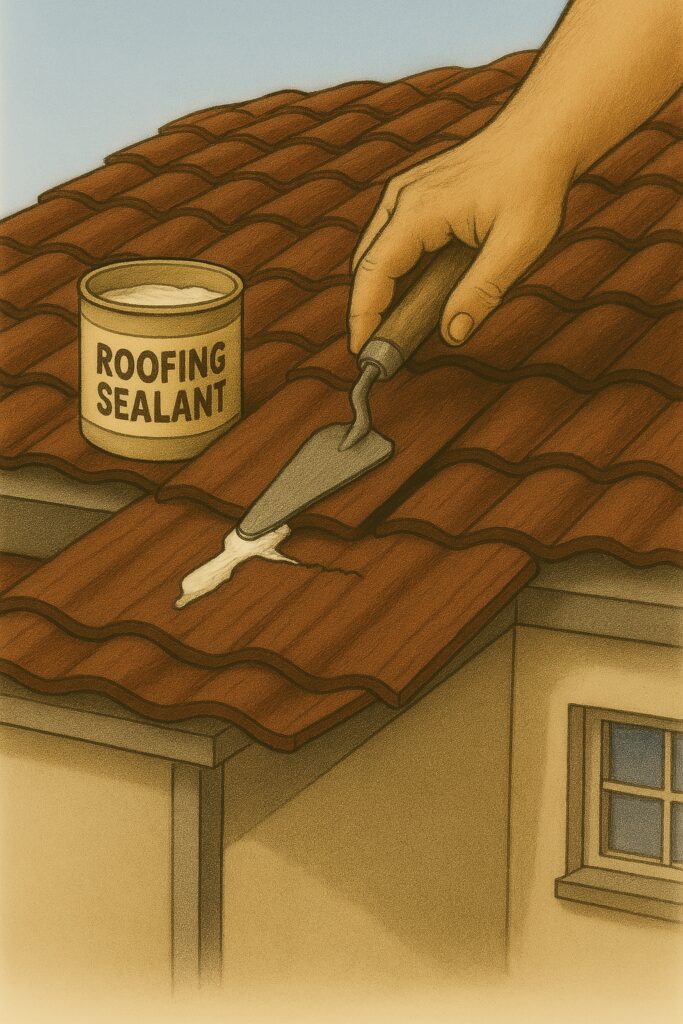
Fixing a leaking tile roof can be a daunting task, but with the right approach, you can save your home from water damage and costly repairs. As a homeowner, it's essential to identify the source of the leak quickly and take action.
Whether it's a cracked tile, loose flashing, or worn-out underlayment, addressing the issue promptly is key. By following a step-by-step guide and using the right materials, you can restore your roof's integrity and ensure a dry, comfortable living space. With patience and some DIY skills, you can fix that leak and enjoy peace of mind.

Tile roofs are durable, but they aren’t indestructible. Over time, wear and tear, weather damage, and improper installation can lead to leaks. Ignoring small leaks can result in costly structural damage. That’s why identifying the cause early is crucial.
| Cause | Description | How It Leads to Leaks |
|---|---|---|
| Cracked or Broken Tiles | Weather, foot traffic, or impact can fracture tiles | Allows water to seep through to the underlayment |
| Damaged Underlayment | Aging or deteriorated waterproof layer beneath tiles | Loses effectiveness in repelling water |
| Faulty Flashing | Loose, rusted, or improperly sealed flashing around joints and openings | Water seeps in at vulnerable connection points |
| Poor Installation | Misaligned or poorly secured tiles | Creates gaps and weak points in the roof system |
Some of the most common signs of a leak include water stains on ceilings or walls, mold or mildew growth, dripping water during rainstorms, and musty odors in your attic.
If you notice any of these signs, address the problem immediately to prevent costly repairs. Whether it’s a minor fix or a major repair, understanding the source of the leak is the first step in protecting your home.
Detecting a leak early can save you from expensive repairs. Signs of a leak include water stains on ceilings, mold growth, or damp spots in the attic. You may also notice missing or shifted tiles on the roof. After a storm, inspecting the roof for visible damage can help catch leaks before they get worse.
By understanding the common causes and warning signs of a leaking tile roof, you can take the right steps to fix the issue before it leads to serious damage.
When faced with a leaking tile roof, you may wonder whether to fix it yourself or hire a professional. While some minor repairs can be done on your own, more serious issues require expert attention to ensure long-term protection for your home.
For homeowners who are comfortable working on their roofs, small repairs can be a DIY project.
Replacing a single cracked tile or sealing minor gaps with roofing sealant is manageable if you have the right tools and safety precautions. However, it’s important to assess the damage before attempting any repairs.
You may be able to handle simple fixes like replacing a broken tile, sealing small cracks with roofing sealant, or clearing debris from clogged flashing. These repairs can help prevent leaks from worsening if done correctly.
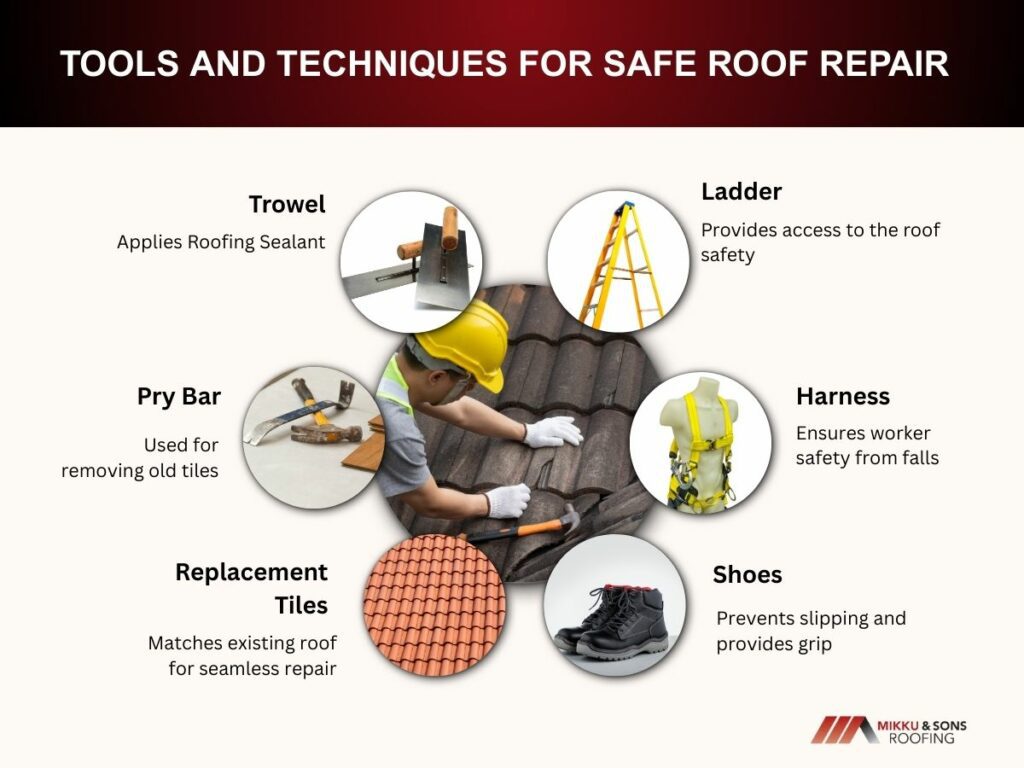
However, safety should always be your top priority. Working on a roof can be dangerous, especially on steep slopes or in wet conditions. Always use a stable ladder, wear slip-resistant shoes, and avoid walking on fragile tiles to prevent further damage.
While DIY repairs may seem cost-effective, hiring a professional is the best choice for major leaks, underlayment damage, or widespread tile issues. If water has already seeped into the underlayment or multiple tiles are broken, professional intervention is necessary.
Experienced roofers have the skills and equipment to inspect the roof thoroughly, repair deteriorated underlayment, and realign tiles properly. They can also ensure that repairs meet industry standards, preventing future leaks and costly damage.
If you notice water stains on your ceiling, mold growth, or a significant number of missing tiles, calling a professional is the safest and most reliable option. Investing in expert repairs can extend the lifespan of your roof and protect your home from further structural issues.
Repairing a leaking tile roof on your own can save money, but it requires the right approach to prevent further damage. Handling tiles incorrectly can cause more breakage, so taking your time and using the right techniques is essential. If the damage is minor and you feel comfortable working at heights, follow these steps to safely and effectively fix the leak.
| Step | Action |
|---|---|
| 1. Identify the Leak | Trace interior stains to roof, inspect for broken or displaced tiles |
| 2. Gather Materials | Ladder, harness, pry bar, replacement tiles, sealant, nails/clips |
| 3. Remove Damaged Tile | Carefully lift adjacent tiles, slide out broken tile |
| 4. Check Underlayment | Inspect for tears or damage; patch or replace as needed |
| 5. Install New Tile | Align and secure using appropriate fasteners or adhesive |
| 6. Seal Minor Cracks | Apply roofing sealant over small cracks as a temporary fix |
| 7. Monitor After Rainfall | Check for continued leakage to ensure repair was successful |
Before making any repairs, locate the exact spot where water is getting through. A visible crack in a tile or a displaced tile is usually a clear sign of trouble. If the leak is inside your home, trace the water stains on the ceiling to their highest point, then check the corresponding area on the roof. Keep in mind that water can travel along the underlayment before dripping inside, so the leak may not always be directly above the interior stain.
Once you’ve found the damaged area, you’ll need the right tools to complete the repair safely. A sturdy ladder, a roofing harness, and slip-resistant shoes are necessary for working on a tile roof. Avoid stepping directly on tiles, as they can easily crack under pressure. Instead, walk on the lower edges of tiles or use a plywood board to distribute your weight evenly.
You’ll also need replacement tiles that match your existing roof, a pry bar, a trowel, roofing sealant, and nails or clips to secure the new tiles.
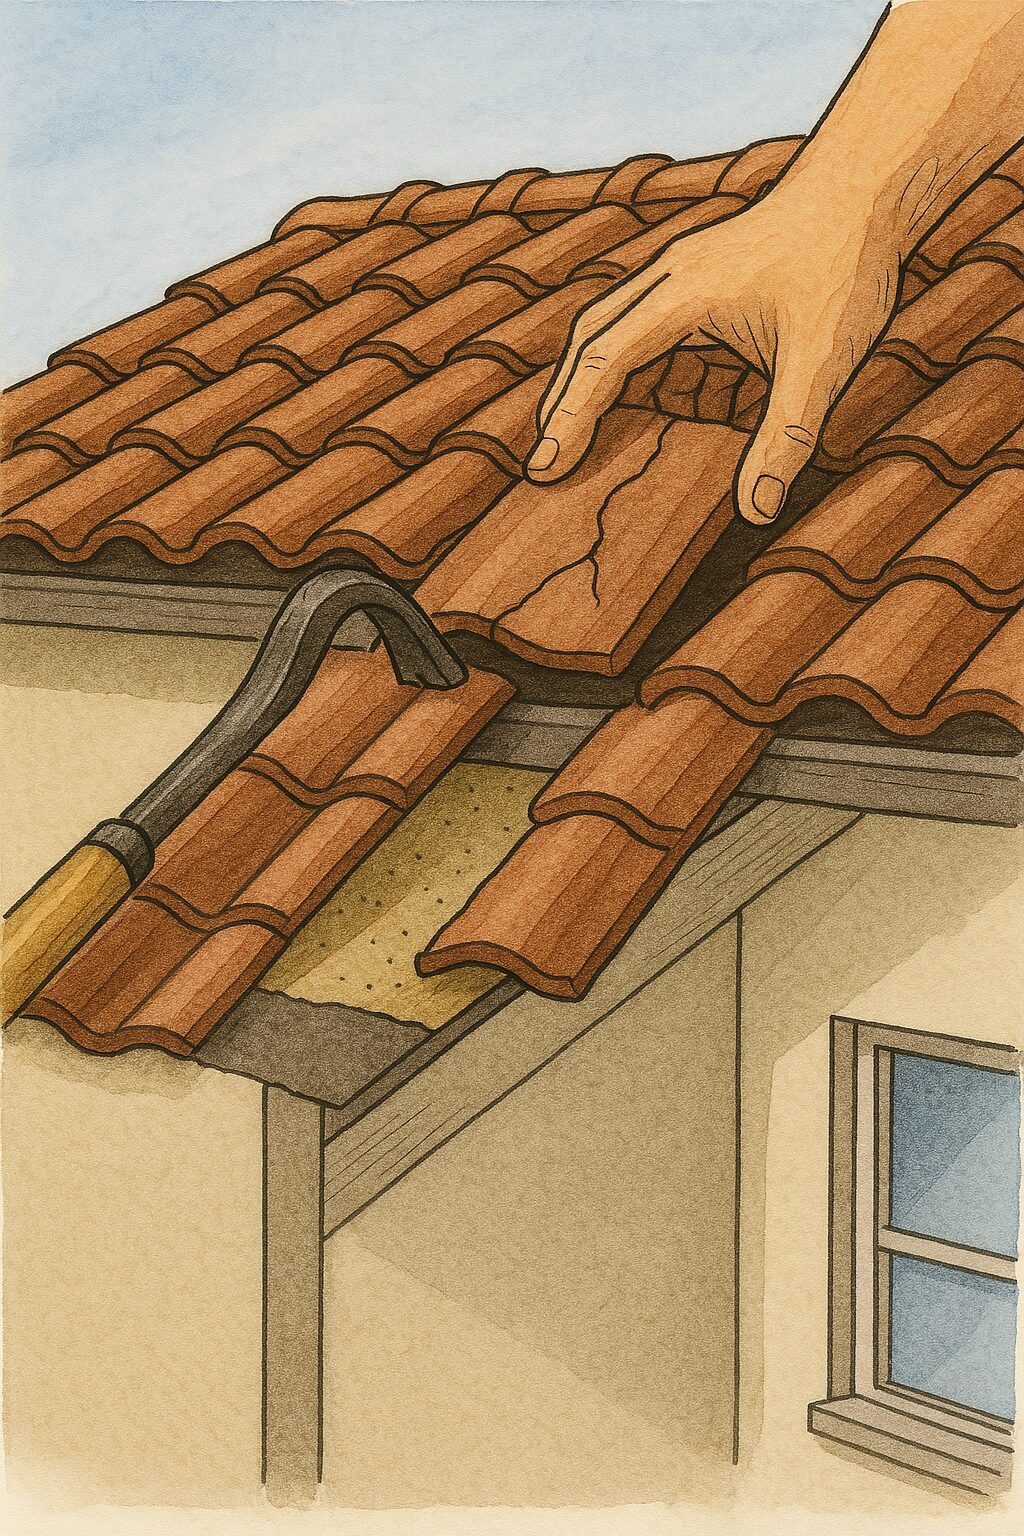
To remove a cracked or broken tile, carefully lift the tiles above it using a pry bar. Most tiles overlap, so you’ll need to gently slide the damaged tile out without disturbing the surrounding ones. If the tile is stuck, avoid forcing it out, as this can break neighboring tiles. Instead, wiggle it free while applying gentle pressure.
Once removed, check the underlayment beneath the tile. If it’s torn or deteriorating, you may need to apply a waterproof patch or replace that section before installing the new tile.
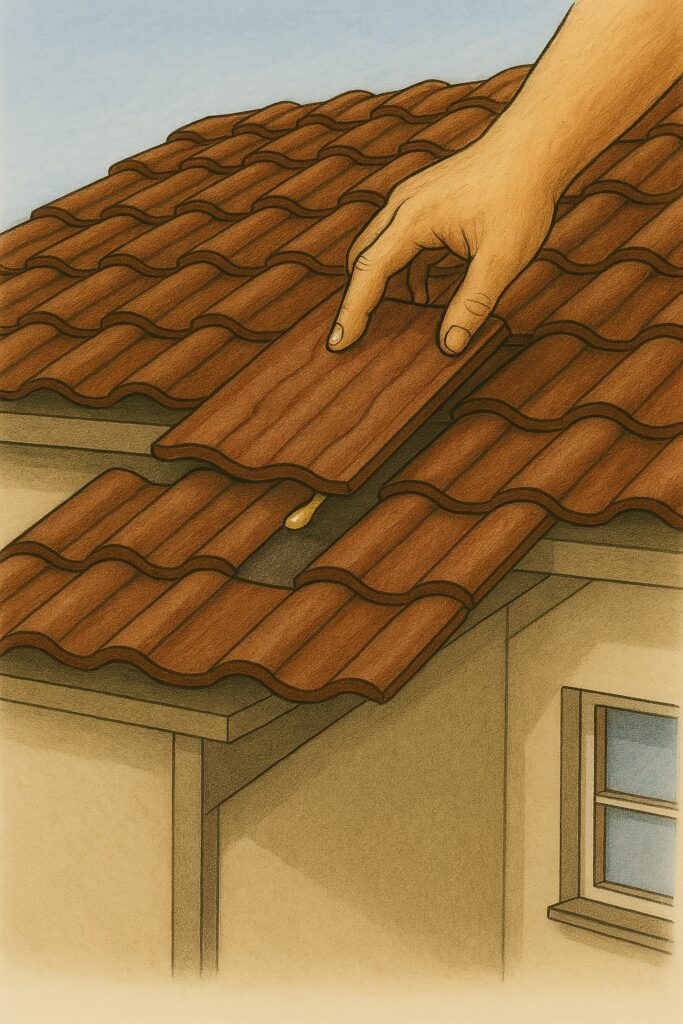
Slide the replacement tile into position, ensuring it aligns properly with the surrounding tiles. Depending on your roof type, tiles may be secured with nails, clips, or adhesive. If using nails, place them in pre-existing holes to avoid cracking the tile. If adhesive is needed, apply a small amount underneath the tile to hold it in place.
Make sure the new tile sits flush with the others and does not lift or shift. If it’s uneven, water can seep underneath and continue causing leaks.
If your tiles are mostly intact but have small cracks, applying a roofing sealant can be a quick fix. Use a trowel to spread the sealant over the cracked area, ensuring it fills the gap completely. While this method won’t be as durable as replacing the tile, it can temporarily prevent leaks until a professional repair is possible.
After completing the repair, inspect the surrounding area for any additional damage. Check nearby tiles, flashing, and underlayment to ensure everything is in good condition. If you notice widespread damage, consider having a professional assess the roof for a more permanent solution.
Once the repair is complete, keep an eye on the area after the next rainfall. If water stains or damp spots appear again, the problem may be more serious than a simple tile replacement. In that case, it’s best to consult a roofing expert to inspect for deeper issues, such as underlayment failure or structural damage.
By following these steps carefully, you can successfully repair minor leaks in your tile roof. However, if the damage is extensive or if you feel unsure about working at heights, hiring a professional is always the safest choice.
Tile roofs are known for their durability, but without proper maintenance, they can develop leaks over time. Regular upkeep helps prevent costly repairs and extends the life of your roof. By addressing small issues early, you can avoid major water damage and ensure your roof continues to protect your home.
| Issue | Prevention Strategy |
|---|---|
| Roof tile aging | Replace old or damaged tiles promptly |
| Poor drainage | Clean gutters and install guards |
| Flashing wear | Re-seal or replace as needed |
| Moss and debris accumulation | Use safe moss removers; trim trees nearby |
| Weak ventilation | Ensure attic is well-ventilated to prevent moisture buildup |
Inspecting your tile roof at least twice a year can help catch potential problems before they worsen. It’s best to check after heavy storms or extreme weather conditions, as strong winds and debris can damage tiles. Look for cracked, broken, or missing tiles, as even minor gaps can allow water to seep through. Pay attention to the roof valleys, as water tends to collect in these areas.
If you’re comfortable, perform a visual inspection from a ladder or the ground using binoculars. However, walking on a tile roof can be risky, as tiles can easily crack under pressure. If a closer inspection is needed, it’s safer to call a professional roofer.
Clogged gutters and drains can cause water to back up onto the roof, increasing the risk of leaks. Leaves, dirt, and debris can accumulate over time, blocking proper drainage. Regularly cleaning your gutters ensures that rainwater flows away from the roof instead of pooling around tiles.
Downspouts should also be checked for blockages. If water is spilling over the edges of your gutters, it’s a sign they need cleaning. Installing gutter guards can help reduce debris buildup and make maintenance easier.
Flashing is a critical component of your roof, sealing areas where water could enter, such as around chimneys, vents, and skylights. Over time, flashing can loosen, rust, or crack, creating weak points where leaks can develop. Inspect flashing regularly and reseal or replace it as needed to prevent water intrusion.
If you notice gaps or corrosion, applying a waterproof sealant can provide a temporary fix, but replacing damaged flashing is the best long-term solution. Flashing issues are a common cause of roof leaks, so keeping it in good condition is essential.
Branches that hang over your roof can cause serious damage. During storms, strong winds can snap branches, leading to broken tiles or punctures in the roof. Even smaller branches that constantly rub against the roof can wear down protective layers and weaken tiles.
Regularly trimming trees near your home reduces the risk of falling debris. It also minimizes the buildup of leaves and moss, which can trap moisture and lead to mold growth.
Moss and algae can take hold in damp areas of your roof, particularly in shaded spots. While they may seem like minor cosmetic issues, they can trap moisture and accelerate tile deterioration. Left unchecked, moss can lift tiles and allow water to seep underneath, leading to leaks.
To remove moss or algae, use a soft-bristled brush and a mild roof cleaner designed for tile surfaces. Avoid using pressure washers, as high-pressure water can crack or dislodge tiles. Preventative treatments, such as zinc or copper strips, can help keep moss and algae from returning.
A well-ventilated attic plays a crucial role in maintaining a healthy roof. Poor ventilation can trap heat and moisture, leading to condensation buildup that weakens the underlayment. Ensuring adequate airflow helps regulate temperature and prevents moisture-related damage.
Check your attic vents regularly to make sure they are not blocked by insulation or debris. If your attic feels excessively hot or humid, consider installing additional ventilation to improve air circulation.
As you've now mastered the art of fixing a leaking tile roof, it's time to explore other potential sources of water woes in your home. While roofs are often the first suspects when it comes to leaks, they're not the only culprits.
We'll now delve into the common causes of leaks that have nothing to do with your roof. From faulty plumbing to hidden issues in your walls, understanding these lesser-known sources can help you tackle water damage more effectively. Stay tuned for more insights on how to keep your home dry and secure.
Built-up roofing is one of the oldest and most trusted flat roofing options out there. You have probably seen it on commercial buildings, industrial warehouses, and even some residential properties.
It’s been around for over a century, and there’s a reason it’s still widely used today. Instead of relying on a single layer, BUR uses multiple layers of bitumen and fabric to create a strong and watertight surface.
This method makes it a solid choice for buildings that face harsh weather, heavy foot traffic, or the risk of fire. But is it right for you? There are several factors you need to consider before choosing it for your roof.
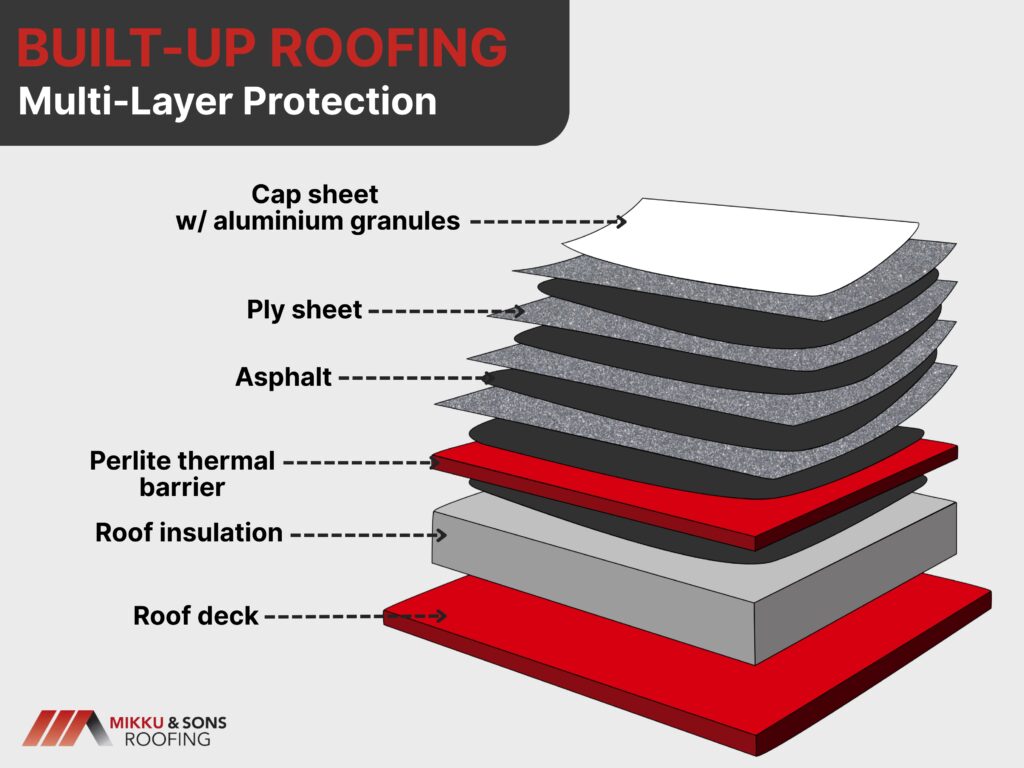
Built-up roofing (BUR) is created by layering multiple materials to form a thick, protective barrier over a building. This process involves alternating layers of bitumen (asphalt, coal tar, or cold-applied adhesive) and reinforcing fabric, such as fiberglass or organic mats.
These layers are then topped with a final protective surface, which can be gravel, mineral granules, or a reflective coating. The process typically follows these steps:
The number of layers in a BUR system can vary. Some roofs use three layers (a three-ply system), while others use four or more for increased durability and weather resistance.
There are different types of BUR systems, mainly categorized by the type of bitumen used and the finishing surface. Each type of BUR has its advantages and is chosen based on the building's needs, climate, and budget.
| Roof Type | Lifespan | Installation Complexity | Weight | Weather Resistance | Maintenance Needs | Cost Range (per sq. ft.) |
| Built-Up Roofing (BUR) | 20-30 years | High | Heavy | Excellent | Low to Medium | $5 - $10 |
| Single-Ply (TPO, EPDM, PVC) | 15-25 years | Medium | Light | Good | Medium | $4 - $8 |
| Modified Bitumen | 20-25 years | Medium | Medium | Very Good | Medium | $4 - $9 |
| Metal Roofing | 40-70 years | High | Heavy | Excellent | Low | $7 - $15 |
Some buildings benefit from the added fire protection of gravel, while others may prioritize energy efficiency with a smooth, reflective surface. Here are the most common variations:
A strong roof protects everything inside, stands up to the weather, and reduces the need for frequent repairs. Built-up roofing (BUR) has been a trusted option for decades because of the way it handles these challenges.
These strengths make BUR a smart option for buildings that need a roof that does more than just sit there.
A roof that wears down too fast can lead to costly replacements and constant repairs. BUR is designed to last longer than many other roofing systems because of its layered structure.
Each layer adds protection, preventing common roofing issues like leaks, cracks, and early deterioration. BUR can handle foot traffic and daily exposure to harsh elements without losing its strength.
Many BUR systems can last 20 to 30 years or more with proper installation and maintenance, making them a long-term solution for those who want fewer roofing headaches.
Roofs that fail under extreme weather can leave a building vulnerable to leaks, mold, and structural damage. BUR’s thick, multi-layered design provides excellent protection against heavy rain, strong winds, and intense sunlight.
Each layer works together to create a strong barrier that prevents water from seeping through and causing internal damage. Even in areas where temperature swings are common, BUR holds up well.
It can expand and contract without cracking, reducing the risk of sudden failures.
Fire safety is a major concern for any building, and some roofing materials can increase the risk of flames spreading. BUR is naturally fire-resistant, especially when topped with a layer of gravel or a reflective coating.
These materials help slow down the spread of fire, giving occupants more time to respond and emergency crews a better chance of controlling the situation. Some insurance providers even offer lower premiums for buildings with fire-resistant roofing.
This makes BUR a practical choice for businesses and homeowners looking to reduce fire risks while potentially lowering long-term costs.
A roof that constantly needs repairs can drain your budget fast. BUR installation costs can be higher upfront, but its long lifespan and low maintenance needs can make it a more affordable option over time.
The layered design helps prevent common roofing problems, reducing the need for frequent fixes. Because BUR can last for decades without major issues, property owners save money by avoiding early replacements.
When you factor in fewer repair costs and lower long-term maintenance expenses, BUR often proves to be a cost-effective investment.
Leaky roofs are one of the biggest concerns for any property owner, and seams are often the weak points where water finds its way in. BUR has fewer seams than many other roofing systems, reducing the chances of leaks developing over time.
The layered installation process creates a tight, secure surface that stays watertight even in harsh conditions. This seamless design also makes it easier to apply protective coatings or gravel to further enhance the roof’s strength.
With fewer weak spots, BUR provides reliable coverage that helps keep your building safe and dry for years to come.
Roofs are constructed with their strengths in mind, but none is perfect. Built-up roofing (BUR) offers solid protection, longevity, and fire resistance, but it also comes with drawbacks.
Before committing to BUR, it’s important to consider the downsides and see if they outweigh the benefits for your specific situation.
A strong roof is a good thing, but too much weight can be an issue. BUR is one of the heavier roofing systems available, and not all buildings can handle the extra load.
The multiple layers of bitumen and fabric, along with the gravel or reflective coating on top, add significant weight. In some cases, additional structural support is required to prevent stress on the building.
This can increase installation costs and extend the project timeline. If a building wasn’t originally designed to support a BUR system, reinforcing it can be expensive and may not always be practical.
Getting a BUR system installed isn’t as simple as laying down a few sheets of material. It requires a detailed, labor-intensive process that can take more time than other roofing options.
The use of hot asphalt or tar during installation can produce strong odors, making it unpleasant for people inside the building. For businesses, this can be disruptive, especially if the work is being done while operations are still running.
The longer installation time also means more labor costs, which can add up quickly. Compared to single-layer systems that go on quickly, BUR takes patience and skilled professionals to get it done right.
A flat roof isn't ideally flat and usually has a slope to it. BUR works well for low-slope roofs, but steeper roofs don't benefit from BUR's multi-layered design, and sometimes, the material may not adhere properly.
Buildings with weight restrictions or limited structural capacity may also struggle to support a BUR system without modifications. This makes it important to assess a building’s design before choosing BUR.
If the structure isn’t built to handle the extra weight or if the slope isn’t right, a different roofing system might be a better option.
Although BUR offers long-term savings, the initial investment can be high. The materials, labor, and time required to install it properly make it more expensive upfront than some other roofing systems.
| Cost Factor | Estimated Cost Range (per sq. ft.) |
| Materials (bitumen, fabric, gravel, coatings) | $2.50 - $5.00 |
| Labor (installation, skilled workers) | $3.00 - $7.00 |
| Structural Reinforcements (if needed) | $2.00 - $6.00 |
| Insulation (optional but recommended) | $1.50 - $3.50 |
| Maintenance (periodic inspections, minor repairs) | $0.10 - $0.50 (annual) |
| Repairs (leak fixes, patching layers) | $1.00 - $4.00 |
| Replacement (full re-roofing if necessary) | $6.00 - $12.00 |
This can be a dealbreaker for those looking for a budget-friendly option. The cost is often justified by the roof’s long lifespan and lower maintenance, but not everyone has the budget to cover the higher upfront expense.
If immediate affordability is a priority, BUR might not be the best choice.
Every roof has its maintenance needs, and fixing them can be a challenge when BUR develops issues. Since the system consists of multiple layers, pinpointing the exact location of a leak isn’t always straightforward.
Water can travel between layers before showing signs of damage, making it harder to detect the source of the problem. Patching a BUR roof also requires care.
If not done correctly, repairs can create weak spots or stand out visually from the rest of the roof. This can affect performance and appearance, which might be a concern for property owners who want a uniform look.
The type of roofing system you choose affects your building’s durability, maintenance needs, energy efficiency, and even long-term costs. Built-up roofing (BUR) has proven itself as a strong, long-lasting option, especially for flat and low-slope roofs.
The balance between form and function plays a key role in how a roof performs. Flat roofs require a roofing system that prevents water buildup and protects against UV exposure.
They provide more usable space and a modern, efficient design, but they also demand materials that can withstand standing water and heavy foot traffic. This is where the multi-layered construction of BUR excels as it creates a solid, watertight surface that works well in these conditions.
Missing shingles on your roof can leave your home vulnerable to water damage, energy inefficiency, and structural issues. Whether caused by severe weather, aging materials, or poor installation, addressing missing shingles promptly is crucial to preventing costly repairs. Understanding the causes of shingle loss can help homeowners take preventative measures and maintain their roof’s longevity.
This guide covers what to do if you have missing shingles on your roof, how to assess damage, make temporary fixes, and choose the best repair options. It also highlights the risks of ignoring missing shingles and key factors for replacement, helping you protect your home and extend your roof’s lifespan.
Missing shingles can be caused by various factors, ranging from weather conditions to aging materials. Understanding these causes can help homeowners take preventative measures to protect their roofs.
High winds, heavy rain, hail, and snow can loosen or tear shingles off the roof. Storms can also cause debris to strike the roof, leading to further damage.
Over time, shingles deteriorate due to exposure to sunlight, moisture, and fluctuating temperatures. As they age, they become brittle and more prone to cracking, curling, or falling off.
If shingles are not installed correctly, they may not be securely fastened and can detach more easily. Using improper materials or failing to follow manufacturer guidelines can also contribute to premature failure.
Birds, squirrels, and raccoons can damage shingles while searching for food or shelter. Their scratching, pecking, or nesting activities can loosen or remove shingles, leading to potential leaks.
Poor ventilation can cause heat and moisture buildup in the attic, leading to shingle deterioration from underneath. This weakens the adhesive and fasteners, making shingles more likely to come loose.
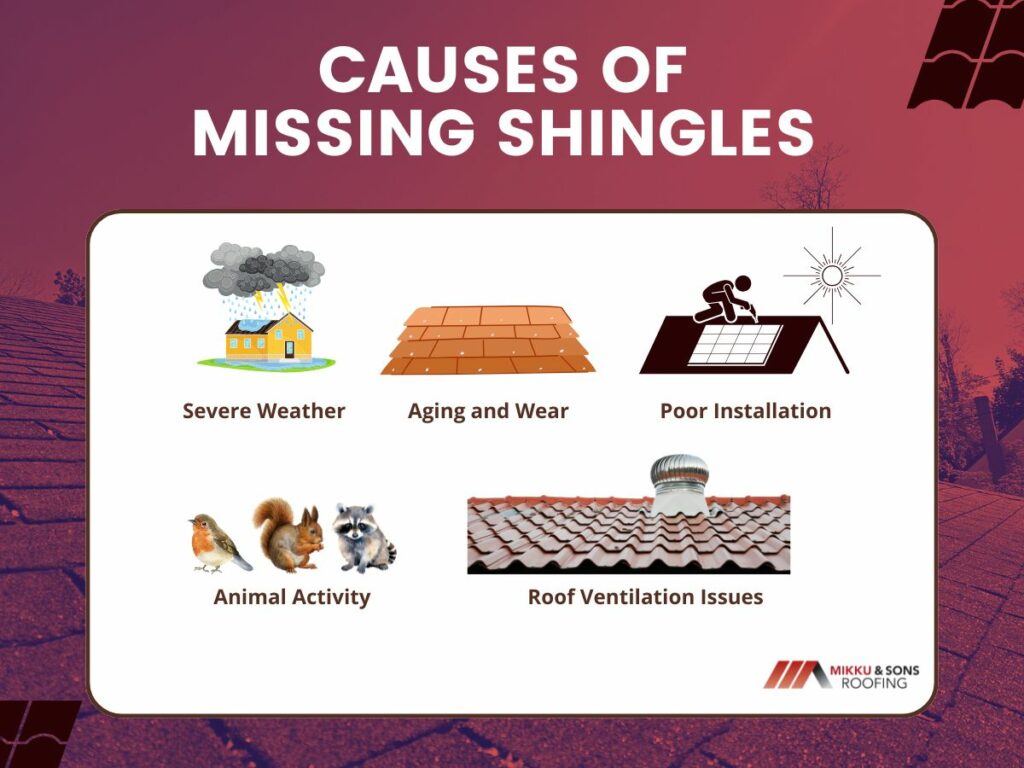
By understanding the common causes of missing shingles, homeowners can take proactive steps to maintain their roofs. Regular inspections and timely repairs can help prevent further damage and extend the roof’s lifespan.
Missing shingles on your roof can lead to leaks and further damage if not addressed quickly. Here’s what you should do:
Begin by visually inspecting the roof from the ground, noting the quantity and location of missing shingles. If it is safe to do so, use binoculars for a closer look. If you have a sturdy ladder and feel comfortable, you can carefully ascend to get a slightly better view but prioritize safety. Never walk on a wet or steep roof. Note any other signs of damage like curled, cracked, or loose shingles.
Use a heavy-duty tarp or reinforced plastic sheeting, not just thin plastic. Secure the covering with roofing nails or furring strips, ensuring it's taut and extends well beyond the damaged area. If windy conditions are expected, use extra fasteners and consider weighted objects to prevent the tarp from blowing away.
Obtain quotes from multiple reputable roofing contractors. Verify their licenses, insurance, and references. Ask about their experience with the specific type of shingles on your roof. A reputable roofer will provide a detailed estimate and explain the repair process.
Contact your insurance company immediately and document the damage with detailed photos and videos. Keep records of all communication with your insurer. If possible, get a copy of the police report if the damage was from a storm.
Remove any loose shingles or debris from the surrounding area and gutters. This will prevent further damage and make it easier for the roofer to work.
Maintain a detailed record of all expenses, including materials, labor, and insurance claims. This documentation will be helpful for insurance purposes and future repairs.
After the repairs are completed, conduct a thorough inspection of the roof, ideally with the roofer. Ensure that all shingles are properly installed and that there are no signs of leaks or other damage.
Addressing missing shingles promptly can help maintain your roof’s integrity and prevent costly repairs down the line. Whether you choose a DIY fix or hire a professional, taking action quickly is key.
Missing shingles may seem like a minor issue, but they can lead to serious consequences if left unaddressed. Understanding these risks can help homeowners take timely action to prevent costly damage.
Missing shingles expose the underlying roof structure to rain and moisture, which can lead to leaks. Over time, water infiltration can cause mold growth, wood rot, and interior ceiling damage.
A damaged roof can compromise your home’s insulation, allowing heat or cool air to escape. This can lead to higher energy bills as your HVAC system works harder to maintain a comfortable temperature.
Prolonged exposure to the elements can weaken the roof decking and support structures. If left unchecked, this can lead to costly repairs or even require a full roof replacement.
Gaps in the roof can provide entry points for rodents, insects, and birds. These pests can cause further damage by nesting in the attic and chewing on insulation or wiring.
A roof in poor condition can lower your home's curb appeal and resale value. Potential buyers may be deterred by the need for expensive repairs, making it harder to sell your home.
Addressing missing shingles promptly can prevent these serious consequences and help maintain the integrity of your home. Regular inspections and maintenance are key to avoiding long-term damage and costly repairs.
Replacing missing shingles is essential for maintaining the integrity of your roof and preventing further damage. However, several factors should be considered to ensure a successful and long-lasting repair.
It's important to choose replacement shingles that match the color, style, and material of the existing ones. Mismatched shingles can affect your home’s appearance and may impact its resale value.
Before replacing shingles, check for underlying issues such as water damage or weakened decking. If multiple shingles are missing or the damage is widespread, a partial or full roof replacement may be necessary.
Different types of shingles, such as asphalt, wood, or metal, offer varying durability and weather resistance. Consider your climate and budget when selecting materials to ensure longevity and protection.
While replacing a few shingles can be a DIY project, extensive repairs may require a roofing contractor. A professional can ensure proper installation and identify potential problems that might go unnoticed.
Plan shingle replacement during favorable weather conditions to avoid complications from rain, wind, or extreme temperatures. Spring and fall are often ideal times for roofing work due to mild temperatures.
Taking these factors into account can help ensure a smooth and effective shingle replacement. Proper installation and regular maintenance will keep your roof in top condition and protect your home for years to come.
Taking quick action when you notice missing shingles can prevent costly damage and keep your home well-protected. By understanding the causes, making temporary fixes, and considering the best repair options, you can maintain your roof’s durability and efficiency. Regular inspections and proper maintenance will also help you catch potential issues before they worsen.
Whether you choose to replace shingles yourself or hire a professional, ensuring a secure and weather-resistant roof is essential for your home’s longevity. By staying proactive, you can avoid major repairs, protect your investment, and keep your home safe from the elements.
Shingling a hip roof might seem like a job best left to the pros, but with the right prep and a step-by-step approach, you can tackle it yourself. Hip roofs, with their sloping sides meeting at a ridge, demand careful shingle installation to ensure a weathertight seal.
This guide will equip you with the knowledge to handle the task effectively. From prepping the roof and laying underlayment to cutting shingles for those tricky angles and finishing with ridge caps, each step is crucial. With attention to detail and safety, you can achieve a durable and attractive roof.
Installing shingles on a hip roof requires careful preparation and strict adherence to safety measures. Proper planning ensures a smoother installation process and helps prevent accidents. Before you start, it’s essential to gather the right materials, inspect the roof, and take necessary precautions.
Before beginning, make sure you have all the necessary tools and materials on hand.
Having the right equipment will save you time and prevent unnecessary delays. You’ll need roofing shingles, underlayment, roofing nails, a roofing hammer or nail gun, a chalk line, a utility knife, a tape measure, a pry bar, and a ladder. Additionally, ensure you have protective gear, including gloves, safety glasses, and a harness.
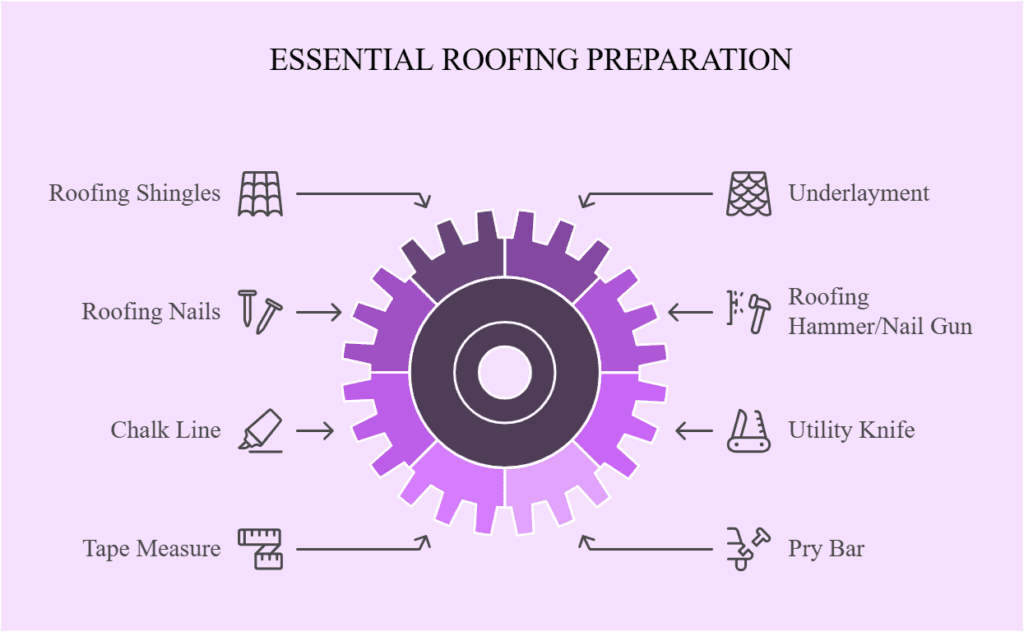
A thorough roof inspection is crucial before installing shingles. Look for signs of damage, such as rotting wood, water leaks, or structural weaknesses. If any issues are present, they must be repaired before shingling.
Installing shingles over a damaged roof can lead to costly repairs down the line. Replace any compromised plywood sheathing, reinforce weak areas, and ensure proper ventilation to prevent future issues.
The weather plays a significant role in the success of your roofing project. Ideal conditions for shingle installation include mild temperatures and dry weather.
Avoid installing shingles on rainy, windy, or excessively hot days, as these conditions can make the process dangerous and reduce the lifespan of your roof. Wet surfaces increase the risk of slipping, while extreme heat can soften the shingles, making them more prone to damage.

Roofing work comes with inherent risks, so safety should always be a top priority. Before climbing onto the roof, secure a sturdy ladder on a flat surface and wear a safety harness attached to an anchor point.
Never work on a roof alone—having a partner can help in case of an emergency. Additionally, wear non-slip shoes to improve stability, and always be mindful of your footing, especially on steep slopes.
Clear the work area of any debris, loose tools, or unnecessary materials that could create tripping hazards. If working on a residential property, inform those inside about the project to prevent accidental disturbances.
Keeping a clean and organized workspace reduces the risk of accidents and increases efficiency. Use caution tape or safety barriers to prevent unauthorized access to the area, especially if children or pets are nearby.
Once the roof deck is prepared, the next step is installing the underlayment. The underlayment acts as a moisture barrier, protecting the roof deck from water damage and leaks. Proper installation is key to ensuring long-term durability.
There are different types of roofing underlayment, and selecting the right one is essential for optimal performance. Asphalt-saturated felt is a traditional and affordable option that provides basic protection.
Synthetic underlayment is lightweight, durable, and resistant to tearing, making it a preferred choice for many professionals. Peel-and-stick underlayment is self-adhering and waterproof, ideal for areas prone to heavy rain and ice. Choosing the right underlayment depends on your climate, budget, and roofing needs. High-quality materials will provide better protection and longevity.
Correct installation of the underlayment ensures maximum effectiveness.
A properly installed underlayment enhances the overall strength of your roof and prevents water-related issues. Taking the time to do it right will save you from costly repairs in the future.
The drip edge and starter shingles are essential for protecting your roof from water damage and ensuring a strong foundation for the shingles. Skipping these steps can result in leaks, wind damage, and premature roof failure.
The drip edge is a metal flashing that prevents water from seeping into the fascia and roof deck. To install it correctly, start at the eaves and position the drip edge so it extends slightly beyond the roofline to direct water away from the structure.
Secure it with nails every 12 to 16 inches to prevent movement in high winds. Overlap sections by at least 2 inches to create a continuous barrier against water infiltration. Install the drip edge on the rakes after the underlayment for added protection against wind-driven rain.
Starter shingles provide the first layer of defense against wind uplift and water infiltration. Cut off the tabs of standard shingles or use pre-cut starter strips to create a flat surface for the first row.
Align the starter shingles along the roof’s edge with a slight overhang to direct water into the gutters. Secure them with nails near the adhesive strip, following the manufacturer’s guidelines for a firm hold. Ensure precise alignment, as any mistakes at this stage can impact the appearance and durability of the entire roof.
A well-installed drip edge and starter shingle layer reinforce your roof’s resistance to water damage and wind uplift. Taking the time to do it right ensures long-term durability and performance.
Once the starter shingles are in place, it’s time to lay the asphalt shingles. Proper installation ensures durability, weather resistance, and a professional finish.
Start by placing the first row of shingles directly on top of the starter shingles. Ensure they are properly aligned along the eaves and leave a small overhang. Secure each shingle with roofing nails, following the manufacturer’s guidelines for placement and spacing. Proper alignment of the first row is crucial, as it sets the foundation for the entire roof.
For a strong and visually appealing roof, stagger each row so that seams do not align. Cut shingles as needed to create an offset pattern, preventing water from seeping between seams. A staggered pattern improves water resistance and overall structural integrity.
Nail each shingle securely, placing nails below the adhesive strip. Use enough nails to keep them firmly in place, especially in high-wind areas. Press down on each shingle to ensure it adheres properly. Properly secured shingles prevent wind uplift and leaks.
As you install shingles, carefully cut and fit them around vents, chimneys, and valleys. Use flashing and roofing cement to seal these areas and prevent leaks. Attention to detail in these areas is essential for long-term durability.
Hips and ridges are critical areas of a hip roof that require special attention. Properly cutting and fitting shingles in these areas will enhance your roof’s durability and weather resistance.
Start by measuring the length of the hip to determine how many shingles you’ll need. Cut each shingle to fit along the hip line, ensuring a slight overhang for proper water runoff. Use a chalk line to maintain a straight and consistent alignment. This helps prevent uneven spacing and gaps that could lead to leaks.
Lay the shingles from the bottom of the hip, overlapping each piece as you go up. Secure each shingle with nails on both sides to keep them in place. Overlapping properly prevents water infiltration and strengthens the roof’s structure. Trim excess material to ensure a neat finish.
For the ridge, use specially designed ridge cap shingles or cut standard shingles into ridge caps. Position each piece evenly along the ridge and nail them in place, following the wind direction for extra security. Proper ridge installation helps with ventilation and extends the roof’s lifespan. Apply roofing adhesive for added hold in high-wind areas.
Taking the time to cut and fit shingles correctly on hips and ridges will improve your roof’s overall strength and appearance. A well-finished hip and ridge system ensures long-term protection against the elements.
Ridge cap shingles provide the final layer of protection for your roof’s ridges, preventing water infiltration and enhancing the roof’s appearance. Proper installation ensures durability and a clean, finished look.
Ridge cap shingles are specially designed to cover the peaks of your roof. You can use pre-cut ridge cap shingles or cut three-tab shingles into smaller sections. Using manufacturer-recommended ridge cap shingles offers better durability and a polished finish.
To install ridge cap shingles, start at the end of the ridge opposite the prevailing wind direction. Align the first ridge cap shingle and secure it with nails on both sides, placing them about an inch above the overlap area. Continue overlapping each shingle as you move along the ridge, ensuring a consistent and uniform look.Properly overlapping shingles prevent wind uplift and water penetration.
After nailing all the ridge cap shingles in place, apply roofing adhesive to the final shingle to ensure a firm hold. In high-wind areas, additional adhesive or nails may be required for extra security. A well-installed ridge cap protects your roof’s most vulnerable points and enhances its overall lifespan. Taking the time to do it correctly will keep your roof in top shape for years to come.
After installing the shingles and ridge caps, the last step is performing a thorough inspection and making any necessary final adjustments. Taking the time for a final check ensures a long-lasting and well-protected roof.
Go over the entire roof and inspect the shingles for proper alignment, ensuring they are evenly spaced and securely fastened. Look for any lifted or loose shingles that could lead to leaks or wind damage. A properly installed roof should have a clean, uniform appearance without visible gaps or misaligned shingles.
Check around vents, chimneys, and valleys to confirm that flashing is properly installed and sealed. Apply roofing sealant where necessary to reinforce areas prone to water infiltration. Proper sealing prevents leaks and extends the lifespan of your roof.
Remove any debris, stray nails, or leftover materials from the roof and surrounding area. Clear gutters of any shingle granules or obstructions to ensure proper drainage. Finally, conduct a final walkthrough to double-check that every component is correctly installed and secured. A thorough cleanup and inspection complete the roofing process, leaving you with a durable and reliable roof.
To install shingles on a hip roof, begin by securing flashing around ridges and edges. Then, start shingling from the bottom, overlapping each row by two-thirds of the shingle length. Ensure a staggered pattern and secure with nails.
Finish with ridge cap shingles for added protection. For more roofing insights, consider whether you can shingle over existing shingles, a topic explored in our previous blog post, which delves into the pros and cons of this approach.
