One of the worst things for the integrity of a roof is going through an intense storm. Surges of wind can pull up shingles and let the rain seep in. In rare cases, sometimes even hail can affect us in the Valley and cause small dents or holes in the roof.
Lucky for you, your roof is made to make it through these storms without much problem. That said, it only takes one bad storm to cause damage–and when that time comes, you’ll want to be prepared to repair it quickly to prevent water damage. Knowing what signs to watch out for will help you avoid expensive damage and early roof replacement. If you see any of these common signs of wind damage, then you need a professional inspection of your roof:
It’s never too late for you to schedule a roof inspection. Mikku & Sons Roofing has been in the business for over 20 years and offers a full roof inspection for free. We want to be as sure as you are that your roof is solid–if there are any issues or points of concern, we’ll address them with a detailed plan of attack when you’re ready to proceed. Call us today or fill out our contact form!
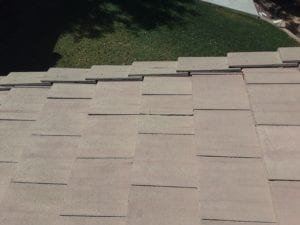
A discoloration on your roof can be an indicator of devastating occurrences, and more often than not is largely noticeable – stains, growth and dark streaks certainly do not look appealing. Thankfully not every discolored roof means that it will fail, as it often just requires some cleaning to get back in shape.
Algae and plant debris is one of the most common reasons for discoloration on a roof. Green and black streaks across shingles is a sign of algae growth, something that grows and thrives in moisture filled environments. If the angle of your roof has shade, this is a common problem you will likely encounter.
Algae feeds on the limestone filler that is found in asphalt shingles. There are temporary measures you can take, such as adding copper to your shingles, although it will eventually wear out. Another issue that could be causing a stain is by a drooping tree limb, either dropping leaves or rubbing fruits into the shingles. Be sure to trim back your trees to prevent this from happening while also allowing more sun to hit your roof and deter algae.
Check around your chimney for black streaks. Sometimes soot can build up and lead down the roof – something that has washed away and stained the shingles. Rust also is found like soot, bleeding from metal vents or chimneys onto your shingles creating a dark red or orange color. If you notice that the shingles are much darker than usual and are damp, there is a strong chance you actually have water damage.
Shingles will age and lose their granules over time and will cause the shingles to lighten up. If you suspect you may have stains on your roof, we advise you to call and set up your free roof inspection with Mikku & Sons Roofing today!
As the years go by, seeing solar panels atop a roof has become a pretty common sight here in Arizona. Have you been considering getting solar panels installed on your roof? Once your panels are set up they are planned to be permanently installed, so proper planning is required to get the most out of them. Make sure you’re ready for the commitment and read on for our tips for installing solar panels.
Is your roof going to be capable of carrying the weight of solar panels? This is a question you want to find the answer to long before even starting your project, let alone once the panels have been installed – the last thing you need is to find a collapsed roof where a panel fell through. By having a roof inspection, you can not only test the carrying capacity of your roof but also search for other damages that may need to be addressed. Mikku & Sons Roofing does offer a free roof inspection and will give you a detailed report on your roof itemizing what you will need to address before starting your solar panel project. What follows are a few tips for installing solar panels on your roof.
If your roof is on the older side and you are already considering replacing it within the next few years, it will just be easier on your time and wallet to get it done before installing solar panels. While solar panels can be removed and reattached when needed, it is a lot of work and will be an extra expense you probably don’t want or need to pay. After you get your roof replaced, a quality roof should last for at least 20 years. Depending on how long your panels last, you may not even have to worry about adjustments for a decade or two.
While on your roof, be sure to clear out any objects such as antennas, vents, or other objects that could get in the way of installation. Contacting a roofing contractor is usually your best course of action for moving objects such as vents that are required to adhere to building codes. Many people also forget to consider the shade that is so appreciated from large trees may actually inhibit the ability of the solar panels. Be sure to trim or relocate any trees that will block the sun from your roof!
There are more things you may need to keep in mind, depending on the specifics for your roof, but that’s why Mikku & Sons Roofing is here to help. We provide free roof inspections and will offer advice not only for what should be fixed and improved, but also help you to find whether your roof is ready for solar panel installation or not. Call today!
While you may find that your seasonal decorations can take up a lot of time to set up and be a bit of a pain, they truly can be fun and can light up your home beautifully. It’s important to make sure that you properly install your decorations so you don’t end up with any roof damage. What follows are some tips from Mikku & Sons Roofing for helping to minimize roof problems and still get the seasonal look you’re dreaming of! Especially when on your roof, be careful hanging your seasonal decorations!
It’s important that you plan out how your decorations will be organized before starting. Make sure you measure any cords or cables to be sure that nothing comes up short while you are hanging things. If you plan to climb a ladder to get close to your roof, be especially careful of hanging lights so neither you nor the ladder snag a loose cable.
Be sure to check the labels and packaging to see what the intended use is for your decoration. Many decorations are indoors only and should not be used outdoors – the outdoor specific lights are weatherproofed to not short out when wet!
It’s important to have your home decorated and shining beautifully during the holidays! What is also important is keeping safe both your roof from damage, and you from being hurt. Make sure that when hanging decorations, you always have a strong and sturdy ladder that allows you to anchor to the side of your home. Make sure you are wearing close-toed shoes as well, and have a partner help you whenever possible. For roof decorations that require setup on top of the roof, harnesses can also be worn as well.
Whatever you are hanging, be sure not to use nails for your decorations! The nails will create holes that can lead to leaks. The last thing you need is to have a water damaged roof caused just by setting things up for fun! What you should use are clips that are specifically designed to fasten holiday decorations to roofs. Often clipping onto shingles and gutters, these are a hassle-free, damage-free form that won’t damage your roof or void any warranties!
Your roof is one of the most important parts of your home, and your extra fixtures such as vents and chimneys can be very expensive to replace or repair. Be sure to keep decorations away from where any warm air would emit from, as it can warp and melt the decorations.
Be sure to carefully remove your holiday decorations just as you set them up. If you yank down lights or decorations, you risk heavily damaging your roof. Getting up close and personal with your roof is also a good time to do some minor roof inspections. If you see anything that looks suspicious, call us today for a free estimate and professional inspection, only from Mikku & Sons Roofing!
Monsoon season in Phoenix is usually accompanied by some of the most extreme weather conditions that we face: heavy winds, dust storms, heavy rain, and sometimes even hail. In 2010, the most expensive hailstorm Phoenix has faced resulted in nearly $3 billion in recorded losses. Even extreme heat is natural for our summers, leading to severe damage among unmaintained or old roofs.
Now that the monsoon season is coming to a close, you should take an opportunity to run over some roof maintenance before we have any end of the year storms roll through. Simple repairs and checks can help prevent hundreds to thousands of dollars in repair work and increase the overall longevity of your roof!
As a general rule of thumb, you need to be extremely cautious when on your roof – just walking on a roof can cause damage, and is particularly dangerous for those not accustomed to working with heights. We recommend that you use a pair of binoculars or the zoom feature of your phone’s camera to examine your roof for any monsoon damage, or to call Mikku & Sons Roofing for a free, full roof inspection.
Generally, you will be looking for:
Although this year was on the drier side, even sparse summer rains encourage the growth of outdoor foliage. Be sure to check around your home for loose or hanging branches, trees and shrubs in need of trimming, and piles of leaves where critters may nest.
Roofs that go unchecked risk developing leaks and even greater repairs! Minor water damage, small to large holes, and damage to paint and wall texture can cost you money you didn’t want to spend, just on repairs. If you wait even longer, more extreme water damage, sagging ceilings, or failing structural integrity can cost nearly $8000 or more!
Schedule an appointment for your roof tune-up today and keep it in top shape! Mikku & Sons Roofing has provided roof repair and maintenance to Arizona homeowners for over 19 years and can tune-up your roof today. Call now at (623) 465-1068.
Tile roofs can last up to 50 years in Arizona. However, the tile underlayment (felt/ tar paper) typically lasts 20 to 30 years. The tile underlayment will start rotting out when water gets under the roof tiles. Tile underlayment is a roofing material that is installed straight to your roof's decking and acts as a waterproofing membrane.
The most common ways water can get under roof tiles are: clogged valleys/ roof flashing, broken tiles, or the roof tiles not laid properly.
Roof tiles are mainly aesthetic and act as a barrier between the tile underlayment and the roof tile.
The Arizona sun will destroy tile underlayment if it is exposed. Most tile underlayments cannot withstand the UV rays and start deteriorating rapidly.
There are some tile underlayments that are designed for heat and sunny climates such as Arizona’s. So, let’s explore what is the best tile roof underlayment in Arizona!
Many different types of underlayments can be used under concrete tiles in Arizona. Here are the most common: felt (SBS-modified bitumen), synthetic, and self-adhering underlayments.
We will talk about each type of concrete tile underlayment and determine what is best based on several factors: price, waterproofing, durability, and UV resistance.
Synthetic tile underlayments have been increasing in popularity in Arizona. However, in our opinion, they are not the best material to use. Synthetic tile underlayment is a material that is woven together using polypropylene and polymer and has vapor-resistant and water-resistant qualities.
In fact, we will recommend homeowners not choose synthetic concrete tile underlayments. Let’s talk about why we don’t recommend synthetic concrete tile underlayments.
Some synthetic underlayments are more expensive than the felt type of concrete tile underlayments, while other synthetics are cheaper. In fact, the material price can be double that of a felt type of underlayment. Synthetic tile underlayment costs $0.015 to $0.02 per sq. ft and usually comes in rolls that cover 10,000 sq ft at $150,00 - $200 per roll.
It can be cheaper to do two layers of felt than a single layer of synthetic, depending on the brand of material.
Synthetic is the king of waterproofing capabilities and is 100% waterproof. However, synthetics don’t self-seal around fasteners well (nails, staples, etc). This is the biggest issue when installing synthetic underlayment under concrete tile roofs. A concrete tile roof is comprised of
The underlayment is rolled out to cover the deck's surface (keeping it waterproof) and nailed in place.
Batten strips (4 ft sections of 1×2 wood strip) are then nailed or stapled on top of the underlayment. They provide rows for the roof tile cleats to rest on and prevent them from sliding down the roof.
Then the roof tiles themselves.
Installing a tile roof requires both the batten strips and underlayment to be fastened to the deck. So, with a synthetic underlayment that doesn’t automatically seal around the fastener’s penetrations, your roof is vulnerable.
The number one reason your concrete tile roof leaks is from water getting under the batten strips and going through the fastener's penetrations.
Rubber-modified felt papers will automatically seal these penetrations while synthetics will not.
So even though synthetics have a 50 years product warranty they are not the best tile underlayment for sealing the around the roof fasteners.
As far as durability, synthetic roof material is quite durable. However, when synthetic tears it tends to tear in big sections. Synthetic concrete tile underlayments have a durable surface for foot traffic and have an excellent non-slip surface
Synthetic underlayment has very strong UV-resistant qualities. When exposed to the direct sun, the underlayment can maintain a UV resistance from 6 to 12 months
This underlayment is different from both the synthetic and felt underlayment because it has a self-adhering bottom. When installing a thin film is pulled away and the self-adhering bottom adheres to the roof's deck.
The gives the advantage of leaving no roof fasteners (cap nails) exposed.

Another benefit is most of the self-adhering concrete tile underlayments are rubber-modified and automatically self-seal around any nails pounded through its surface.
Self-adhering concrete tile underlayments are generally more expensive. Self-adhering tile underlayment also called rubberized asphalt roofing underlayment, is $0.05 to $0.075 per sq. ft and costs $100 - $150 per roll that covers 2,000 sq ft. Note: this is just the material price and not what it costs for installation. It is usually around the same price to use synthetic underlayment.
This concrete tile underlayment is excellent at waterproofing. It has a lot of rubber inside of it and lasts a very long time. The seams are adhered together providing a waterproof surface.
Self-adhering concrete tile underlayment is the most durable underlayment available in Arizona. Specifically, the brand, Boral Tile Secure, is the best concrete tile underlayment in Arizona for the durability factor. It can be used under metal roofs so it has a very high melting point.
The surface is non-slip and can handle high foot traffic which is good for the installers!
This material can handle a lot of UV exposure and lasts up to 6-12 months of direct Arizona sun! For UV Resistance, self-adhering underlayment is the best underlayment for tile roofs in Arizona
Felt-style underlayments have been around the longest out of the other two types. They are different classes and types of felt that are used under concrete tiles in Arizona. This material is a blend of cellulose, asphalt, polyester, and bitumen soaked in a waterproofing agent. In layman's terms, it is felt paper saturated with asphalt.
Felts thicknesses are organized by weight classes ranging from 30# to 90#. Some felts are better than others.
Organic felt tile underlayment was used a lot 20 to 30 years ago. However organic felt is the cheap option. It tends to dry up and curl on the seam edges with age.
Also, there have been incidences where roof rats have chewed up all the organic felt paper under tile roofs causing the roof to leak severely.
The better felts are the SBS Rubber modified bitumen. They are fortified with rubber which helps the underlayment lay flat on installation. The rubber also helps the material to self-seal around the roof fasteners.
The price for SBS rubber modified bitumen is the cheapest out of the other two options. In many cases, it is costs less to apply two layers of SBS rubber modified felt than one layer of synthetic or self-adhering underlayment.
For the price, felt is the best underlayment for tile roofs in Arizona, and costs around $30-$40 per roll and each roll cover around 4000 sq ft, which means it costs $0.0075 to $0.01 per sq ft. Note: this is just the material price and not what it costs for installation.
Organic felt is not 100% waterproof, but the SBS-modified version has more rubber, allowing it to be more water proof than the organic felt.
In Arizona, we have a very dry climate so SBS modified felt papers are more than enough to keep your roof dry.
The composition of the SBS prevents it from rotting and deteriorating like its organic cousin.
Felts are quite durable and can handle foot traffic quite well. The organic felts are less durable than SBS-modified felts.
However, if the felt is installed in high temperatures the asphalt becomes pliable and the tar paper can slide when being installed. This is a hazard for the roofers since the tile roofs have a pitch.
Both the self-adhering and synthetic concrete tile underlayments have better UV resistance than felt. If a tile breaks on your tile roof and exposes the surface of the underlayment it is advised to get the tile replaced as soon as possible.
The SBS-modified felts are generally more UV resistant than the organic felts. Felt does not win the UV resistance test for underlayments in Arizona.
The synthetics are out ruled out being that they are not self-sealing when a nail is pounded through their surface. In fact, we would NOT recommend synthetics under tile at all for Arizona. It is the best underlayment for under shingle roofs in cold climates.
One of the biggest faults synthetics have is not being repairable. One of the other two options is if there is a premature leak then they can easily be repaired with more felt and tar.
Many times a tile roof starts leaking in a high water flow area years before the rest of the underlayment needs to be changed. In our opinion synthetics is one of the worst underlayments for tile roofs in Arizona.
While self-adhering underlayment is the best tile underlayment in Arizona for durability, length of life and UV resistance, an SBS rubber-modified felt is our pick.
The particular brand that we like the most is TU-43. Tu-43 lasts a long time, it can easily be repaired, has a rubber and fiberglass core, and it is has a reasonable price tag.
However, Boral Tile Seal would be our pick for the best self-adhering tile underlayment in Arizona. It just comes at a higher price.
Installing two layers would be cheaper than one layer of the self-adhering underlayment and last around the same time (some cases even longer).
So, if you need the underlayment replaced under your tiles in Arizona then we would recommend TU-43 as the choice of tile underlayment material. In our opinion, TU-43 is the best underlayment for tile roofs in Arizona!
Anyone living in Arizona knows that the summers here get extremely hot! In this blog, we will explore energy-efficient roofing options.
Using your Air Conditioning in the summertime adds considerably to your electric bill every month. There are ways of saving money by using energy-efficient building materials.
We will talk specifically about choosing energy-efficient roofing materials for the next time you need to re-roof your house or on your new construction home.
There are several types of roofing materials or roof types that are commonly used in Arizona. The most common pitched roofs are tile or shingle. For flat roofs: rolled roofing systems and foam.
So what should someone look for when wanting to choose an energy-efficient roofing material? The easiest way is to look for ENERGY STAR® roofing materials.
The Energy Star logo on the roofing materials packaging indicates that the product is certified to be an energy-efficient roofing material. Energy Star determines roof materials’ energy efficiency by their solar reflectance and emittance.
For example, roofing energy-efficient shingles use granules that reduce the amount of heat that is transferred into the material while shingles that aren’t designed to be energy efficient absorb more heat.
The surface temperature difference between energy-efficient roofing materials with special granules and non-energy efficient materials can be up to 100 degrees Fahrenheit.
Another important thing to take into consideration on choosing your energy-efficient roofing material is color.
Darker colors tend to absorb the sun’s energy and transmit the heat into the building below while lighter colors tend to reflect the sun more efficiently. So it is important to not only choose the color material that you like but also choose lighter tones.
If your roof and attic do not have the proper ventilation then it does not matter what material you use on top of the roof. Improper ventilation will negate the benefits of the energy-efficient roofing material that is used on your roof. In fact, roofing material manufacturers will automatically void material warranties if the roof/attic is not ventilated according to code.
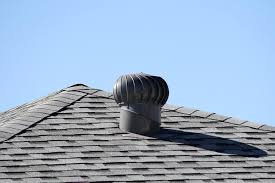
There are many different types of vents that are used depending on the type of roof you have. Here is a roof vent calculator tool if you are wondering how many vents you need.
This photo is used to illustrate what a shingle roof turbine vent looks like. Turbine vents help increase energy efficiency by exhausting hot air from the attic.
We will review different energy-saving options on the common roof types of Arizona. The roof types we will cover are tile, shingle, and flat roofs. Let’s explore the different energy-efficient roofing materials for each type of roof.
Tile roofs are excellent at being energy efficient when it comes to the airflow factor. There is a space between the tiles and the felt that helps promote airflow.
Tile roofs are durable and last a long time. The two main ways to increase the energy efficiency of your tile roof include extra ventilation and installing a reflective foam material on top of your felt. The material that is used commonly in Phoenix is called Radiant Barrier.
This will reflect the heat and prevent it from entering the attic space. While Radiant Barrier is not considered a roofing material, it is very energy efficient! Both of these options will help you save on your monthly electricity bill!
We wrote an article on the best tile underlayment in Arizona, feel free to check it out!
Shingle roofs are very common in Arizona being that they are the most economical roof on the market. Asphalt tends to get really hot in the summer in Arizona.
However, the energy efficiency is lower than tile roofs. The best method of increasing the efficiency of your shingle roof is replacing the old worn-out shingle with the Energy Star rated shingles (which are considered energy-efficient roofing material).
Also, increased ventilation or upgraded ventilation can help as well. Automatic or active vents are a great option and can be programmed to use the fan when the temperature of the attic hits a certain threshold. High-quality vents such as ridge vents also help promote proper ventilation as well.
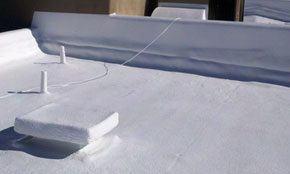
Flat roofs in Arizona are comprised of many different materials. The most common being asphalt. Asphalt is not an energy-efficient roofing material.
Coating your roof with Acrylic cool roof coatings is a great way to cool down your flat roof. Acrylic elastomeric roof coatings will seal, extend, and renew your flat roof. They will also drop the surface temperature of the roof up to 60 degrees Fahrenheit.
Acrylic Elastomeric roof coatings have strong reflective qualities and are strongly recommended for restoring your old roof, reducing your energy bills, and transforming your roof into being more energy-efficient.
Hands-down polyurethane foam roofs are the best roofs for the hot climate of Arizona and the most energy-efficient roof available.
The system consists of two-part: 1-inch thick polyurethane foam and 1 to 2 coats of acrylic elastomeric coatings (we spoke already about how elastomeric coating is energy-efficient roofing material).
Some of our customers at Mikku and Sons have seen their electricity bill drop by 50% after getting a new Foam Roof. Foam can be installed over pre-existing flat roofs. It is a great system that excels in insulating your home and reflecting the sun. Check out our cool roof systems.
It Depends on the Roof Type. Roofing Costs vary because there are many different roof types in Arizona that will affect how much should pay a roofer to do your roof.
Each type of roof has a different price tag attached to it. In this blog, we will explore the prices of each type of roof available in Arizona to figure out how much you should pay a roofer.
Let’s look at how much you should pay a roofer for a concrete tile roof. A Concrete Tile roof per square (or per 100 square feet) costs $400 to $700 per square for an “R and R” (to remove the tile and replace the existing tile underlayment and reuse the same roof tiles).
'Reusing the same tile is a cost-effective way to replace your roof.
On average, a tile “R and R” for a whole roof costs $7,000 to $15,000 it heavily depending on the size of your roof in Arizona.
Note: this is just an average of how much you should pay a roofer to do your tile roof.
However, some tile brands are brittle and all the tiles need to be replaced which means you will have to pay your roofer more.
In the event that all of the tiles needs to be replaced on your roof the cost per square generally costs:
These prices are supposed to be used as a general guide only on how much you should pay a roofer. Each tile roof varies in size and complexity.
For example, a roof with a larger square area is generally cheaper per square because you get “economies of scale”.
Complexity plays a part in the cost of a new tile roof as well. A roof that is is considered complex has many valleys, different slopes, or angled ridges.
Another price factor is the roofing company you choose. This can make up to a 50% difference in how much you should expect to pay a roofer.
There are many unlicensed “companies” that have rock bottom prices. But should never be an option because they end up usually costing the customer more money when they have to hire a reputable company to fix their roof.
The price range among the roofing companies can vary greatly. For example, our salesman has placed a bid on a job for $15,000.00 and another company had placed a bid for $30,000.00!
The last factor that affects concrete tile roof prices is the quality of the material.
Usually only affects the price by a few hundred to thousands on how much you should pay a roofer (depending on the size of the job). We strongly recommend the best materials to our customers since the ROI is what we focus on.
Using “better” material makes the tile roof last up to 5 to 10 years longer and is worth the extra money!
Let’s look at how much you should pay a roofer for a shingle roof. Shingle roofs are known as the “economical” roof in Arizona.
They are the cheapest roof systems available and last up to 20 to 30 years. They are a great option for “getting the most bang for your buck”.
On an average roof to tear off the existing shingles and install new ones one could expect to pay $7,000 to $15,000.
Note: this is just an average price on how much you should pay a roofer to do your shingle roof.
There are different types of shingles and qualities. The main types in Arizona are Three-tab and Architectural.
Three-tab shingles are a cheaper option than Architectural shingles yet do not last as long (5-7 years less) Usually the price difference between the two is a few hundred for the whole roof.

THREE-TAB

ARCHITECTURAL
Size and complexity play a part in the price as well on how how much you should pay a roofer on a shingle roof.
If the slope of the roof is steeper than 6/12 (6 inches drop over a 12-inch section) then the price will be higher since there is more labor involved. If there are many roof vents that affect the price as well.
Beware of the companies that charge rock bottom prices the shingle market has a low price barrier to enter so there are more unskilled companies that cut corners.
Let’s look at how much you should pay a roofer for a foam roof. Foam roofs are one of the most expensive roofing systems in Arizona but are considered the best option for flat roofs. It has the best insulating properties of any other roof system available on the market.
It is generally $400 to $700 a square. So on average roof size, a new foam roof is around $10,000 to $15,000. Note: this is a general rule of thumb on how much you should pay a roofer to foam your roof.
However, this is not factoring in tearing off the original roof which will vary in cost. Also, a foam roof needs to be re-coated every 5 to 10 years but will last a lifetime if this is done.
So it is important to keep this in mind when thinking about how much you should pay a roofer to install a foam roof.
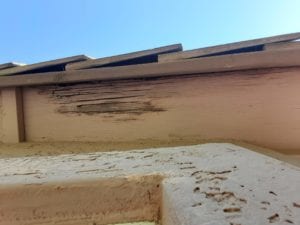
We’re guessing if you are reading this blog, you likely either already have a leaking concrete tile roof or you have one that is old and likely to begin leaking soon. Read on for tips on how to detect leaks in concrete tiles roofs and what the importance of replacing the underlayment is once it goes bad.
The underlayment that’s used on concrete roofs will typically last you around 20-30 years, although it is heavily dependent on what kind of material was used. Most of the track-style homes across the valley use 30# underlayment, which is the thinnest underlayment allowed according to roofing code, and will last approximately 20-25 years.
If you know that your roof is approaching this age, or is over 20 years old already, then there’s a good chance leaks will start to show up sooner than later. Many leaks go undetected until it’s too late, especially if they are found in harder to see locations like on the eves or gable edges of a roof. A good sign that there’s a leak is to walk around the base of your roof and look upwards at the underside – any signs of water staining are an immediate sign you should have your roof checked.
Being proactive means that you are acting in advance before damages are done. Rather than be reactive when fixing your roof, having a proper maintenance plan in place can greatly reduce the effects caused by unseen damages. Things this will help to avoid include dry wall repairs caused by leaks, repainting stained ceilings, removal of mold and still water, and more.
To give an idea of what replacing concrete tile roof underlayment may look like, we’ve included some pictures from a smaller repair. Remember, when it comes to your roof, repairs should be made quickly before the damage is too late to fix!
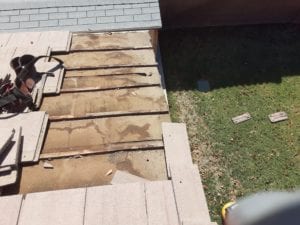
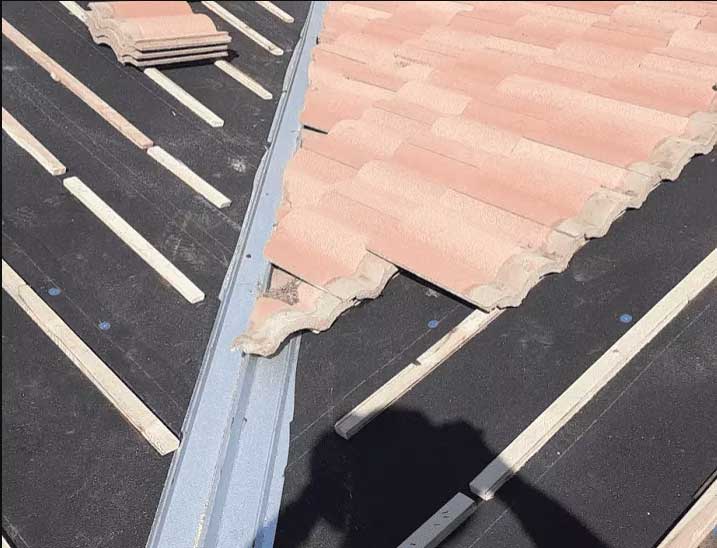
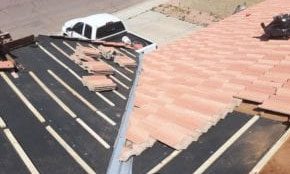
1. Concrete roof tiles are removed:
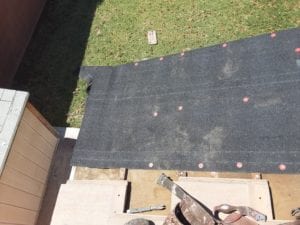
2. Remove Battens strips , clean surface free of debris and install tile underlayment:
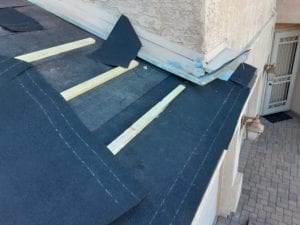
3. Install new Batten Strips:
4. Reinstall roof tiles and replace any broken ones:
As December rolls through, and the rooftop reindeer have come and gone, we hear the same problem year after year. People call in for roof inspections after finding shingles on the ground and hoof prints up top. We have a small list of things to look for, that way Santa has a clean landing and doesn’t damage anything by accident.
As much as Santa loves seeing houses decked all around, you must be careful to leave room for him to land on your roof! Rather than just throwing all your lights and decorations on the roof, try to plan for a lighter roof load. Keep your lights in straight lines, creating a lane for Santa to land in, and avoid keeping too many stand up decorations on the roof (should one of Santa’s reindeer knock them down caught in your shingles).
If you have a chimney, make sure you clean it nice and good. The last thing Santa will want is to slide down a grimy, soot-filled chimney to deliver. Additionally, try to keep the front of the fireplace clear so Santa has a clean exit!
It’s safe to say that you’ll be on the “Nice” list this Christmas if you’ve been cleaning your gutters. If you have not cleaned them out recently, you’ve still got a few days before Christmas to get them squared away. Clogged gutters can cause damage to your exterior walls, or to the foundation of your home. If Santa notices damage, he may not have a safe place to land!
You may leave out a nice treat for Santa every year, but what about for his trusty delivery partners? A nice snack could be some leafy greens carrots or an apple if you want to really treat them!
Check your yard for anything that may hinder Santa on the busiest night of the year. Trim any overhead branches, make sure any large piles of leaves are raked and thrown out, replace any of your broken or missing shingles, and make sure your lights are all active (just to give Santa some more illumination). If you are in Northern Arizona or anywhere else that experiences snow and harsher conditions, make sure your roof is clear of snow and break any ice dams.
Of course, if you want to have the safest conditions and some peace of mind, the best thing you can do is to get a proper roofing inspection. Fortunately for you, Mikku and Sons works with Santa year-round inspecting roofs for his arrival. If you want to make sure you’re ready for Santa and his reindeer, give us a call today!
